

EX8500 & EX11000
Reliability You Can Count On!
© 2019 EasyPro, Inc
Pg. 3
IN THE USA
ASSEMBLED
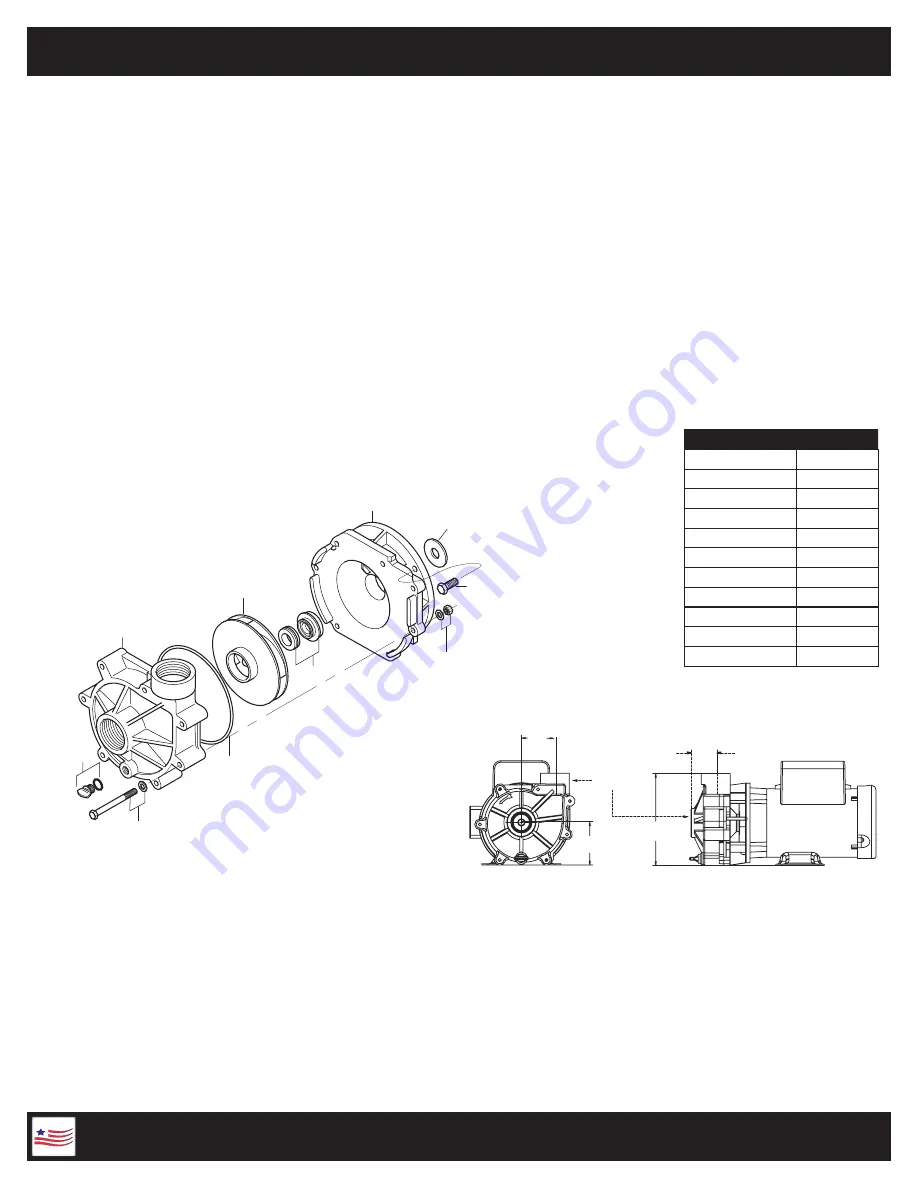
PUMP END ASSEMBLY
1. Clean and inspect all pump parts (0-ring, seal seats, motor shaft, etc.).
2. Apply sealant to the bracket bore ID wall and around the seal case - follow sealant mfg. instructions. We recommend using Gasgacinch
®
. Silicone
sealant can also be used.
3. Press carbon graphite seal into bracket while taking care not to damage carbon graphite face.
4. Place slinger (rubber washer) over motor shaft and mount bracket to motor.
5. Carefully, lubricate the seal seat elastomer OD and impeller hub ID with water. Press the seal seat into the impeller hub making certain that the
ceramic is in evenly - the sealing surface should be parallel with the impeller hub.
6. Carefully lubricate carbon-graphite and ceramic sealing surfaces with CLEAN water. Do not use silicon lubricants or grease!
7. Assemble bracket to motor with four M-bolts
8. Thread impeller onto shaft and tighten! If required, remove motor end-cap and use a screwdriver on the back of motor shaft to prevent shaft rotation
while tightening. Replace motor end cap.
9. Seat large O-ring in volute slot and assemble volute to bracket with seven 1/4-20 x 2
3
/
4
" hex cap screws, washers and nuts. Tighten in a cross
pattern (30 in-lbf).
10. Install drain plug with its O-ring in volute drain hole.
11. Before operating pump, allow a proper cure time for the sealant used in step 2.
DISASSEMBLY
1. Shut off power to motor before disconnecting any electrical wiring from the back of the motor.
2. Disassemble volute from bracket by removing the seven
1
/
4
" - 20 threads per inch x 2
3
/
4
" hex cap screws.
3. Remove cap covering shaft at back of motor and with a large screwdriver, prevent shaft rotation while unscrewing impeller.
4. Remove ceramic piece from impeller. (If you are replacing the seal)
5. Detach bracket from motor.
6. Remove carbon-graphite seal from bracket by pressing out from the back. Do not dig out from the front! (If you are replacing the seal)
DESCRIPTION
PART NUMBER
DRAIN PLUG
1000.110
O-RING, DRAIN PLUG
E014B70
VOLUTE
1000.070P
LARGE O-RING
1000.061
IMPELLER
1000.05__*
SEAL - BRASS
1000.0415
SEAL - SS316
1000.0414
SEAL-FOR POWER SERIES 1000.0411
BRACKET
1000.030P
SLINGER
1000.010V
HARDWARE KIT
1000.502
Note: These part numbers are only for stan
-
dard models within the EX8500 and EX11000
*1000.05__ Reference page one for Impeller
numbers.
VOLUTE
IMPELLER
WASHER &
LOCK NUT
BRACKET
M BOLT
LARGE
O-RING
SEAL
P-BOLT
& WASHER
DRAIN PLUG
& O-RING
SLINGER
2.75
3.50
7.54
2.00
Motor illustration is for reference only.
1
1
/
2
" FNPT


