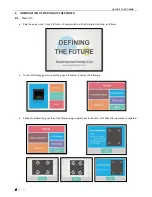
background image


QUICK START GUIDE 

  | 

P a g e


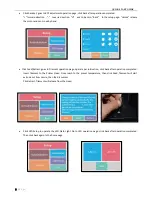
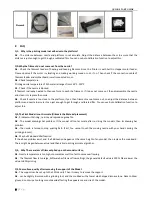
Click handset, goes to XYZ adjustment operation page, click back after operation completed. 

“+” forward direction 

“-"    reverse direction

“H”    axis to be zero

“Back”    to the setup page

“Unlock” release 

the motor and can move by hand. 


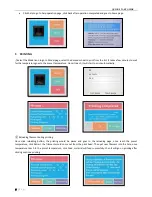
Click Feed/Retract, goes to Filament operation page, operate per instruction, click back after operation completed. 

Insert  filament  to  the  Printer  Head,  Once  reach  to  the  preset  temperature,  then  click  Feed,  filament  will  start 

extrude out from nozzle, then feed is success. 

Click retract, filament will release from the Head. 


Click LED Setup to operate the LED Flash Light, Go to LED operation page, click back after operation completed. 

Then click back again to the home page.   


Summary of Contents for WATERCUBE

Page 1: ... START GUIDE VERSION 1 1 WATERCUBE 3D PRINTER Please read this User s Manual carefully before use Please keep this User s Manual properly for future reference Pictures are for reference only subject to our available products ...

Page 2: ...f power supply 1 1 3 Instructions during printing 1 2 PRODUCT INTRODUCTION 1 2 1 Name of main components 1 2 2 Basic Parameter 2 3 UNPACKING AND INSTALLATION 3 4 INTRODUCTION OF STARTING UP THE PRINTER 4 4 1 Power On 4 5 PRINTING 6 5 1 Instruction of LCD Display 7 6 MAINTANANCE 7 7 LIST OF ACCESSORIES 7 8 FAQ 8 ...

Page 3: ... Please do not pile weights on this machine 1 2 Specification for use of power supply Please use the power cord supplied with this machine This machine applies to 110 240V power supply Please do not plug and unplug the power connector with wet hands Please make sure to insert the plug completely into the socket Please do not deliberately pull and excessively bend the wire supplied with this machin...

Page 4: ... C Recommended print head temperature PLA 190 210 C ABS 210 230 C Bed temperature 0 120 Recommended bed temperature PLA 50 70 C ABS 90 110 C Print speed 10 60 mm S Layer thickness 0 05 0 2mm Molding size L190 D190 H180mm Machine size D420 x W416 5x H425 5mm Compatible systems Windows Connection SD Card USB connection for printing 3D format supported STL OBJ Slicing software EASYWARE CURA Machine r...

Page 5: ...ake out 3DPrinter Remove all packing foam and put printer on a level table Use side panels to lift the Printer from the Box 4 Take the Locker out 5 Tear the Sticky paper out on the Platform 6 Put the Glass reinforced epoxy laminate sheet into the platform 7 Fix the material holder onto the back of 3D printer Take out the printing Filament and hang them on the material rest 8 Put the material throu...

Page 6: ... On Plug the power cord Insert SD card Power Switch on The 3D printer starts up as follows Touch LCD Display goes to operation page click setup it comes the following Click Auto calibration goes to auto calibration page operate per instruction click back after operation completed ...

Page 7: ...Retract goes to Filament operation page operate per instruction click back after operation completed Insert filament to the Printer Head Once reach to the preset temperature then click Feed filament will start extrude out from nozzle then feed is success Click retract filament will release from the Head Click LED Setup to operate the LED Flash Light Go to LED operation page click back after operat...

Page 8: ... preset temperature Once it reach it will start to print automatically Reloading filament during printing Once click reloading button the printing would be pause and goes to the reloading page once reach the preset temperature click Retract the filament would come out from the print head Then put new filament into the hole once temperature reach to the preset temperature click Feed material will f...

Page 9: ...ge the residual print material in the nozzle and the extruder to avoid the nozzle from blockage when printing for the next time This is the basic maintenance for a 3D printer The guide rail can be added with engine oil for one time every half a year for anti rusting and lubrication Recommended temperature for the working environment 5 C 30 C do not air the machine body with a fan during the printi...

Page 10: ...gh a calibrated film You can use Auto Calibration function to adjust this Q3 The Print Model is not Accurate Dislocate the Material placement A1 Problem with slicing re slice and reproduce gcode file A2 The model drawings has problem If the model still not accurate after re slicing the models then its drawing has problem A3 the nozzle is forced to stop printing Path First You cannot touch the movi...

Page 11: ...he distance between Nozzle and Platform Q7 Printing supplies difference With the maturity of 3D printing FDM printing supplies on the market is rich and multiple color But the compatibility of supplies and printers is particularly important Thank you for choosing EasyThreed 3D Printer Shenzhen EasyThreed Technology Co Ltd www easythreed com Tel 86 755 89882011 Address No A2 2nd Floor Avant Low Car...

Reviews: