background image

9

200 A Fused Loadbreak Elbow Connector Replacement Fuse

InstallatIon InstructIons

   MN132021EN   November 2016

Step 16

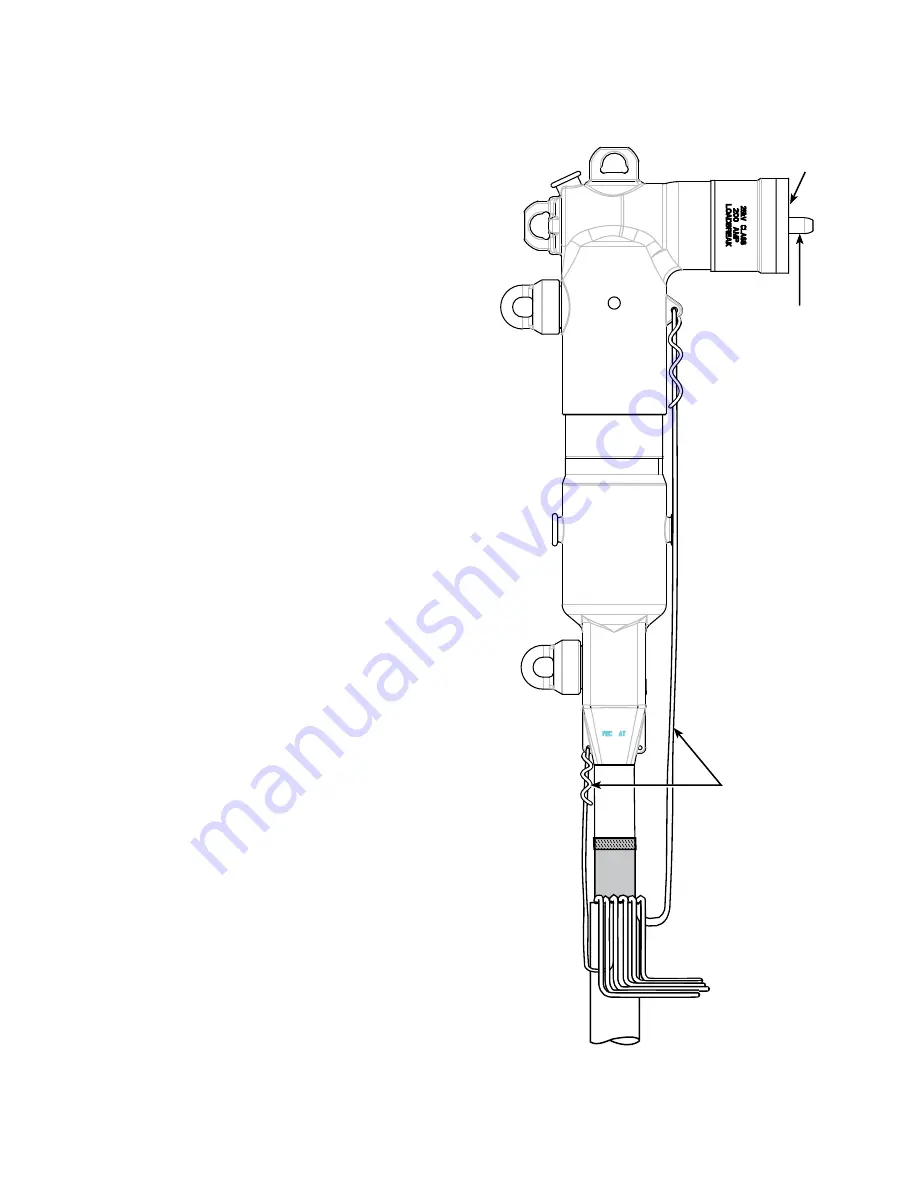
Push down and twist elbow housing to align the probe 

adapter. The threaded hole in the probe adapter should be 

centered with respect to the hole in the elbow housing and 

perpendicular to the probe axis. By hand, insert loadbreak 

probe into the elbow housing along the center axis of the 

interface and thread the probe into the probe adapter. A thin 

layer of silicone lubricant applied to the last 1/4

"

 (6 mm) of 

the probe body (not on the threads) can aid in installation.
After at least three turns or when the probe is seated (5-1/2 

turns) onto the probe adapter, use provided installation tool 

to properly torque the loadbreak probe. Proper torque is 

applied when the tool twists at least 180° (1/2 turn).

ote:

N

If a different installation tool is used it must apply a 

torque of 100 to 120 lbf-in (11.0 – 13.5 N-m).

Re-attach drain wire lead to the drain wire eye of the elbow 

housing.
Clean and lubricate bushing and elbow housing interfaces 

areas with a thin, uniform coating of the silicone provided. 
Do not connect two different phases of a multiple-phase 

system. Before closing a single-phase loop, make certain 

both ends of the loop are the same phase.

Step 17

After the fuse has been replaced, using a clampstick, 

install the Fused Loadbreak Elbow Connector back onto the 

grounded feedthru device.

Step 18

Using a clampstick, remove the insulated protective cap 

from the tap end apparatus bushing. Install the tap end 

cable termination onto the tap end bushing using the 

appropriate procedure for the tap end cable termination.

Step 19

Using a clampstick, remove the insulated protective cap 

from the apparatus bushing and the Fused Loadbreak 

Elbow Connector from the feedthru device. Install the 

Fused Loadbreak Elbow Connector onto the apparatus 

bushing using the standard loadmake operating procedures 

described in Step 20.

ote:

N

Before installing the Fused Loadbreak Elbow 

Connector back onto the apparatus bushing, the 

cause for the fuse operation should be remedied.

Assemble Loadbreak Probe

Clean and 

Lubricate Interface

Drain Wires

Summary of Contents for 200 A Fused Loadbreak Elbow Connector Replacement...

Page 1: ...200 A Fused Loadbreak Elbow Connector Replacement Fuse Installation Instructions COOPER POWER SERIES Fusing Equipment MN132021EN Effective November 2016 Supersedes June 2011 S240 97 1 ...

Page 2: ...R PURPOSE OR MERCHANTABILITY OTHER THAN THOSE SPECIFICALLY SET OUT IN ANY EXISTING CONTRACT BETWEEN THE PARTIES ANY SUCH CONTRACT STATES THE ENTIRE OBLIGATION OF EATON THE CONTENTS OF THIS DOCUMENT SHALL NOT BECOME PART OF OR MODIFY ANY CONTRACT BETWEEN THE PARTIES In no event will Eaton be responsible to the purchaser or user in contract in tort including negligence strict liability or otherwise ...

Page 3: ...ty instructions iv PRODUCT INFORMATION 1 Introduction 1 Read This Manual First 1 Additional Information 1 Acceptance and Initial Inspection 1 Handling and Storage 1 Quality Standards 1 FUSE REPLACEMENT PROCEDURES 2 Probe and Elbow Housing Disassembly 3 Fuse Disassembly 4 Replacement Fuse Installation 6 Probe Adapter Reassembly 7 Elbow Housing and Probe Reassembly 8 ...

Page 4: ...hazardous situation which if not avoided will result in death or serious injury WARNING Indicates a potentially hazardous situation which if not avoided could result in death or serious injury CAUTION Indicates a potentially hazardous situation which if not avoided may result in minor or moderate injury CAUTION Indicates a potentially hazardous situation which if not avoided may result in equipmen...

Page 5: ...imiting fuse protection The Fused Loadbreak Elbow Connector provides a convenient and cost effective means to adding fused protection to underground distribution systems for connecting underground cables to transformers switching cabinets and junctions equipped with loadbreak bushings Read This Manual First Read and understand the contents of this manual and follow all locally approved procedures ...

Page 6: ... indicating instruments specifically designed for test points Use of conventional voltage sensing devices may provide false No Voltage indications The test point must be dry and free of contaminants when checking for voltage After indication is taken clean dry and lubricate the test point cap with silicone grease and assemble to the test point Always consider the termination to be energized until ...

Page 7: ...e unthread and remove loadbreak probe from fused loadbreak elbow Remove Loadbreak Probe Wire Probe Wrench Drain Wires Turn Counterclockwise to loosen Step 5 Detach drain wire lead from the drain wire eye of the elbow housing At the overlap of elbow housing and cable housing insert supplied bleeder strap approx 1 2 13 mm under lip of elbow housing Slide strap around the entire circumference of fuse...

Page 8: ...t and pull motion to the elbow housing to separate it from the cable housing Note N A screwdriver through the pulling eye on top of the elbow will aid in twisting and pulling to separate Discard bleeder strap after housings are separated Elbow Housing Upper Pulling Eye Cable Housing Grip While Separating Facing Outward Separate Step 7 Using the supplied 1 8 hex wrench unthread the two set screws f...

Page 9: ...ions MN132021EN November 2016 Step 8 Remove probe adapter from fuse end cap stud on top of fuse Probe Adapter Fuse End Cap Stud Step 9 Gripping the square portion of the cable housing use the supplied 3 16 hex wrench to loosen and unthread fuse from cable housing 3 16 Hex Wrench ...

Page 10: ...N132021EN November 2016 Replacement Fuse Installation Step 10 Remove old fuse from cable housing Remove Old Fuse Threaded End Step 11 Thread fuse clockwise by hand and start threads into the connector in bottom of the cable housing until hand tight Insert Replacement Fuse Threaded End ...

Page 11: ...ts Confirm check dimension shown in illustration above Position the long end of the hex wrench on the cable housing nosepiece verify that the top of the fuse end cap is equal to or below indicator notch on the hex wrench Check Dimension Use the Hex Wrench notch to measure proper depth Indicator Notch Indicator Notch Step 13 Install probe adapter on unthreaded stud Probe adapter should rest flush o...

Page 12: ...ut on the end post of the fuse then tighten each set screw an additional 1 8 1 4 turn until tight Probe Adapter Seated Flush On Top of Fuse End Cap 1 8 3mm Hex Wrench Align the Flats of the Probe Adapter Parallel to the Nosepiece of the Bushing Loadbreak Bushing Insert Step 15 Using supplied lubricant clean and lubricate elbow and cable interfaces Assemble elbow housing onto the cable housing Make...

Page 13: ... the elbow housing Clean and lubricate bushing and elbow housing interfaces areas with a thin uniform coating of the silicone provided Do not connect two different phases of a multiple phase system Before closing a single phase loop make certain both ends of the loop are the same phase Step 17 After the fuse has been replaced using a clampstick install the Fused Loadbreak Elbow Connector back onto...

Page 14: ...again This insures that the fused loadbreak elbow is latched and was not dislodged during the latching check in previous step above Fault Close 1 It is not recommended that operations be made on known faults 2 If a fault is experienced the fused loadbreak elbow connector probe and the bushing must be replaced Loadbreak Operation Area must be clear of obstructions or contaminants that would interfe...

Page 15: ...11 200 A Fused Loadbreak Elbow Connector Replacement Fuse Installation Instructions MN132021EN November 2016 This page is intentionally left blank T ...

Page 16: ...ited States Eaton com cooperpowerseries 2016 Eaton All Rights Reserved Printed in USA Publication No MN132021EN November 2016 Eaton is a registered trademark All trademarks are property of their respective owners For Eaton s Cooper Power series product information call 1 877 277 4636 or visit www eaton com cooperpowerseries SAFETY FOR LIFE ...

Reviews: