


IOM 2596 Cast 10”–16” | Fabricated 10”-36” 10/2011
REV A.
Page 4 of 15
Eaton Filtration, LLC, 44 Apple Street, Tinton Falls, NJ 07724 | www.eaton.com/filtration | Phone: 732-212-4700
Installation, Operation & Maintenance Manual
Model 2596 Self-Cleaning Strainer
Cast 10” to 16” and Fabricated 10” to 36”
NOTE
: Good operating practice dictates that the
operator observes the strainer carefully for several
weeks to determine the best operating mode, that
is, continuous or intermittent backwash. Refer to
“Self-Cleaning Strainer Control Panel Instructions” provided
with such equipment.
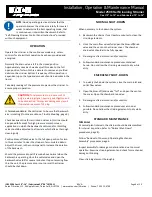
OPERATION
Operate the strainer in the continuous mode only, unless
controls for intermittent operation have been provided and
energized.
Normally the drain valve is left in the closed position.
Approximately once each week adjust this valve to the full
open position for two to three minutes to remove any settled
debris on the strainer bottom. Frequency of this operation is
dependent upon the type and amount of entrained solids in the
liquid.
Take daily readings of the pressure drop across the strainer to
ensure proper operation.
CAUTION:
Total pressure drop in excess of 15
psig is a warning signal requiring investigation and
corrective action. Permanent damage may result
if operated in excess of 15 psig.
I
F THIS SHOULD OCCUR
:
Check strainer to be sure that backwash
arm is rotating (if not see section on Trouble Shooting, page 9).
Check backwash line for restrictions. Valves in this line should
be opened full except for high pressure or mesh screen
applications in which the backwash control and/or throttling
valve should be adjusted to a flow rate which attains thorough
cleaning only.
Position blow-off/drain valve to the full open position for two
to three minutes to clear the strainer of accumulated debris.
Adjust the timer, in the control panel to increase the duration
of the backwash.
Should the pressure drop still remain above normal when the
backwash is operating, close the outlet valve and open the
backwash valve full for several minutes. If upon resuming flow
thru the unit, the pressure drop is not normal, the strainer
should be shut down.
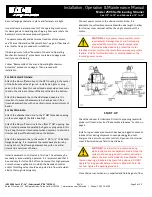
NORMAL
SHUT-DOWN
When necessary to shut-down the system:
1.
Backwash the strainer for at least six minutes to clean the
straining elements.
2.
Close the main flow valves fully open the blow-off/drain
valve and the vent on the strainer cover. The chamber
drain valve should also be fully opened.
3.
De-energize strainer motor and/or controls.
4.
Follow standard maintenance procedures contained
herein. Do not allow the straining elements to dry while
dirty.
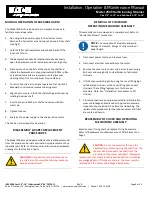
EMERGENCY
SHUT-DOWN
1.
To quickly shut-down the system, close the main inlet and
outlet flow valves.
2.
Open the blow-off/drain valve “full” and open the vent on
the cover. Open the chamber drain valve.
3.
De-energize strainer motor and/or controls.
4.
Follow standard maintenance procedures as soon as
possible. Do not allow the straining elements to dry while
dirty.
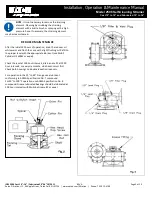
STANDARD
MAINTENANCE
I
NTERNALS
At normal plant intervals, the strainer should be disassembled
for internal inspection (refer to “Normal Shut-Down”
procedures, page 4).
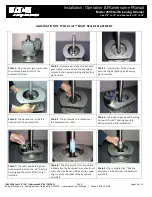
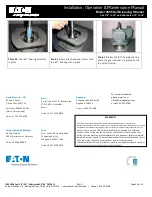
Follow “Removal of Cover and Operating Mechanism
Assembly” procedures, page 6.
Inspect assembly for damage or deterioration due to normal
operation. Examine straining element and check for mechanical
damage or blinding.
Clean straining element thoroughly.


