background image

40

InsTALLATIon And oPerATIon MAnuAL

  25-16330-B   December 2019   www.eaton.com

Panel Controls and Indicators

LCD Display Overview

name

Function

Time

Displays the current time

Date

Displays the current date

System Health

Displays the current system health

Active Zones

Displays the number of zones and if they are active

Alarm Counter

The alarm counter ‘AC==xxx’ represents the total number of 

instances the CIE has entered the alarm state . It increments on 

the state change & not the number of alarm events 

fault relay 

disablement state

FLT/RL:E = Fault Relay Enabled

FLT/RL:D = Fault Relay Disabled

PN, LP AD, ZN = Panel, Loop, Address & Zone . (Not pictured)

Appears on an event screen

System Healthy

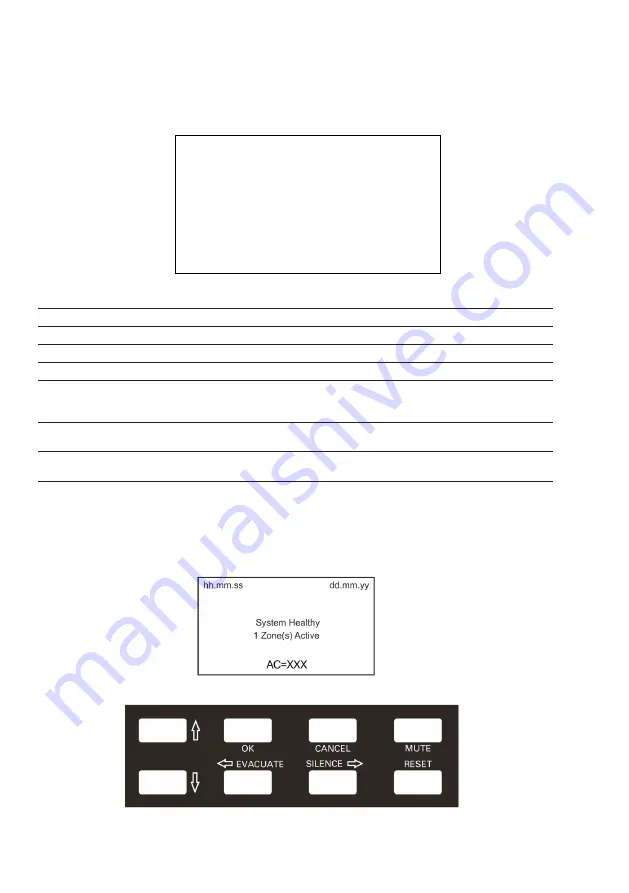
The panel is operated via an 8 button keypad . The default healthy screen is shown 

below . From this screen all the panels functions can be operated . Press any key to 

prompt the passcode screen .

Figure 8 . default system Healthy screen

System Healthy

1 of 2 Zone(s) Active

AC=XXX

12:05:00

23-April-19

FLT/RL:E

Summary of Contents for 910187FULL-0198

Page 1: ...AddressableTwo Loop Fire Panel Installation and Operation Manual...

Page 2: ...lities 22 Spur tolerant soft addressing 22 Integral Power Supply and Battery 23 TECHNICAL SPECIFICATION 23 Optional Functions as per EN54 Parts 2 4 26 Panel Inputs 26 Panel Outputs 27 Output to Fire A...

Page 3: ...locate Zones Devices 35 Sounder Trigger 36 Delay Configuration 36 MCP Override 36 Allocation List 36 Dependency detection 37 Panel Fault Finding 38 PANEL CONTROLS AND INDICATORS 39 Panel Overview 39 L...

Page 4: ...anel Settings Australian Mode 66 Testing Test Device 67 Testing Test Zone 68 Testing Test Sound Levels 69 Testing One Man Walk Test 70 Testing Global Flashing LED screen 71 Testing Analogue Levels 72...

Page 5: ...Change Notes Date A First Release March 2019 B First Revision December 2019 Introduction to the Manual This manual provides information on the installation operation and maintenance of the Eaton Fire...

Page 6: ...urance that the panel the sensor the interfaces and the ancillaries are all fully compatible with each other and that the full range of system functionality is supported by each device Each loop of th...

Page 7: ...ses back boxes to be fitted Then fire sensors call points alarm sounders and interface units can installed 3 Address Schedule Schedule of sensor locations to be completed by installer and returned to...

Page 8: ...may be necessary and these must be listed on the commissioning certificate see Commissioning the panel Loop lengths The maximum permitted loop length is 2 km measured from the near to the far termina...

Page 9: ...130 210 MAB100R MAB100R Addressable Reflective Beam Detector 5 50m 120 130 210 MAB50R MAB50R Addressable Call Points Addressable Manual Call Point 53 87 87 CBG370S CBG370S Addressable Manual Call Poin...

Page 10: ...CASB483 8500111FULL 0197X Addressable Wall Sounder VAD Red Plastic White Flash Weatherproof 100 111 151 CASB483WP 8500115FULL 0201X Addressable Wall Sounder VAD Red Plastic White Flash 92 106 147 CAS...

Page 11: ...65 MCOM MCOM Addressable Micro Single Channel Output Unit Reset on Reset 18 5 35 65 MCOM R MCOM R Addressable Micro Single Channel Output Unit Sounder 18 5 35 65 MCOM S MCOM S Addressable Shop Unit Mo...

Page 12: ...20 C Alarm temperature static N A A1R 60 C 60 C BS 77 C CS 90 C Heat sensor class as defined by EN54 5 2000 N A A1R BS CS control panel selectable A2S Relative humidity no n co nd 0 to 95 Height w o b...

Page 13: ...n and sensitivity requirements The status LED can be programmed to either be permanently off under normal conditions or to pulse in order to confirm that it is in communication with the control panel...

Page 14: ...of loop powered sounders and beacons are available to operate with the control panel consisting of a combined sounder base with a maximum output of 95 dB A a standalone sounder with a maximum output...

Page 15: ...ly After the body has been clicked into place and connected a sensor or front cover is then added to complete a very simple quick and neat installation The cover enables the base sounder to be used as...

Page 16: ...ring a higher level of resilience or ingress protection Two different versions are available standard version and an IP66 rated version Visual Alarm Devices VADs A range of loop powered VADs are avail...

Page 17: ...nitored for open and short circuits A specific resistance is required to activate an alarm condition fully open or short circuit conditions are monitored and generate a system fault signal Inputs are...

Page 18: ...programmed to accept a Zener barrier and a zone of intrinsically safe detectors End of line for this zone now becomes 6K8 and the diode in the detector base must be removed Shop Unit Interface This in...

Page 19: ...um allowable area to be covered by a single spur zone 4 Way Sounder Circuit Controller This interface provides power for 4 separately controllable conventional sounder circuits each circuit can be sep...

Page 20: ...o 20 conventional detectors connected via the EFXN520 range of detector bases and compatible detectors onto an Eaton analogue fire panel It will operate with any Eaton conventional detector in configu...

Page 21: ...on between 18V and 28V They are polarised and suppressed The total alarm load is less than the rating of the panel Alarm Power Interface Note It is possible to use devices outside these requirements i...

Page 22: ...main supply shall be verified Spur tolerant soft addressing The panel utilises intelligent soft addressing technology to greatly simplify the installation and commissioning processes Once the system...

Page 23: ...RAW 800mV 5V Output 430mV Maximum Loadings 26V O P 0 48A I max b 26V RAW O P 1 2A I max b 5V 0 5A Standby Current 2 Loops Loaded 26V 140mA I max a 26V RAW 50mA I max a 26V 140mA I min 26V RAW 50mA I m...

Page 24: ...ture compensation Maximum current drawn from the batteries when the mains is not available 3 0A Deep Discharge Protection 20 6V Battery Internal Impedance Fault 0 5 Inputs Addressable Loops Max Number...

Page 25: ...resistor 6k8 Max Cable Length 2km Min Recommended cable size csa 1mm2 Fire Protecting Equipment Nominal Voltage 20 4V 29 0V Max Load 60mA Fused PTC4 100mA polyswitch End of Line resistor 6k8 Max Cabl...

Page 26: ...tal Number of knockouts 24 Diameter of knockout 20 mm Cable Specification Minimum cross sectional area 1mm2 Maximum cross sectional area 4mm2 Recomended cable type FIRETUF FP200 2 5 mm2 csa CAUTION TE...

Page 27: ...fitted for correct operation The total alarm load across all sounder outputs 1 0A All outputs are fused with 1 6A Glass fuse Alarm devices should be spread equally across the four sounder circuits Fig...

Page 28: ...d end of line resistors 6K8 5 are fitted to ensure correct operation Output to Fault Warning Routing Equipment Option 8 9 EN54 Part 2 This output which is fused and monitored using a 6K8 end of line r...

Page 29: ...oftware Optional Functions as per EN54 Parts 2 4 1 Auxiliary Relay Option not required by EN54 This output is a volt free contact which is protected by a polyswitch It is rated at 24V DC 1A If operate...

Page 30: ...S LIVE WHEN THE MAIN SWITCH IS TURNED OFF A further label should be placed on the main isolating device reading WARNING THE FIRE ALARM SUPPLY REMAINS LIVE WHEN THIS SWITCH IS TURNED OFF Or B If the is...

Page 31: ...screen to the earthed body of any metal devices enclosures or cable containment The screen or drain wire of the loop cables should not be considered as safety earth and therefore should not be connec...

Page 32: ...gulations and with BS5839 part 1 and part 6 The electronic components within the fire panel are Static Sensitive Do not touch the electronics directly Mounting the Backbox The panel can be flush mount...

Page 33: ...33 Installation and Operation Manual 25 16330 B December 2019 www eaton com Installation System Wiring A typical system wiring arrangement Figure 3 Typical System Wiring diagram...

Page 34: ...Commissioning the panel Commissioning the panel Up downloading using PC software The PC Software enables the address location text device type and any comments to be downloaded to the CF2000 panels F...

Page 35: ...e selected time so can be used as a further trigger source Isolate Addresses This allows a group of addresses max 8 on the same loop to be isolated from the trigger Panel does not go to Fire trigger i...

Page 36: ...of a device when triggered can be delayed based on a user defined value in minutes This programming option is enabled when a value other than zero is entered inside the Delay window MCP Override This...

Page 37: ...h panel output can be assigned a unique list of zones derived from the zones available on the loop to activate this output two unique zones from this list have to be in fire or alternatively any zone...

Page 38: ...38 Installation and Operation Manual 25 16330 B December 2019 www eaton com Commissioning the panel Panel Fault Finding...

Page 39: ...rs devices for faults e g Smoke detectors Sounders Report to System Supervisor General Disable Monitors panel for disablements Report Fault to Service Dept Test Supervisor Engineer is testing the syst...

Page 40: ...stances the CIE has entered the alarm state It increments on the state change not the number of alarm events fault relay disablement state FLT RL E Fault Relay Enabled FLT RL D Fault Relay Disabled PN...

Page 41: ...View Events screen is shown below The events screens are accessed from the healthy screen by first pressing any button You will then be prompted to enter the passcode which will show the screen below...

Page 42: ...16330 B December 2019 www eaton com Panel Controls and Indicators Fire Event The Fire screen is shown below From this screen all the panels functions can be operated Press any key to prompt the passc...

Page 43: ...ew Fires screen is accessed as shown below The screens are accessed from the healthy screen by first pressing any button You will then be prompted to enter the passcode which will show the screen belo...

Page 44: ...Pre Alarm screen is accessed as shown below The screens are accessed from the healthy screen by first pressing any button You will then be prompted to enter the passcode which will show the screen be...

Page 45: ...ew Fault screen is accessed as shown below The screens are accessed from the healthy screen by first pressing any button You will then be prompted to enter the passcode which will show the screen belo...

Page 46: ...abled Address screen is accessed as shown below The screens are accessed from the healthy screen by first pressing any button You will then be prompted to enter the passcode which will show the screen...

Page 47: ...47 Installation and Operation Manual 25 16330 B December 2019 www eaton com Panel Controls and Indicators View Disabled Address continued Figure 15 View Disabled Address continued...

Page 48: ...isabled Zone screen is accessed as shown below The screens are accessed from the healthy screen by first pressing any button You will then be prompted to enter the passcode which will show the screen...

Page 49: ...isabled I O screen is accessed as shown below The screens are accessed from the healthy screen by first pressing any button You will then be prompted to enter the passcode which will show the screen b...

Page 50: ...w Log screen is accessed as shown below The log screens are accessed from the healthy screen by first pressing any button You will then be prompted to enter the passcode which will show the screen bel...

Page 51: ...event log is provided allowing the user to scroll the events A test indication counter is supported providing the user with test event count for any suppressed data as per 10 3 3 a Subsequent fire sta...

Page 52: ...ns are accessed from the healthy screen by first pressing any button You will then be prompted to enter the passcode which will show the events screen by default Press the Scroll Down button until the...

Page 53: ...en is accessed from the healthy screen by first pressing any button You will then be prompted to enter the passcode which will show the events screen by default Press the Scroll Down button until the...

Page 54: ...reens are accessed from the healthy screen by first pressing any button You will then be prompted to enter the passcode which will show the events screen by default Press the Scroll Down button until...

Page 55: ...ns are accessed from the healthy screen by first pressing any button You will then be prompted to enter the passcode which will show the events screen by default press the Scroll Down button until the...

Page 56: ...ns are accessed from the healthy screen by first pressing any button You will then be prompted to enter the passcode which will show the events screen by default Press the Scroll Down button until the...

Page 57: ...eens are accessed from the healthy screen by first pressing any button You will then be prompted to enter the passcode which will show the screen below by default Press OK and scroll through the list...

Page 58: ...ase Log screen is accessed as shown below The screens are accessed from the healthy screen by first pressing any button You will then be prompted to enter the passcode which will show the screen below...

Page 59: ...Wait Mode screen is accessed as shown below The screens are accessed from the healthy screen by first pressing any button You will then be prompted to enter the passcode which will show the screen be...

Page 60: ...e sound Mode screen is accessed as shown below The screens are accessed from the healthy screen by first pressing any button You will then be prompted to enter the passcode which will show the screen...

Page 61: ...e Password screen is accessed as shown below The screens are accessed from the healthy screen by first pressing any button You will then be prompted to enter the passcode which will show the screen be...

Page 62: ...t Password screen is accessed as shown below The screens are accessed from the healthy screen by first pressing any button You will then be prompted to enter the passcode which will show the screen be...

Page 63: ...e Language screen is accessed as shown below The screens are accessed from the healthy screen by first pressing any button You will then be prompted to enter the passcode which will show the screen be...

Page 64: ...te Time screen is accessed as shown below The screens are accessed from the healthy screen by first pressing any button You will then be prompted to enter the passcode which will show the screen below...

Page 65: ...em Details screen is accessed as shown below The screens are accessed from the healthy screen by first pressing any button You will then be prompted to enter the passcode which will show the screen be...

Page 66: ...alian Mode screen is accessed as shown below The screens are accessed from the healthy screen by first pressing any button You will then be prompted to enter the passcode which will show the screen be...

Page 67: ...t Device screen is accessed as shown below The screens are accessed from the healthy screen by first pressing any button You will then be prompted to enter the passcode which will show the screen belo...

Page 68: ...w The screens are accessed from the healthy screen by first pressing any button You will then be prompted to enter the passcode which will show the screen below by default Press OK and scroll through...

Page 69: ...Levels screen is accessed as shown below The testing screens are accessed from the healthy screen by first pressing any button You will then be prompted to enter the passcode which will show the scre...

Page 70: ...lk Test screen is accessed as shown below The testing screens are accessed from the healthy screen by first pressing any button You will then be prompted to enter the passcode which will show the scre...

Page 71: ...Flashing LED screen is accessed as shown below The testing screens are accessed from the healthy screen by first pressing any button You will then be prompted to enter the passcode which will show the...

Page 72: ...gue Levels screen is accessed as shown below The testing screens are accessed from the healthy screen by first pressing any button You will then be prompted to enter the passcode which will show the s...

Page 73: ...from the healthy screen by first pressing any button You will then be prompted to enter the passcode which will show the screen below by default Press OK and scroll through the list of events using th...

Page 74: ...te Device screen is accessed as shown below The screens are accessed from the healthy screen by first pressing any button You will then be prompted to enter the passcode which will show the screen bel...

Page 75: ...isable Address screen is accessed as shown below The screens are accessed from the healthy screen by first pressing any button You will then be prompted to enter the passcode which will show the scree...

Page 76: ...6 Installation and Operation Manual 25 16330 B December 2019 www eaton com Panel Controls and Indicators Enable Disable Address continued Figure 43 Device Config Enable Disable Address screen continue...

Page 77: ...Disable Zone screen is accessed as shown below The screens are accessed from the healthy screen by first pressing any button You will then be prompted to enter the passcode which will show the screen...

Page 78: ...Disable I O screen is accessed as shown below The screens are accessed from the healthy screen by first pressing any button You will then be prompted to enter the passcode which will show the screen...

Page 79: ...Autoconfig screen is accessed as shown below The screens are accessed from the healthy screen by first pressing any button You will then be prompted to enter the passcode which will show the screen b...

Page 80: ...ge Device screen is accessed as shown below The screens are accessed from the healthy screen by first pressing any button You will then be prompted to enter the passcode which will show the screen bel...

Page 81: ...81 Installation and Operation Manual 25 16330 B December 2019 www eaton com Panel Controls and Indicators Device Config continued Figure 48 Device Config Change Device screen continued...

Page 82: ...82 Installation and Operation Manual 25 16330 B December 2019 www eaton com Appendix Appendix System Wiring A typical wiring arrangement is shown Figure 49 Typical System Wiring...

Page 83: ...ed 3 Suitable for mounting to mounting boxes with 50 80mm fixing centres General If difficulty is experienced when mounting the sensor this may be due to the following 1 Wiring causing an obstruction...

Page 84: ...84 Installation and Operation Manual 25 16330 B December 2019 www eaton com Appendix Addressable Call Point Figure 51 Call Point...

Page 85: ...FP200 or MICC Standby current 320 uA Operating temperature 10 to 55 degrees C 95 RH Sound output 3dB Low volume 84dB 4mA set by panel Medium volume 92dB 8mA High volume 95dB 12mA Tones set by install...

Page 86: ...B December 2019 www eaton com Appendix Loop powered beacon Connection Details Earth screen of cable to be continuous between beacons WARNING DO NOT USE HIGH VOLTAGE TESTERS IF ANY EQUIPMENT IS CONNECT...

Page 87: ...he rear gasket fits underneath the base and the sounder gasket fits inside the base Connect the device as shown WARNING DO NOT USE HIGH VOLTAGE TESTERS IF ANY EQUIPMENT IS CONNECTED TO THE SYSTEM EART...

Page 88: ...he device 1 Drill required holes for the cable gland fixing 2 Drill out the required fixing holes 3 Fix to mounting surface using two suitable screws WARNING DO NOT USE HIGH VOLTAGE TESTERS IF ANY EQU...

Page 89: ...position and pass the wires into it 4 Connect the unit according to the diagram below ote N No addressing of the interface is required See control panel operation for details Figure 56 Wiring for 3 wa...

Page 90: ...ed cable entries in the surface mounting backbox 3 Fit the back box in position and pass the wires into it 4 Connect the unit according the diagram ote N No addressing of the interface is required See...

Page 91: ...am ote N No addressing of the interface is required See control panel operation for details Figure 58 Zone Monitor Unit otes N 1 This unit can only be used with EFXN520 detector base and compatible de...

Page 92: ...UF FP200 MICC ote N No addressing of the interface is required See control panel operation for details There are no serviceable parts so no maintenance procedures apply Figure 59 Standard connections...

Page 93: ...ram ote N No addressing of the interface is required See control panel operation for details Figure 60 Shop Monitor Unit otes N 1 This unit can only be used with EFXN520 detector base and compatible d...

Page 94: ...om the analogue addressable panel loop Without this unit the self addressing features of the system will not function correctly 2 No addressing of the interface is required See control panel operation...

Page 95: ...t taking care not to damage the circuit board 3 Connect the unit according to the diagram below ote N No addressing of the interface is required See control panel operation for details This unit requi...

Page 96: ...control panel operation for details There are no serviceable parts so no maintenance procedures apply Figure 63 Standard connections 1 This unit can only be used with Eaton EFXN520 detector base and...

Page 97: ...ort circuit faults Battery Disposal Instructions Although batteries contain lead and small amounts of antimony and arsenic they are safe if handled according to the accompanying guide The battery cell...

Page 98: ...put to automatic fire protection equipment type A 7 11 Delays to outputs 7 12 3 Dependencies on more than one alarm signal Type C 7 13 Alarm counter 8 9 Output to fault routing equipment 9 5 Disableme...

Page 99: ...99 Installation and Operation Manual 25 16330 B December 2019 www eaton com Notes Notes...

Page 100: ...uth Yorkshire DN2 4NB Eaton EMEA Headquarters Route de la Longeraie 7 1110 Morges Switzerland Eaton eu 2019 Eaton All Rights Reserved Publication No 25 16330 B December 2019 Eaton is a registered trad...

Reviews: