UPS OPERATING INSTRUCTIONS
Eaton 9395 Plus 1 UPS (225–275 kVA) Installation and Operation Manual
S
164201710 Rev 2
www.eaton.com\powerquality
7-7
Table 7‐3. Display Menu Operation (continued)
Operation
Subfunction
Function
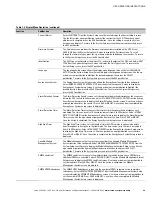
Contrast Adjust
Select
CONTRAST
from the System Setup Level 0 menu to display the Contrast Adjust screen.
Use the left or right arrow pushbutton to adjust the contrast for the LCD. When the contrast
adjustment is complete, press the
SAVE
pushbutton
.
Once the setting is saved, the System
Setup screen displays. To return to the System Setup screen without saving the setting, press
the
ESC
pushbutton
.
Firmware Versions
The Versions screen provides the firmware version numbers installed on the UPS. Select
VERSIONS
from the System Setup Level 0 menu to display the Versions screen. To scroll
through the firmware types, press the up or down arrow pushbutton on the menu bar. To return
to the System Setup screen, press the
ESC
pushbutton
.
Identification
The Unit Type screen provides the model, CTO, and serial numbers of the UPS unit. Select
UNIT
TYPE
from the System Setup Level 0 menu to display the Unit Type screen. To return to the
System Setup screen, press the
ESC
pushbutton
.
Language
The Language Setup screen allows the display menu language to be set. Select
LANGUAGE
SETUP
from the System Setup Level 0 menu to display the Language Setup screen. Use the up
or down arrow pushbutton to highlight the desired language, then press the
SELECT
pushbutton
.
To return to the System Setup screen, press the
ESC
pushbutton
.
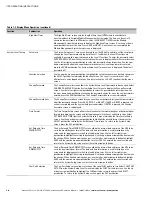
Energy Saver System
The Energy Saver System Setup screen allows the Energy Saver function to be configured.
Select
ENERGY SAVER SYSTEM SETUP
from the System Setup Level 0 menu to display the
Energy Saver System Setup screen. Use the up or down arrow pushbutton to highlight the
desired function, then press the
SELECT
pushbutton
.
To return to the System Setup screen,
press the
ESC
pushbutton
.
Storm Detection Counter
The Storm Detection Counter screen sets the number of power line disturbances that can occur
before the UPS locks into Online mode. Select
STORM DETECTION COUNTER
from the Energy
Saver System Setup screen to display the Storm Detection Counter screen. Use the up or down
arrow pushbutton to set the counter. Press
SAVE
or
ABORT
. Once the action is completed, the
Energy Saver System Setup screen is displayed.
Storm Detection Timer
The Storm Detection Timer screen sets the length of time that power line disturbances are
monitored. The time can be set in 10 minute increments from 0 to 990 minutes. Select
STORM
DETECTION TIMER
from the Energy Saver System Setup screen to display the Storm Detection
Timer screen. Use the up or down arrow pushbutton to set the time. Press
SAVE
or
ABORT
.
Once the action is completed, the Energy Saver System Setup screen is displayed.
High Alert Timer
The High Alert Timer screen sets the length of time the UPS remains in Online mode before
transferring back to Energy Saver System mode. The time can be set in 10 minute increments
from 0 to 990 minutes. Select
HIGH ALERT TIMER
from the Energy Saver System Setup screen
to display the High Alert Timer screen. Use the up or down arrow pushbutton to set the time.
Press
SAVE
or
ABORT
. Once the action is completed, the Energy Saver System Setup screen is
displayed.
Variable Module
Management System
The Module Management System Setup screen allows the Variable Module Management
System function to be configured. Select
MODULE MANAGEMENT SYSTEM SETUP
from the
System Setup Level 0 menu to display the Module Management System Setup screen. Use the
up or down arrow pushbutton to highlight the desired function, then press the
SELECT
pushbutton
.
To return to the System Setup screen, press the
ESC
pushbutton
.
VMMS Load Limit
The VMMS Load Limit screen sets the maximum load that can be drawn from a UPM before
additional UPMs are activated. Select
APM LOAD LIMIT
from the Module Management System
Setup screen to display the VMMS Load Limit screen. Use the up or down arrow pushbutton to
set the load limit. Press
SAVE
or
ABORT
. Once the action is completed, the Module
Management System screen is displayed.
VMMS UPM Redundancy
The VMMS UPM Redundancy screen sets the number of UPMs to remain active to maintain
redundancy. Select
VMMS UPM REDUNDANCY
from the Module Management System Setup
screen to display the VMMS UPM Redundancy screen. Use the up or down arrow pushbutton to
set the number of UPMs. Press
SAVE
or
ABORT
. Once the action is completed, the Module
Management System Setup screen is displayed.


