25-75 kW
User's and Installation Guide
85
10
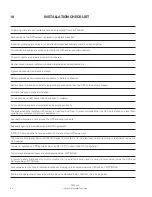
INSTAllATION CHECklIST
All packing materials and restraints have been removed from each cabinet.
Each cabinet in the UPS system is placed in its installed location.
A cabinet grounding/mounting kit is installed between any cabinets that are bolted to-gether.
All conduits and cables are properly routed to the UPS and any ancillary cabinets.
All power cables are properly sized and terminated.
Neutral conductors are installed or bonded to ground as per requirements.
A ground conductor is properly installed.
Battery cablesa are terminated and connected to battery connectors.
Battery Shunt trip and Aux contact signal wiring is connected from the UPS to the bat-tery breaker.
LAN and telephone drops are installed.
All telephone and LAN connections have been completed.
Air conditioning equipment is installed and operating correctly.
The area around the installed UPS system is clean and dust-free. (It is recommended that the UPS be installed on a level floor
suitable for computer or electronic equipment.)
Adequate workspace exists around the UPS and other cabinets.
Adequate lighting is provided around all UPS equipment.
A 230 VAC service outlet is located within 7.5 meters of the UPS equipment.
The Remote Emergency Power-off (REPO) device is mounted in its installed location and its wiring is terminated inside the
UPS cabinet.
Jumper is installed on EPO between pins 1 and 2 if EPO is used in the NC configuration.
Alarm relays and signal inputs are wired appropriately. (OPTIONAL)
A remote battery disconnect control is mounted in its installed location and its wiring is terminated inside the UPS and
battery cabinet. (OPTIONAL)
Accessories are mounted in installed locations and wiring is terminated inside the UPS cabinet. (OPTIONAL)
Startup and operational checks are performed by an authorized Eaton Customer Service Engineer.
Summary of Contents for 93PR 25(75)
Page 1: ...User s and Installation Guide Eaton 93PR UPS 25 75 kW ...
Page 2: ......
Page 3: ...Eaton 93PR UPS 25 75 kW User s and Installation Guide ...
Page 96: ......
Page 97: ......
Page 98: ...614 02087 00 ...

