background image


-8- 

4. Panel Description 

The  display  panel  of  1K/1KXL/2K/2KXL/3K/3KXL  is  the  same,  which  is 

shown as below: 


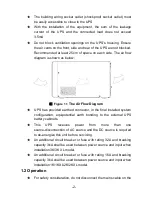
Figure 4.1 

The Display Panel 

4.1 Button 

Switch


Function


ON/Silence 

Button


Turn on UPS system: 

By pressing the ON-Button continuously for more than 1 second the 

UPS system is turned on. 

Deactivate acoustic alarm: 

By  pressing  this  Button,  an  acoustic  alarm  and  LCD  blue 

background blinking can be deactivated in the battery mode. 

By short touch this Button all acoustic alarms can be deactivated in 

all modes. 

Do the battery test: 

By pressing this Button the UPS can do the battery test in the Line 

mode or ECO mode or CVCF mode.         

OFF 

Button


When  mains  power  is  normal,  the  UPS  system  switches  to  No 

output or Bypass mode by pressing OFF-Button, and the inverter is 

off. At this moment, if Bypass is enabled, then the output sockets are 

supplied with voltage via the bypass if the mains power is available. 

Deactivate acoustic alarm: 

Summary of Contents for 9E-IN 1K

Page 1: ...Eaton 9E IN Series 1000 2000 3000 XL USER MANUAL ...

Page 2: ...TON 8 4 2 LCD DESCRIPTION 9 5 CONNECTION AND OPERATION 12 5 1 INSPECTION 12 5 2 CONNECTION 12 5 3 BATTERY RECHARGE 18 5 4 TURN ON THE UPS 18 5 5 TEST FUNCTION 19 5 6 TURN OFF THE UPS 19 5 7 AUDIBLE ALARM MUTE FUNCTION 19 6 OPERATING MODE FOR ALL MODELS 21 6 1 LINE MODE 22 6 2 BATTERY MODE 22 6 3 BYPASS MODE 23 6 4 NO OUTPUT MODE 23 6 6 ECO MODE ECONOMY MODE 24 6 5 CVCF MODE 24 6 7 ABNORMAL MODE 25...

Page 3: ...TRICAL SPECIFICATIONS 35 10 2 OPERATING ENVIRONMENT 35 10 3 DIMENSIONS AND WEIGHTS 36 11 COMMUNICATION PORT 37 11 1 RS 232 COMMUNICATION PORTS 37 11 2 AS400 INTERFACE OPTIONAL 37 11 3 CMC INTERFACE OPTIONAL 37 11 4 NMC INTERFACE OPTIONAL 37 12 SOFTWARE 38 APPENDIX 1 REAR PANEL 39 ...

Page 4: ... heat Do not connect appliances or items of equipment which would overload the UPS e g laser printers etc to the UPS output Place cables properly to avoid someone treaded or tripped over them Assure to connect with the earth reliably Assure external battery source must be earthed A readily accessible disconnect device shall be incorporated in the building installation wiring for permanently connec...

Page 5: ...as provided earthed connector in the final installed system configuration equipotential earth bonding to the external UPS battery cabinets This UPS receives power from more than one source disconnection of AC source and the DC source is required to de energize this unit before servicing An additional circuit breaker or fuse with rating 32A and breaking capacity 3kA shall be used between power sour...

Page 6: ...de the UPS Remove the protective panel only after disconnecting the terminal connections To connect external battery cabinets use the expansion cable suggested by the manufacturer in this manual Use No 12 AWG for 3K XL input output wire 90 C copper wire and 5kgf cm Torque force when connecting to terminal block Please don t disconnect battery connector when UPS work normally for 3K XL Before inser...

Page 7: ...pose a risk of shock Take all precautionary measures specified below and any other measures necessary when working with batteries remove all jewellery wristwatches rings and other metal objects use only tools with insulated grips and handles Wear rubber gloves and boots Do not lay tools or metal parts on top of batteries Disconnect the charging source prior to connecting or disconnecting battery t...

Page 8: ... 2 Category C1 Radiated Emission IEC EN 62040 2 Category C1 Harmonic Current IEC EN 61000 3 2 Voltage Fluctuation and Flicker IEC EN 61000 3 3 EMS ESD IEC EN 61000 4 2 Level 4 RS IEC EN 61000 4 3 Level 3 EFT IEC EN 61000 4 4 Level 4 SURGE IEC EN 61000 4 5 Level 4 CS IEC EN 61000 4 6 Level 3 MS IEC EN 61000 4 8 Level 3 Voltaje Dips IEC EN 61000 4 11 Low Frequency Signals IEC EN 61000 2 2 Safety IS ...

Page 9: ... 6 2 Description of Commonly Used Symbols Some or all of the following symbols may be used in this manual It is advisable to familiarize yourself with them and understand their meaning ...

Page 10: ...rter This manual covers the UPS listed as follows Please confirm whether it is the model you intend to purchase by performing a visual inspection of the Model No on the rear panel of the UPS The Model List Item Model name Power Rating Model type Model description Other 1 9E IN 1K 1000VA 900W Tower Standard model Single Phase input Single Phase Output 2 9E IN 2K 2000VA 1800W Tower Standard model Si...

Page 11: ...LCD blue background blinking can be deactivated in the battery mode By short touch this Button all acoustic alarms can be deactivated in all modes Do the battery test By pressing this Button the UPS can do the battery test in the Line mode or ECO mode or CVCF mode OFF Button When mains power is normal the UPS system switches to No output or Bypass mode by pressing OFF Button and the inverter is of...

Page 12: ...s mode External Battery Ah Battery remain time display disable enable only for 1K 2K 3K and Charger current in all mode could be selected by pressing Select Button and confirmed by pressing Enter Button Enter Button Note External Battery pack number cannot be select for Standard model 1K 2K 3K 4 2 LCD description Figure 4 2 The LCD Display LCD icon Function Display Function Input Information It in...

Page 13: ...The lowest grid would be displayed if the level is 5 20 Battery Information It indicates the battery capacity Every grid represents the capacity of 20 If the battery low alarm occurs the lowest grid will flash to remind you Mode Fault Warning Information It Indicates the operating mode or Fault kind or Warning kind or battery remain time only for 1K 2K 3K several warning kinds at the same time cou...

Page 14: ...ault mode or has some warnings LCD idle function If you enable LCD background idle function When UPS is off to standby mode LCD background will be turned off within 5 seconds After any key pressed the LCD background will be lighted on ...

Page 15: ...ket The UPS System has an input breaker on the standard cabinet For 1KXL 2KXL 3KXL If the UPS is connected via the power cord For 1KXL 2KXL model please use a proper external socket with protection against electric current and pay attention to the capacity of the socket over 9A for 1KXL over 18A for 2KXL If the UPS is connected via wires For 3KXL model it is recommended to select the 12AWG wire an...

Page 16: ...s and protective components before connecting the input wire with the input terminals It is recommended to select an extra external NFB Non Fuse Breaker instead of the traditional combination kit including breaker and fuse When selecting the external NFB the user can refer to below table for detailed information when installation Model INPUT NFB on UPS Cabinet VOLTAGE CURRENT 3KXL 250Vac 32A ...

Page 17: ...tery Input Connection for long backup time model When connecting the external batteries it s recommended to pay attention to these following items Use the battery pack with voltage 36VDC for 1KXL 3 pcs of 12V batteries 72VDC for 2KXL 6 pcs of 12V batteries 96VDC for 3KXL 8 pcs of 12V batteries Note Connection of batteries more than or less than required will cause abnormality or permanent damage O...

Page 18: ...wire is connected to the terminal of the battery Note the battery GND should be firstly grounded through screw for protection purpose Make sure the wires are fasten The suggested tighten force is 6KgF cm to 8KgF cm install the terminal block cover on the rear panel of the UPS Connect the input power cord of the UPS to mains power supply the battery would start to be charged The Caution A DC breake...

Page 19: ... 16 Figure 5 2 1KXL Battery Connection diagram ...

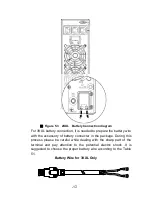
Page 20: ...ttery wire with the accessory of battery connecter in the package During this process please be careful while dealing with the sharp part of the terminal and pay attention to the potential electric shock It is suggested to choose the proper battery wire according to the Table 5 1 Battery Wire for 3KXL Only ...

Page 21: ... is able to operate directly without recharging process but the backup time may be shorter than the nominal value specified 5 4 Turn on the UPS 1 With mains power connecting Press On button continuously for more than 1 second to turn on the UPS the UPS will get into the Line mode the LCD screen will indicate the state of the UPS 2 Without mains power connecting Even though mains power is not conne...

Page 22: ...umstance the UPS might have output power if bypass mode is enabled Disconnect the mains power to turn off the output 2 In Battery Mode Press OFF button continuously for more than 1 second to turn off the UPS the UPS will get into no output or standby mode After 10s UPS will be shut down completely 5 7 Audible alarm mute function If the audio alarm is too annoying in battery mode the audio alarm is...

Page 23: ...without batteries if the open battery alarm is too annoying you can mute it through software Alarm Table List NO Status Alarm 1 Battery mode Beep once every 4 sec 2 Battery mode with battery low Beep once every sec 3 Bypass mode Beep once every 2 min 4 Overload Beep twice every sec 5 Warning active see Warning Fault Code Table Beep once every sec 6 Fault active Beep continuously 7 Button function ...

Page 24: ... and the warning string will be shown circularly Once a fault comes forth all previous warnings will not be shown again only the fault string will be presented Table 6 1 Operating Mode Operating mode Code No output mode STbY Bypass mode bYPA Line mode LINE Battery mode bATT Battery test mode TEST ECO mode ECO Converter mode CVCF Table 6 2 Warning Fault Code Warning String Site Fail for 1K 2K 3K SI...

Page 25: ... shown as figure6 1 The information about the mains power the battery level the UPS output and the load level will be displayed The LINE string indicates UPS working in Line mode Figure 6 1 The Line mode 6 2 Battery mode The LCD display in battery mode is shown as figure6 2 The information about the battery voltage the battery level the UPS output and the load level will be displayed The bATT stri...

Page 26: ...again for more than 1 second to resume the alarm function Figure 6 2 The Battery mode 6 3 Bypass mode The LCD display in bypass mode is shown as figure6 3 The information about the mains power the battery level the UPS output and the load level will be displayed The UPS will beep once every 2 minutes in bypass mode The bYPA string indicates UPS working in the bypass mode Figure 6 3 The Bypass mode...

Page 27: ...o battery mode and the load will be supplied continuously by the battery 1 ECO mode can be enabled through the LCD setting or the software Winpower etc 2 The transfer time of UPS output from ECO mode to battery mode is less than 10ms It is suggested that takes account of application for some sensitive load 6 5 CVCF mode CVCF Constant Voltage Constant Frequency which is also called converter mode U...

Page 28: ...tring would be shown on LCD display to indicate the status of the UPS and the background light will become red color For example SHOR would be shown when the connected load or the UPS output is in short circuited the LCD display is shown as figure6 5 followings Figure 6 5 The Fault mode ...

Page 29: ...could be set to 220V 230V and 240V In bypass or no output mode pressing the Enter button on the LCD panel for more than 1 second to enter setting mode The LCD display is shown in the following figure7 1 The string OPV that stands for output voltage 230Vac indicates the existing output voltage is 230Vac if you want to set output voltage press the Enter button for more than 1 second a flickering str...

Page 30: ...he UPS would turn to bypass mode in several seconds if Bypass Enable is selected and turn to no output mode in several seconds if Bypass Disable is selected Operating mode can be selected in UPS ECO CVF Here UPS means the normal online mode ECO means the high efficiency mode and CVF means the converter mode The mode change would be active only after the UPS is turned on External Battery Ah could b...

Page 31: ... changing the Operating mode from normal mode to converter mode through the LCD display Step 1 OPV after pressing the Enter button Step 2 OPF after pressing the Select button Step 3 bYPA after pressing the Select button ...

Page 32: ...CO flickering after pressing the Select button Step 6 CVF flickering after pressing the Select button Press the Enter button Short touch Enter button exit setting mode Be same with the way of setting CVCF mode which is showed above it is easy to set the bypass status and other work mode through the LCD panel ...

Page 33: ... 30 ...

Page 34: ...open 1 Check building wiring socket outlet and input cable 2 Check the Breaker No Communication data 1 RS232 wire is not matched 2 USB wire is not matched 1 check or change the RS232 wire 2 check or change the USB wire Emergency supply period shorter than nominal value 1 Batteries not fully charged 2 Batteries defect 1 Charge the batteries until the Batteries are fully charged 2 Change the batteri...

Page 35: ...ow UPS internal fault Notify dealer bSFT Bus soft start fail UPS internal fault Notify dealer bUSS Bus short UPS internal fault Notify dealer TEPH Inverter temperature high Inside temperature of the UPS is too high Check the ventilation of the UPS check the ambient temperature ITPH Inner Ambient temperature high The ambient temperature is too high Check the environment ventilation INVH Inverter hi...

Page 36: ...ome non critical loads Check whether some loads are failed SITE Site fail Phase and neutral conductor at input of UPS system are reversed Rotate mains power socket by 180 or connect UPS system Please have the following information at hand before calling the After Sales Service Department 1 Model number serial number 2 Date on which the problem occurred 3 LCD display status Buzzer alarm status 4 Ma...

Page 37: ...arts 9 2 Storage If the batteries are stored in temperate climatic zones it is recommended to recharge those batteries every three months for 1 2 hours It is highly suggested to shorten the recharging intervals in every two months at locations where subjects to high temperatures ...

Page 38: ... IN 1K 9E IN 1KXL 9E IN 2K 9E IN 2KXL 9E IN 3K 9E IN 3KXL Voltage 24V 36V 48V 72V 72V 96V Capacity Note1 9Ah 5Ah 120Ah Note2 9Ah 5Ah 120Ah 9Ah 5Ah 120Ah Note 1 The Capacity of external batteries can be set to 300Ah maximum but it may need more time to fully charge the batteries Note 2 It is recommended that the Capacity of external batteries for 1KXL should be over 20Ah as the lowest setting charg...

Page 39: ...nd weights Model No Dimensions W H D mm Net Weight kg 9E IN 1K 144 228 356 9 2kg 9E IN 2K 190 327 399 17 4kg 9E IN 3K 190 327 399 22 7kg 9E IN 1KXL 102 228 346 3 8kg 9E IN 2KXL 102 327 390 6 0kg 9E IN 3KXL 102 327 390 6 1kg ...

Page 40: ...alarm OK or on Bypass and so on To see more detail about the interface definitions please check the AS400 user manual 11 3 CMC Interface Optional It provides connection to Modbus protocol with standard RS485 signal To see more detail please check the CMC user manual 11 4 NMC Interface Optional NMC Network Management Card allows the UPS to communicate in a variety of networking environments and wit...

Page 41: ... any UPS on the same LAN no matter how far from the UPSs Installation procedure 1 Go to the website http www ups software download com winpower htm 2 Choose the operation system you need and follow the instruction described on the website to download the software 3 When downloading all required files from the internet enter the serial No 511C1 01220 0100 478DF2A to install the software When your c...

Page 42: ... 39 Appendix 1 Rear panel 1K 1KXL ...

Page 43: ... 40 2K 2K 2KXL Output TB ...

Page 44: ... 41 3K 3KXL ...

Reviews: