FP-5000
IL17569B
Page 11-3
Effective Date: 12/05
Effective Date: 12/05
For more information visit:
www.eatonelectrical.com
Page 11-3
11.2.4 Self Test Status
The FP-5000 Feeder Protection Relay performs a self-test of the
microprocessor and supporting hardware such as memory and analog
circuitry. To view the results, select the Status/Control menu then
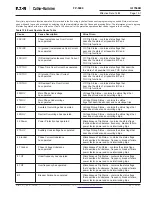
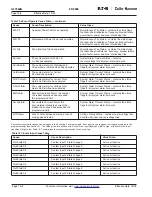
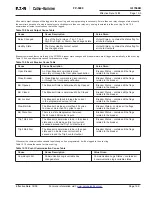
Status/Self Test Status. See the troubleshooting Section 12.1.3
“Self Test Status Indication” for a detailed description of each function.
11.2.5 Test Menu
Tests performed under the test menu allow the user to perform fault
simulations and control the state of relays 1 – 6. To access the test
menu functions, lift the protective cover labeled “Set” and “Test”,
press the “
Test
” button, and enter the unit’s password.
11.2.5.1 Fault Simulation
The FP-5000 has a self-test function, which allows voltages and
currents, both rms and phasor values, to be applied to the internal
firmware in a simulation process. The unit can be placed in a trip or
no trip mode to verify coordination trip times, demonstrate tripping
and indicate trip times under user-selected overload conditions. The
various functions that can be checked are:
• Overvoltage
• Undervoltage
• Unbalanced voltage
• Instantaneous overcurrent
• Inverse time overcurrent
• Unbalance current protection
Once the desired protection settings have been programmed, the
“Test” function can be used as follows:
• If a non-trip test is desired, the user must disarm tripping. The first
step is to enable the “Disarm Control” setting in the “
Set
” mode
“System Config” setting menu. Then, the “Arm/Disarm Trip” selection
can be made from the test menu.
• Press the “
Test
” button. Enter the unit’s password, then select
“Fault Simulation” under the test menu.
• Enter the phasor values of voltages (line-to-neutral for a Wye con-
nection or line-to-line for a Delta connection) and phasor currents.
Refer to the FP-5000 protection settings to determine appropriate
values for testing. Select the “Fault V&I
Phasors” menu item and
select the VA Phasor. Input the desired VA magnitude from 0 to 150 V
and the angle. Press “
Enter
” and then press “
Previous.
” Repeat these
steps to set the remaining voltages and currents to the desired test
values, then press “
Previous
” to return to the “Fault Simulation” menu.
• Using the down arrow key, select “Max Time (s):”. Enter the
maximum test time, in seconds (up to 600 seconds = 10 minutes),
that the simulation will be allowed to run without a trip condition.
• Scroll down to the “Start Simulation!” menu selection. Press
“
Enter
” to begin the simulation.
• Once the simulation is started and before a trip occurs, the “
Monitor
”
screens can be used to view the measured values of the simulated
voltages and currents.
• When a trip occurs, the front panel “
Log
” screens can be used to
view the cause of the trip and the voltages, currents and internal
flags at the time of trip.
• The time to trip can be viewed by reentering the front panel “
Test
”
function Fault Simulation/Stop Simulation, which includes a screen
showing the Simulation status, including the elapsed time in cycles.
The power and energy calculations continue to be based on the
measured current and voltage inputs, not the simulation values.
The fault simulation is aborted and normal protection is resumed if
measured currents go above 0.1 per unit.
11.2.5.2 Operate Relays
Note that the Healthy Relay cannot be overwritten. To test the
Healthy Relay, cycle power and the contacts should follow. To test
relays 1 – 6, lift the protective cover labeled “
Set
” and “
Test.
” Press
the “
Test
” button. Enter the unit’s password, then scroll down to
“Operate Relays” using the single arrow down key. The following
procedure will test relay 3 in this example. Scroll down using the
single arrow key to “Operate Rly3” and press “
Enter
”, then “
Enter
”
once again to confirm. With an ohmmeter measure between pins
113 and 114 of connector TB1 to verify that Relay 3 is closed. The
resistance should be close to zero ohms. Now press the “
Previous
”
button to return to the test menu. Scroll down to “Reset Relays” and
press “
Enter.
” Scroll down using the single down arrow key to
“Reset Rly3.” Press “
Enter
” and “
Enter
” again to confirm. Measure
between pins 113 and 114 of connector TB1 again. The ohmmeter
should read a high resistance or O.L. for an open circuit. This
exercise can be performed on all relays listed in the “Operate
Relays” menu.
Note:
Trip 1 & 2 relays have approximately 44K across the open
contacts as part of the monitor circuit.
11.3 Cleaning Instructions
Never clean the FP-5000 with the system or FP-5000 power
energized. Clean only with a dry, clean cloth. Do not use water or
solvents of any kind.
11.4 Trip Battery Check
The battery backed trip circuit latch is sourced by a user-accessible
disc/button type battery located under the bottom right hand
communication cover which is shared with the PowerPort RS232
interface. To test the battery simply push the test button to the left of
the battery holder with or without the FP-5000 powered. If the green
LED indicator, located above the battery holder, does not light the
batter has either expired or has been installed incorrectly. The
battery must be installed with the positive side up (as shown on the
front of the communication cover) and the power must be ON. The
battery can easily be replaced with a 2032 (20 x 3.2 mm) 200 mAhr,
3.0 V lithium button cell.
The battery must be installed while the FP-5000 is powered to
eliminate unnecessary wear on the battery. When power is removed
the battery maintains the trip status latch and drives the appropriate
LED. This will occur even with the inner case removed from the
outer chassis. A fresh battery should last a minimum of 72 hours. If
the battery is inserted while the power is off it may remain in
operation until it expires. This will cause the battery to become
useless if it is needed.
Note: If the battery is inserted when the FP-5000’s power is off you
may notice one or all of the LEDs flashing. The LEDs will be
restored to their proper state when the power is turned ON, and in
turn, will discontinue the use of the battery.
11.5 Power-up LED Indicator Status
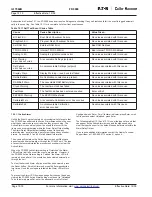
Upon power-up of the FP-5000, all 13 LEDs on the user interface
overlay and the four communication board LEDs viewed through
holes at the top of TB3 will light for ~ 1 second. If an LED fails to
light, this indicates there is an internal failure of the LED or related
circuitry, and the inner chassis is suspect and should be replaced or
returned for service. The Trip Battery test LED is a separate circuit
and does not light on power up, only when the pushbutton is pushed.


