background image

SLX9000 Adjustable Frequency Drives User Manual

MN04003020E 

For more information visit: 

www.eaton.com

2-3

January 2009

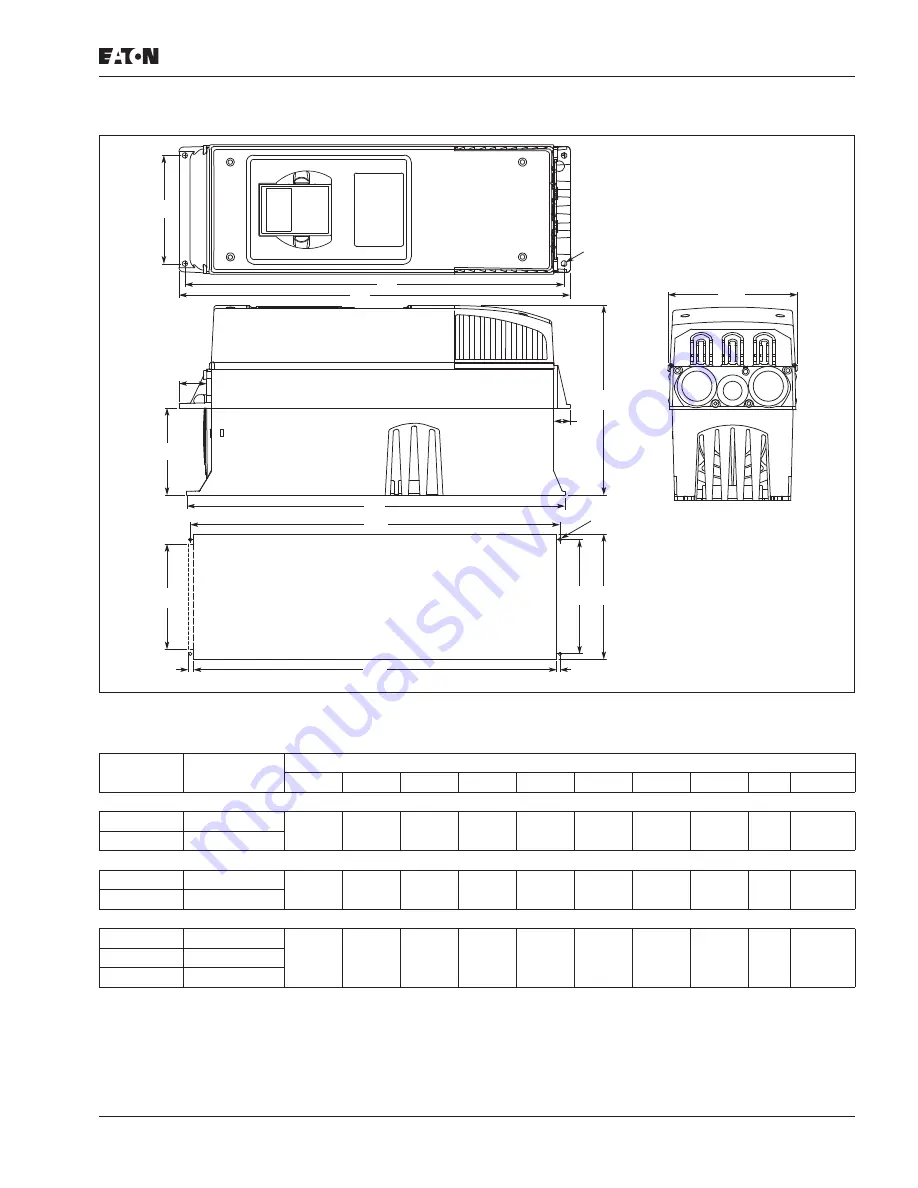
Figure 2-2: SLX9000 Dimensions, NEMA Type 1 and NEMA Type 12 with Flange Kit, MF4 – MF6

Table 2-2: Dimensions for SLX9000, MF4 – MF6 with Flange Kit 

Voltage

hp (I

H

)

Approximate Dimensions in Inches (mm)

W1

W2

H1

H2

H3

H4

H5

D1

D2

Dia. A

Frame Size — MF4

230

3/4 – 3

5.0
(128)

4.5
(113)

13.3
(337)

12.8
(325)

12.9
(327)

1.2
(30)

.9
(22)

7.5
(190)

3.0
(77)

.3
(7)

480

1 – 5

Frame Size — MF5

230

5 – 7-1/2

5.6
(143)

4.7
(120)

17.0
(434)

16.5
(420)

16.5
(419)

1.4
(36)

.7
(18)

8.4
(214)

3.9
(100)

.3
(7)

480

7-1/2 – 15

Frame Size — MF6

230

10 – 15

7.7
(195)

6.7
(170)

22.0
(560)

21.6
(549)

22.0
(558)

1.2
(30)

.8
(20)

9.3
(237)

4.2
(106)

.3
(7)

480

20 – 30

575

2 – 25

W2

H1

H2

D2

Flange Opening

H4

H5

H3

W1

Dia. A

D1

W3

W4

W5

Dia. B

H7

H6

H9

H8

Summary of Contents for Cutler-Hammer SLX9000 Series

Page 1: ...SLX9000 Adjustable Frequency Drives User Manual Effective January 2009 Supersedes October 2008...

Page 2: ......

Page 3: ...E ARE MADE REGARDING THE INFORMATION RECOMMENDATIONS AND DESCRIPTIONS CONTAINED HEREIN In no event will Eaton Electrical Inc be responsible to the purchaser or user in contract in tort including negli...

Page 4: ...3 8 CHAPTER 4 CONTROL WIRING 4 1 Control Unit 4 1 Control Connections 4 2 Motor Thermistor PTC Connection 4 9 CHAPTER 5 MENU INFORMATION 5 1 Keypad Operation 5 1 Indicators on the Keypad Display 5 1...

Page 5: ...Reference Parameters 9 33 Pump and Fan Control 9 40 Keypad Control Parameters 9 49 Control Signal Logic 9 50 APPENDIX A FAULT CODES A 1 APPENDIX B EXPANDER BOARD OPTAA B 1 Description of Expander Boa...

Page 6: ...e Accessories 3 5 Figure 3 5 Stripping of Cables 3 9 Figure 3 6 SLX9000 MF4 3 10 Figure 3 7 Cable Installation in SLX9000 MF4 3 10 Figure 3 8 SLX9000 MF5 3 11 Figure 3 9 Cable Installation in SLX9000...

Page 7: ...15 Ramp Speed Scaling Between Prohibit Frequencies 9 20 Figure 9 16 Linear and Squared Change of Motor Voltage 9 21 Figure 9 17 Programmable VHz Curve 9 22 Figure 9 18 Motor Cooling Power 9 26 Figure...

Page 8: ...use Sizes 230V Ratings 3 3 Table 3 3 Cable and Fuse Sizes 480V Ratings 3 4 Table 3 4 Cable and Fuse Sizes 575V Ratings 3 4 Table 3 5 Mounting Procedure 3 6 Table 3 6 Cable Spacings 3 8 Table 3 7 Cable...

Page 9: ...ng Values 8 6 Table 8 5 Basic Parameters P2 1 8 7 Table 8 6 Input Signals P2 2 8 9 Table 8 7 Output Signals G2 3 8 11 Table 8 8 Drive Control Parameters P2 4 8 12 Table 8 9 Prohibit Frequency Paramete...

Page 10: ...ult in minor to moderate injury or serious damage to the product The situation described in the CAUTION may if not avoided lead to serious results Important safety measures are described in CAUTION as...

Page 11: ...1 kW are live when drive is connected to mains even if the motor is not running Contact with this voltage is extremely dangerous and may cause death or severe injury WARNING The control I O terminals...

Page 12: ...connections CAUTION Do not perform any voltage withstand tests on any part of drive There is a certain procedure according to which the tests shall be performed Ignoring this procedure may result in d...

Page 13: ...function properly If fault current protective switches are used they need to be tested with ground fault currents present during possible fault situations Motor and Equipment Safety CAUTION Before sta...

Page 14: ...SLX9000 Adjustable Frequency Drives User Manual xii For more information visit www eaton com MN04003020E January 2009...

Page 15: ...o 15 hp IH and 480V Drives up to 30 hp IH are only available with Brake Chopper Option B All others come with Brake Chopper Option N as standard Factory promise delivery Consult Sales Office for avail...

Page 16: ...plication Control Block is based on microprocessor software The microprocessor controls the motor basing on the information it receives through measurements parameter settings control I O and control...

Page 17: ...cation Control Control Module PE Power Module RS 232 Option Board Measurements Gate Drivers Motor Control P Power Supply Fan 1 Integrated Input Module 2 Rectifier Control I O This measuring method onl...

Page 18: ...MF5 12 5 5 17 5 SLX005A1 2A1B0 5 17 5 7 1 2 25 SLX007A1 2A1B0 7 1 2 25 10 31 SLX010A1 2A1B0 MF6 10 31 15 48 SLX015A1 2A1B0 15 48 20 61 SLX020A1 2A1N0 FR7 20 61 25 75 SLX025A1 2A1N0 25 75 30 88 SLX030...

Page 19: ...23 20 31 SLX020A1 4A1B0 MF6 20 31 25 38 SLX025A1 4A1B0 25 38 30 46 SLX030A1 4A1B0 30 46 40 61 SLX040A1 4A1N0 FR7 40 61 50 72 SLX050A1 4A1N0 50 72 60 87 SLX060A1 4A1N0 60 87 75 105 SLX075A1 4A1N0 FR8...

Page 20: ...1N0 15 18 20 22 SLX020A1 5A1N0 20 22 25 27 SLX025A1 5A1N0 25 27 30 34 SLX030A1 5A1N0 FR7 30 34 40 41 SLX040A1 5A1N0 40 41 50 52 SLX050A1 5A1N0 FR8 50 52 60 62 SLX060A1 5A1N0 60 62 75 80 SLX075A1 5A1N0...

Page 21: ...equency control V f Open Loop Sensorless Vector Control Switching Frequency See Parameter 2 6 8 208 230V 3 4 15 hp 1 to 16 kHz default 10 kHz 20 30 hp 1 to 10 kHz default 3 6 kHz 380 500V 1 30 hp 1 to...

Page 22: ...OST R IEC 61800 5 see unit nameplate for more detailed approvals Control Connections Analog Input Voltage 0 10V Ri 200 k Resolution 10 bit accuracy 1 Analog Input Current 0 4 20 mA Ri 250 differential...

Page 23: ...e mounting surface is flat and strong enough to support the drive is not flammable and is not subject to excessive motion or vibration 3 Ensure that the minimum airflow requirements for your drive are...

Page 24: ...mm H1 H2 H3 D1 D2 D3 W1 W2 W3 R1 dia R2 dia N1 O D Frame Size MF4 230 3 4 3 12 9 327 12 3 313 11 5 292 7 5 190 3 0 77 5 0 126 5 0 128 3 9 100 5 13 3 7 11 0 5 3 1 1 28 480 1 5 Frame Size MF5 230 5 7 1...

Page 25: ...imate Dimensions in Inches mm W1 W2 H1 H2 H3 H4 H5 D1 D2 Dia A Frame Size MF4 230 3 4 3 5 0 128 4 5 113 13 3 337 12 8 325 12 9 327 1 2 30 9 22 7 5 190 3 0 77 3 7 480 1 5 Frame Size MF5 230 5 7 1 2 5 6...

Page 26: ...e Flange Opening MF4 MF6 Voltage hp IH Approximate Dimensions in Inches mm W3 W4 W5 H6 H7 H8 H9 Dia B Frame Size MF4 230 3 4 3 4 8 123 4 5 113 12 4 315 12 8 325 2 5 3 7 480 1 5 Frame Size MF5 230 5 7...

Page 27: ...ions NEMA Type 1 and NEMA Type 12 FR7 Table 2 4 SLX9000 Dimensions FR7 Voltage hp IH H1 H2 H3 D1 D2 D3 W1 W2 R1 dia R2 dia Wt lbs kg Knockouts Inches mm N1 O D Frame Size FR7 230V 20 30 24 8 630 24 2...

Page 28: ...9 Figure 2 5 SLX9000 Dimensions NEMA Type 1 and NEMA Type 12 FR8 Table 2 5 SLX9000 Dimensions FR8 Voltage hp IH Approximate Dimensions in Inches mm Wt lbs kg D1 H1 H2 H3 W1 W2 R1 dia R2 dia Frame Size...

Page 29: ...e hp IH Approximate Dimensions in Inches mm W1 W2 W3 W4 H1 H2 H3 H4 H5 H6 H7 D1 D2 Dia A Frame Size FR7 230 3 4 3 9 3 237 6 8 175 10 6 270 10 0 253 25 6 652 24 8 632 24 8 630 7 4 189 7 4 189 9 23 8 20...

Page 30: ...and 12 for the Flange Opening FR7 FR8 Voltage hp IH Approximate Dimensions in Inches mm W5 W6 W7 H8 H9 H10 H11 H12 H13 Dia B Frame Size FR7 230 3 4 3 9 2 233 6 9 175 10 0 253 24 4 619 7 4 189 7 4 189...

Page 31: ...mensions Extra width is allowed to change the fan without disconnecting cables A clearance around the drive see also B B clearance from one drive to another or distance to cabinet wall C free space ab...

Page 32: ...changed from class H to class T with a simple procedure presented in Figure 2 9 2 10 Figure 2 9 Changing of EMC Protection Class MF4 left and MF5 right 460V Figure 2 10 Changing of EMC Protection Clas...

Page 33: ...ser Manual MN04003020E For more information visit www eaton com 3 1 January 2009 Chapter 3 Power Wiring Power Connections Figure 3 1 Power Connections MF4 MF6 Figure 3 2 FR7 Power and Motor Wiring Ter...

Page 34: ...istance of at least 70 C The cables and the fuses must be dimensioned according to Tables 3 1 and 3 2 Installation of cables according to UL regulations is found on Page 3 15 The fuses also function a...

Page 35: ...Control Cable 4 4 4 4 Level C EN 61800 3 A11 1st environment unrestricted distribution EN 61000 6 3 Level H EN 61800 3 A11 1st environment restricted distribution EN 61000 6 4 Level L EN 61800 3 2nd...

Page 36: ...14 16 7 1 2 10 15 MF5 12 16 23 15 20 30 12 10 8 12 10 8 8 16 8 16 8 16 8 16 8 16 8 16 20 25 30 MF6 31 38 46 35 50 60 8 6 4 8 8 6 1 0 14 1 0 14 1 0 14 2 10 2 10 2 10 40 50 60 FR7 61 72 87 80 100 110 2...

Page 37: ...llation of the mains and motor cables in the drive Figure 3 4 Cable Accessories Note The cable accessories installation kit for drives of protection class NEMA Type 12 includes all components except 4...

Page 38: ...MN04003020E January 2009 Table 3 5 Mounting Procedure 1 Make sure that the plastic bag you have received contains all necessary components 2 Open the cover of the drive 3 Remove the cable cover Obser...

Page 39: ...Re install the cable cover Mount the cable clamps with the three M4x16 screws as shown Note that the location of the grounding bar in MF6 FR7 and FR8 is different from what is shown in the picture 5 P...

Page 40: ...ielded cables are used in parallel for the output on the larger units every cable must have its own overload protection Avoid placing the motor cables in long parallel lines with other cables If the m...

Page 41: ...oximate Dimensions in Inches mm A1 B1 C1 D1 A2 B2 C2 D2 MF4 59 15 1 38 35 39 10 79 20 28 7 1 97 50 28 7 1 38 35 MF5 79 20 1 57 40 39 10 1 18 30 79 20 2 36 60 39 10 1 57 40 MF6 79 20 3 54 90 59 15 2 36...

Page 42: ...or more information visit www eaton com MN04003020E January 2009 Installation of Cables to SLX9000 MF4 MF6 Figure 3 6 SLX9000 MF4 Figure 3 7 Cable Installation in SLX9000 MF4 Ground Terminals Mains Ca...

Page 43: ...es User Manual MN04003020E For more information visit www eaton com 3 11 January 2009 Figure 3 8 SLX9000 MF5 Figure 3 9 Cable Installation in SLX9000 MF5 Ground Terminals Mains Cable Motor Cable DC Te...

Page 44: ...s User Manual 3 12 For more information visit www eaton com MN04003020E January 2009 Figure 3 10 SLX9000 MF6 Figure 3 11 Cable Installation in SLX9000 MF6 Ground Terminals Mains Cable Motor Cable DC T...

Page 45: ...table Frequency Drives User Manual MN04003020E For more information visit www eaton com 3 13 January 2009 Installation of Cables to SLX9000 FR7 Figure 3 12 SLX9000 FR7 Figure 3 13 Cable Installation i...

Page 46: ...Manual 3 14 For more information visit www eaton com MN04003020E January 2009 Installation of Cables to SLX9000 FR8 Figure 3 14 SLX9000 FR8 Figure 3 15 Cable Installation in SLX9000 FR8 Supplied only...

Page 47: ...istance of the motor cable between each phase conductor as well as between each phase conductor and the protective ground conductor The insulation resistance must be 1M 2 Mains cable insulation checks...

Page 48: ...SLX9000 Adjustable Frequency Drives User Manual 3 16 For more information visit www eaton com MN04003020E January 2009...

Page 49: ...be OPTAI or OPTAA Do not use two OPTB_ or OPTC_ boards Also combinations of OPTB_ and OPTC_ boards are prohibited See descriptions for OPTAA and OPTAI option boards in Appendixes B and C All 230V FR7...

Page 50: ...al analog and digital inputs and outputs communication and additional application specific hardware The factory installed standard option board configuration includes an A9 I O board and an A2 relay o...

Page 51: ...t reverse 10 DIN3 Multi step speed selection 1 programmable Contact closed multi step speed 11 GND I O ground Ground for reference and controls 18 AO1 Output frequency Analog output Programmable Range...

Page 52: ...tact closed start reverse 10 DIN3 External fault input programmable Contact open no fault Contact closed fault 11 CMA Common for DIN1 DIN3 Connect to GND or 24V 12 24V Control voltage output Voltage f...

Page 53: ...250 0 10V Ri 200 k 5 AI2 Analog input common Differential input Allows 20V differential mode voltage to GND 6 24 Vout 24V auxiliary output voltage 10 maximum current 100 mA 7 GND I O ground Ground for...

Page 54: ...ower backup for the control and fieldbus Galvanically connected to terminal 12 7 GND I O ground Ground for reference and controls Galvanically connected to terminals 13 19 8 DIA1 Digital input 1 Ri mi...

Page 55: ...ons of SLX9000 drives Figure 4 4 Jumper Selection for SLX9000 MF4 MF6 Terminal Signal Technical Information 21 RO1 1 Normally Closed NC Switching Capacity 24V DC 8A 250V AC 8A 125V DC 0 4A Min Switchi...

Page 56: ...ions of the jumpers Running the motor with signal settings different from the jumper positions will not harm the drive but may damage the motor Note If you change the AI signal content also remember t...

Page 57: ...h the digital input DIN3 of SLX9000 drive The DIN3 is galvanically connected to other I Os of SLX9000 This is why reinforced or double insulation of the thermistor IEC 664 is absolutely required outsi...

Page 58: ...SLX9000 Adjustable Frequency Drives User Manual 4 10 For more information visit www eaton com MN04003020E January 2009...

Page 59: ...dicators for the control place I O term Keypad BusComm The control information i e the menu number the displayed value and the numeric information are represented with numeric symbols The drive is ope...

Page 60: ...cator Description RUN Motor is running Blinks when the stop command has been given but the frequency is still ramping down Indicates the direction of motor rotation STOP Indicates that the drive is no...

Page 61: ...RESET is used to reset active faults Note The motor may start immediately after resetting the faults Browser Button Up Browse the main menu and the pages of different submenus Edit values Browser But...

Page 62: ...Main Menu The user can navigate in the main menu with the Browser buttons up and down The desired submenu can be entered from the main menu with the Menu buttons When there still are pages to enter u...

Page 63: ...ADY I O Term STOP READY I O Term STOP READY I O Term STOP READY I O Term STOP READY I O Term STOP READY I O Term STOP READY I O Term STOP READY I O Term STOP READY I O Term Press to Reset Browse STOP...

Page 64: ...rt P2 9 PID control P2 10 Pump and fan control See the Multi control application manual for detailed parameter lists K3 Keypad control menu P3 1 P3 6 P3 1 Selection of control place R3 2 Keypad refere...

Page 65: ...ion indication M1 is visible on the display Figure 5 5 shows how to browse through the monitored values The monitored signals carry the indication V and listed in Table 5 5 The values are updated once...

Page 66: ...splay is desired Confirm the change with the ENTER button Code Signal Name Unit ID Description V1 1 Output frequency Hz 1 Frequency to the motor V1 2 Frequency reference Hz 25 V1 3 Motor speed rpm 2 C...

Page 67: ...Button Left for 1 to 2 seconds The basic parameters are listed in Chapter 6 You will find the complete parameter lists and descriptions in the Multi Control Application manual Once in the last parame...

Page 68: ...ear on the alphanumeric display I O terminals Keypad panel Fieldbus You can change the control place by entering the edit mode with Menu Button Right The options can then be browsed with the Browser b...

Page 69: ...ace Note See Table 5 6 for how to change the rotation direction STOP Button Activated By default pushing the STOP button will always stop the motor regardless of the selected control place You can dis...

Page 70: ...time by pressing Menu Button Left The memory of the drive can store a maximum of 5 faults in order of appearance The latest fault is indicated by H5 1 the one before that by H5 2 and so on If there ar...

Page 71: ...ault Cust Selections S6 3 Copy parameters P6 3 1 Parameter sets 0 Select 1 Store set 1 2 Load set 1 3 Store set 2 4 Load set 2 5 Load factory defaults 6 Fault 7 Wait 8 OK S6 5 Security P6 5 2 Paramete...

Page 72: ...pplication ID A6 8 4 1 2 Application version A6 8 4 1 3 Firmware interface S6 8 5 Hardware info I6 8 5 2 Unit voltage V I6 8 5 3 Brake chopper 0 Not present 1 Present S6 8 6 Options S6 8 6 1 Slot E OP...

Page 73: ...menu You can store or load two customized parameter sets or load back the factory defaults Confirm with the ENTER button Wait until 8 OK appears on the display Figure 5 11 Storing and Loading of Para...

Page 74: ...enu under the System menu you can further customize your drive operator interface Locate the Keypad Setting submenu S6 6 Under the submenu there are two pages P associated with the keypad operation De...

Page 75: ...ter the edit mode by pressing Menu Button Right Set the desired timeout time and confirm it with the ENTER button You can return to the previous menu at any time by pressing Menu Button Left Note This...

Page 76: ...mode by pushing the Menu Button Right The present mode shown starts to blink Use the Browser buttons to change the fan mode Accept the change with the ENTER button or return to the previous level with...

Page 77: ...formation In the submenu S6 8 under the System menu you can find drive related hardware and software information as well as operation related information Enter the Info menu by pressing the Menu Butto...

Page 78: ...to reset the operation counters you should do the following Figure 5 16 MWh Counter Reset Software Into Submenu S6 8 3 The following information can be found under the Software Info submenu S6 8 3 Ta...

Page 79: ...on board connected to the control board see Chapter 4 You can check the status of the slot by entering the board submenu with the Menu Button Right and using the Browser buttons Push the Menu Button R...

Page 80: ...Make sure that the jumper selections correspond to the selections of this parameter See Figure 4 4 Modbus Interface SLX9000 has a built in Modbus RTU bus interface The signal level of the interface i...

Page 81: ...LX9000 Termination Resistor The RS 485 bus is terminated with 120 termination resistors in both ends SLX9000 has a built in termination resistor which is switched off as a default See the jumper selec...

Page 82: ...32102 42102 FB General Status Word Binary coded 2103 32103 42103 FB Actual Speed 0 01 2104 32104 42104 Motor speed 0 01 Hz 2105 32105 42105 Motor speed 1 Rpm 2106 32106 42106 Motor current 0 1 A 2107...

Page 83: ...frequencies Table 5 22 Bit Definitions Fieldbus Parameters RS 485 Communication Status I6 10 1 With this function you can check the status of the RS 485 bus If the bus is not in use this value is 0 x...

Page 84: ...0 None 1 Odd 2 Even Communication time out P6 10 7 If communication between two messages is broken for a longer time than that defined by this parameter a communication error is initiated If the valu...

Page 85: ...ive when the drive is connected to DC supply even if the motor is not running The control I O terminals are isolated from the mains potential However the relay outputs and other I O terminals may have...

Page 86: ...the quality and quantity of cooling air See Chapter 2 Mounting Space Dimensions 4 Check the inside of the drive for condensation 5 Check that all Start Stop switches connected to the I O terminals ar...

Page 87: ...erence Press the STOP button on the keypad 9 Run the start up tests without the motor being connected to the process If this is not possible make sure that running each test is safe prior to running i...

Page 88: ...START STOP reset ENTER START STOP reset ENTER START STOP reset rpm A 0 Hz 50 Hz 20 Hz 50 Hz 20 Hz 50 Hz 0 Hz 50 Hz 60 Hz 0 Ramp 0 Ramp 0 Ramp 0 Ramp 0 Coasting 0 Coasting 1 Ramp 0 Coasting I O I O I...

Page 89: ...Note If you wish to edit the special parameters you must set the value of par 2 1 22 to 0 Column explanations Code Location indication on the keypad Shows the operator the present param number Parame...

Page 90: ...ed DC link voltage V1 9 Unit temperature C 8 Heatsink temperature V1 10 Analog input 1 V 13 AI1 V1 11 Analog input 2 14 AI2 V1 12 Analog output current 26 AO1 V1 13 Analog output current 1 expander bo...

Page 91: ...inal voltage of the motor 180 690 V 240V 230V 480V 400V 110 P2 1 7 Nominal frequency of the motor 30 00 320 00 Hz 50 00 111 Check the rating plate of the motor P2 1 8 Nominal speed of the motor 300 20...

Page 92: ...ot used 1 Start Reverse 2 Reverse 3 Stop pulse 4 External fault cc 5 External fault oc 6 Run enable 7 Preset speed 2 8 Motor pot UP cc 9 Disable PID Direct freq reference 10 Interlock 1 P2 1 18 DIN3 f...

Page 93: ...digital input The PID controller actual value can be selected from the analog inputs fieldbus or the actual values of the motor PID controller can also be used when the drive is controlled via fieldbu...

Page 94: ...ary 2009 Adjustable switching frequency Autorestart function after fault Protections and supervisions all fully programmable off warning fault Current input fault External fault Output phase Undervolt...

Page 95: ...closed start forward 9 DIN2 Start reverse programmable Contact closed start reverse 10 DIN3 Multi step speed selection 1 programmable Contact closed multi step speed 11 GND I O ground Ground for refe...

Page 96: ...tact closed start reverse 10 DIN3 External fault input programmable Contact open no fault Contact closed fault 11 CMA Common for DIN1 DIN3 Connect to GND or 24V 12 24V Control voltage output Voltage f...

Page 97: ...ven in Chapter 9 Column explanations Code Location indication on the keypad Shows the operator the present parameter number Parameter Name of parameter Min Minimum value of parameter Max Maximum value...

Page 98: ...easured DC link voltage V1 9 Unit temperature C 8 Heat sink temperature V1 10 Analog input 1 13 AI1 V1 11 Analog input 2 14 AI2 V1 12 Analog output current mA 26 AO1 V1 13 Analog output current 1 expa...

Page 99: ...400V 110 P2 1 7 Nominal frequency of the motor 30 00 320 00 Hz 50 00 111 Check the rating plate of the motor P2 1 8 Nominal speed of the motor 300 20 000 rpm 1440 112 The default applies for a 4 pole...

Page 100: ...lue 12 PI controller output P2 1 17 DIN2 function 0 10 1 319 0 Not used 1 Start Reverse DIN1 Start forward 2 Reverse DIN1 Start 3 Stop pulse DIN1 Start pulse 4 External fault cc 5 External fault oc 6...

Page 101: ...Not used 1 Reverse 2 External fault cc 3 External fault oc 4 Fault reset 5 Run enable 6 Preset speed 1 7 Preset speed 2 8 DC braking command 9 Motor pot UP cc 10 Motor pot DOWN cc 11 Disable PID PID c...

Page 102: ...tting 0 00 100 00 0 00 391 P2 2 14 AI2 custom maximum setting 0 00 100 00 100 00 392 P2 2 15 AI2 inversion 0 1 0 398 0 Not inverted 1 Inverted P2 2 16 AI2 filter time 0 00 10 00 s 0 10 389 0 No filter...

Page 103: ...oard relay output 1 function 0 19 2 314 Same as parameter 2 3 1 P2 3 3 Expander board relay output 2 function 0 19 3 317 Same as parameter 2 3 1 P2 3 4 Expander board digital output 1 function 0 19 1...

Page 104: ...Min Max Unit Default Cust ID Note P2 4 1 Ramp 1 shape 0 0 10 0 s 0 0 500 0 Linear 0 S curve ramp time P2 4 2 Brake chopper 0 3 0 504 0 Disabled 1 Used in Run state 3 Used in Run and Stop state P2 4 3...

Page 105: ...nt voltage 0 00 100 00 100 00 605 n x Unmot Parameter max value par 2 6 4 P2 6 7 Output voltage at zero frequency 0 00 40 00 0 00 606 n x Unmot P2 6 8 Switching frequency 1 0 16 0 kHz 6 0 601 Depends...

Page 106: ...0 3 0 713 Same as parameter 2 7 1 P2 7 16 Underload curve at nominal frequency 10 0 150 0 50 0 714 P2 7 17 Underload curve at zero frequency 5 0 150 0 10 0 715 P2 7 18 Underload protection time limit...

Page 107: ...N2 3 Motor torque 4 Motor speed 5 Motor current 6 Motor power P2 9 4 PID controller gain 0 0 1000 0 100 0 118 P2 9 5 PID controller I time 0 00 320 00 s 10 00 119 P2 9 6 PID controller D time 0 00 10...

Page 108: ...ux pumps 2 Autochange with drive aux pumps 3 Autochange and interlocks aux pumps 4 Autochange and interlocks drive aux pumps P2 10 5 Autochange interval 0 0 3000 0 h 48 0 1029 0 0 TEST 40 s Elapsed ti...

Page 109: ...Menu S6 For parameters and functions related to the general use of the drive such as customized parameter sets or information about the hardware and software see Page 5 13 Expander Boards Control Key...

Page 110: ...SLX9000 Adjustable Frequency Drives User Manual 8 18 For more information visit www eaton com MN04003020E January 2009...

Page 111: ...cy par 2 1 2 2 1 5 Current limit ID107 This parameter determines the maximum motor current from the drive To avoid motor overload set this parameter according to the rated current of the motor The cur...

Page 112: ...ssible to ride through short utility voltage interruptions 2 1 12 Stop function ID506 Coasting 0 The motor coasts to a halt without control from the drive after the Stop command Ramp 1 After the Stop...

Page 113: ...transducer 2 Keypad reference parameter R3 2 3 Reference from Fieldbus FBSpeedReference 4 Motor potentiometer reference 5 AI1 AI2 selection Selection of AI2 is made programmable by DIN3 Function P2 1...

Page 114: ...t is displayed and motor stopped when the input is active 5 External fault Contact open Fault is displayed and motor stopped when the input is not active 6 Run enable Contact open Start of motor disab...

Page 115: ...speed 1 7 Preset speed 2 8 DC braking command Contact closed In Stop mode the DC braking operates until the contact is opened DC braking current is about 10 of the value selected with par 2 4 3 9 Mot...

Page 116: ...only the basic parameters B2 1 can be browsed with the keypad 2 2 1 Expander board DIE1 function ID368 This parameter has 12 selections If the expander board digital input DIN1 is not used set the pa...

Page 117: ...Expander board inputs Input number 0 Input 1 Input number 1 Input 2 Input number 2 Input 3 Input number 9 Input 10 Example If you set the value of this parameter to 10 you have selected the local inpu...

Page 118: ...AI1 custom setting minimum AI1 custom setting maximum ID380 ID381 Set the custom minimum and maximum levels for the AI1 signal within 0 10V 2 2 9 AI1 signal inversion ID387 By setting the parameter va...

Page 119: ...14 100 2 2 13 2 2 14 AI2 custom minimum AI2 custom maximum ID391 ID392 These parameters allow you to scale the input current signal between 0 and 20 mA Similar to parameters 2 2 7 and 2 2 8 2 2 15 An...

Page 120: ...ontrolled from the keypad 0 AI1 reference by default AI1 terminals 2 and 3 e g potentiometer 1 AI2 reference by default AI2 terminals 5 and 6 e g transducer 2 Keypad reference parameter 3 2 3 Referenc...

Page 121: ...ists 9 Reversed The reverse command has been selected 10 Preset speed A preset speed has been selected 11 At speed The output frequency has reached the set reference 12 Motor regulator activated Overv...

Page 122: ...2 3 5 Analog output function ID307 This parameter selects the desired function for the analog output signal See Table 8 5 for the parameter values 2 3 6 Analog output filter time ID308 Defines the fil...

Page 123: ...t signal Maximum set value parameter 2 3 9 0 Not inverted 1 Inverted See parameter 2 3 9 below 2 3 8 Analog output minimum ID310 Sets the signal minimum to either 0 mA or 4 mA living zero Note the dif...

Page 124: ...or voltage 100 x Vnmotor DC link voltage 1000 V PI ref value 100 x ref value max PI act value 1 100 x actual value max PI error value 100 x error value max PI output 100 x output max 2 3 10 2 3 11 Exp...

Page 125: ...upervised by parameter 2 3 12 2 3 14 Analog input supervision ID356 With this parameter you can select the analog input to be supervised 0 Not used 1 AI1 2 AI2 2 3 15 Analog input supervision OFF limi...

Page 126: ...RO1 Output Signal Programmed to Relay Output ON Delay ID487 OFF Delay ID488 2 4 1 Acceleration Deceleration ramp 1 shape ID500 The start and end of the acceleration and deceleration ramps can be smoot...

Page 127: ...me at stop ID508 Determines if braking is ON or OFF and the braking time of the DC brake when the motor is stopping The function of the DC brake depends on the stop function parameter 2 1 12 0 DC brak...

Page 128: ...defined with parameter 2 4 5 where the DC braking starts The braking time is defined with parameter 2 4 4 If high inertia exists it is recommended to use an external braking resistor for faster decele...

Page 129: ...d the flux in the motor is increased which in turn increases the motor s capability to brake Unlike DC braking the motor speed remains controlled during braking Flux braking can be set ON or OFF 0 Flu...

Page 130: ...ibit frequency limits ID518 Defines the acceleration deceleration time when the output frequency is between the selected prohibit frequency range limits parameters 2 5 1 and 2 5 2 The ramping time sel...

Page 131: ...o the field weakening point where the nominal voltage is supplied to the motor Linear VHz ratio should be used in constant torque applications See Figure 9 16 This default setting should be used if th...

Page 132: ...arameter Below the frequency at the field weakening point the output voltage depends on the setting of the VHz curve parameters See parameters 2 1 13 2 6 2 2 6 5 2 6 6 and 2 6 7 and Figure 9 17 When t...

Page 133: ...ps may occur when controllers are switched out of operation 0 Controller switched off 1 Controller switched on 2 6 11 Identification ID631 0 No action 1 ID no run When ID no run is selected the drive...

Page 134: ...2 1 12 3 Fault stop mode after fault always by coasting For the undervoltage limits see Table 1 8 Note This protection can not be inactivated 2 7 4 Output phase supervision ID702 0 No response 1 Warn...

Page 135: ...s The thermal current IT specifies the load current above which the motor is overloaded This current limit is a function of the output frequency 2 7 6 Motor thermal protection ID704 0 No Response 1 Wa...

Page 136: ...ferent motor manufacturers If the motor s t6 time t6 is the time in seconds the motor can safely operate at six times the rated current is known given by the motor manufacturer the time constant param...

Page 137: ...from short time overload situations such as one caused by a stalled shaft The reaction time of the stall protection can be set shorter than that of motor thermal protection The stall state is defined...

Page 138: ...ntering a greater value than InMotor 2 If the parameter 2 1 9 Nominal current of motor is changed this parameter is automatically restored to the default value InMotor 1 3 2 7 13 Stall time ID711 This...

Page 139: ...rque values for setting the underload curve are set in percentage of nominal torque of the motor The motor s nameplate data the parameter Motor nominal current and the drive s nominal current IL are u...

Page 140: ...r nominal current this parameter is automatically restored to the default value 2 7 18 Underload time ID716 This time can be set between 2 0 and 600 0 s This is the maximum time allowed for an underlo...

Page 141: ...board slot fault due to missing or broken board See parameter 2 7 19 2 7 22 Actual value supervision function ID735 0 Not used 1 Warning if actual value falls below the limit set with par 2 7 23 2 Wa...

Page 142: ...comes active Otherwise the fault is cleared after the trial time has elapsed and the next fault starts the trial time count again If a single fault remains during the trial time a fault state is true...

Page 143: ...rom the fieldbus FBProcessDataIN1 2 9 3 Actual value input ID334 0 AI1 1 AI2 2 Fieldbus Actual value 1 FBProcessDataIN2 Actual value 2 FBProcessDataIN3 3 Motor torque 4 Motor speed 5 Motor current 6 M...

Page 144: ...e examples below Example 1 In order to reduce the error value to zero with the given values the drive output behaves as follows Given values Par 2 9 4 P 0 PID max limit 100 0 Par 2 9 5 I time 1 00 s P...

Page 145: ...er is switched on the system detects the difference between the setpoint and the actual process value and starts to either raise or decrease in case the error value is negative the PID output accordin...

Page 146: ...z Error value setpoint process value 10 s Max freq 50 Hz As the error value increases the PID output also increases according to the set values D time 1 00s 2 9 7 Actual value 1 minimum scale ID336 Se...

Page 147: ...ing the drive to Run state when the actual value signal either falls below or exceeds see par 2 9 13 the Wake up level determined by parameter 2 9 12 See Figure 9 29 2 9 11 Sleep delay ID1017 The mini...

Page 148: ...more information visit www eaton com MN04003020E January 2009 Figure 9 29 Sleep Function Wake Up Level Par ID1018 Sleep Level Par ID1016 t Par ID1017 Start Stop Status of the Var Speed Drive Stop Runn...

Page 149: ...in percent of the maximum actual value 2 Wake up happens when actual value goes below the limit The limit defined with parameter ID1018 is in percent of the current value of the reference signal 3 Wa...

Page 150: ...0 4 The Autochange function makes it possible to equalize the run times of the motors and to prevent for example pump stalls due to running breaks that are too long Apply the Autochange function with...

Page 151: ...as follows If the number of running auxiliary drives is smaller than the value of parameter 2 10 6 the autochange function can take place If the number of running auxiliary drives is equal to the valu...

Page 152: ...I2 6 24V Control voltage output 7 GND I O ground 8 DIN1 Start 9 DIN2 Interlock 1 par 2 1 17 10 10 DIN3 Interlock 2 par 2 1 18 13 11 GND I O ground 18 AO1 Output frequency 19 AO1 Analog output A RS 485...

Page 153: ...of 3 Pump Autochange Main Diagram 230V AC Drive OPTB5 22 24V DC DIN2 6 8 23 Mains A O S1 K3 K2 K2 K1 1 K1 K1 M1 Drive M1 Mains K3 K1 1 25 DIN3 9 26 Mains A O S2 K3 K1 K2 K2 1 K2 K2 M2 Drive M2 Mains K...

Page 154: ...nfiguration with Two Pumps MF4 MF6 460V Terminal Signal 1 10Vref Reference output 2 AI1 Voltage input frequency reference DIN4 3 AI1 I O Ground 4 AI2 PID Actual Value 5 AI2 6 24V Control voltage outpu...

Page 155: ...System Principal Control Diagram Figure 9 33 Example of 2 Pump Autochange Main Diagram 230V AC OPTA2 OPTAA 22 RO1 24V DC DIN2 12 9 23 Mains A O S1 K2 RO1 K2 K1 1 K1 K1 M1 Drive M1 Mains K1 1 25 DIN3 1...

Page 156: ...y for the time defined with this parameter before the auxiliary drive is started The delay defined applies to all auxiliary drives This prevents unnecessary starts caused by momentary start limit exce...

Page 157: ...auxiliary pumps The drive controlled by the drive is included in the automatics and a contactor is needed for each drive to connect it to either the mains or the drive 4 Autochange and interlocks Driv...

Page 158: ...below which the capacity used must remain so that the autochange can take place This level is defined as follows If the number of running auxiliary drives is smaller than the value of parameter 2 10 6...

Page 159: ...nformation see Page 5 11 P3 3 Keypad direction This parameter allows you to invert the error value of the PID controller and thus the operation of the PID controller 0 Forward The rotation of the moto...

Page 160: ...set Speed 2 DIN3 DIN2 AI2 Exp DIE1 Preset Speed 1 Exp DIE3 DIN3 DIN3 Exp DIE1 DIN3 Exp DIE1 DIE2 DIN1 Direction from Fieldbus Start Stop from Fieldbus P3 5 PID Keypad Reference Reference from Fieldbus...

Page 161: ...n Table 1 8 too short a deceleration time high overvoltage spikes in supply Set the deceleration time longer 3 Ground Fault Current measurement has detected that the sum of motor phase currents is not...

Page 162: ...e sure that the switching frequency is not too high in relation to ambient temperature and motor load 15 Motor stalled Motor stall protection has tripped Check motor 16 Motor overtemperature motor ove...

Page 163: ...is broken or loose signal source has failed Check the current loop circuitry 51 External fault Digital input failed Digital input has been programmed as external fault input and this input is active...

Page 164: ...SLX9000 Adjustable Frequency Drives User Manual A 4 For more information visit www eaton com MN04003020E January 2009...

Page 165: ...d OPTAA Note The 24V control voltage terminal can also be used to power the control module but not the power module K1 X5 X3 C15 C12 C11 C7 C5 R131 C61 R20 R132 V2 C62 R2 C1 R4 R5 V5 C2 R5 C3 R7 R6 V3...

Page 166: ...SLX9000 Adjustable Frequency Drives User Manual B 2 For more information visit www eaton com MN04003020E January 2009...

Page 167: ...power the control module but not the power module V26 C12 C15 C17 V25 V27 V26 V22 V11 L1 V9 V28 R66 R59 R60 C45 V24 V4 K2 D23 R44 C26 C24 R47 R8 C7 V20 R49 C8 R15 R13 T2 R12 R14 V6 R16 R18 C62 R5 C3 R...

Page 168: ...SLX9000 Adjustable Frequency Drives User Manual C 2 For more information visit www eaton com MN04003020E January 2009...

Page 169: ...t DI Digital Input DO Digital Output RO Relay Output A B C D E Option Kit Description Allowed Slot Locations Field Installed Factory Installed 9000X Ready Programs Catalog Number Option Designator Bas...

Page 170: ...tion Kit Description Allowed Slot Locations Field Installed Factory Installed 9000X Ready Programs Catalog Number Option Designator Basic Local Remote Standard MSS PID Multi P PFC Extended I O Card Op...

Page 171: ......

Page 172: ...vices Eaton s global electrical brands including Cutler Hammer MGE Office Protection Systems Powerware Holec MEM Santak and Moeller provide customer driven PowerChain Management solutions to serve the...

Reviews: