9
Instruction Leaflet
IL29C614F
Effective December 2011
Instructions for The Digitrip RMS 310 3-Pole and
4-Pole Trip Unit Installation and Operation with
K-Frame Series C Circuit Breakers
EATON CORPORATION
www.eaton.com
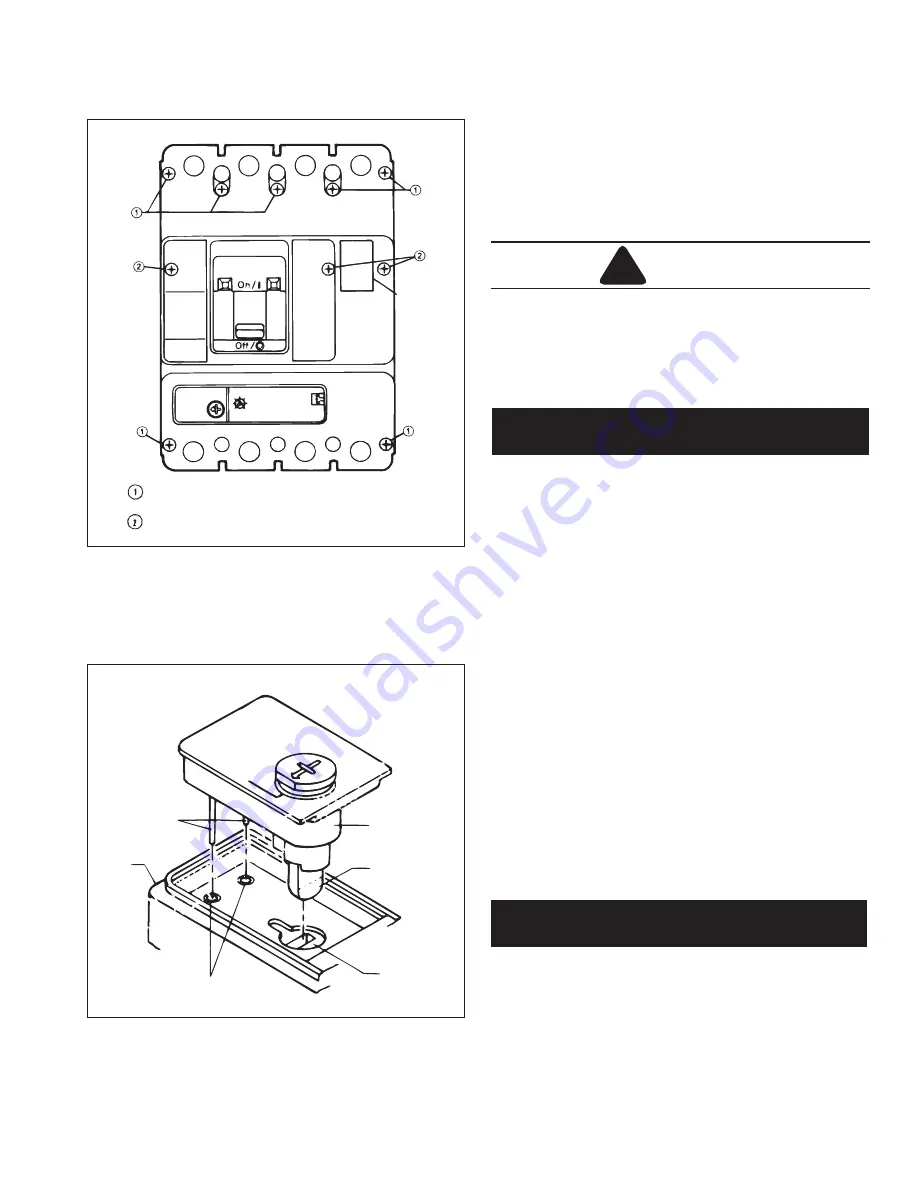
Install circuit breaker cover and pan-head screws fol-
lowed by thread forming screws as shown in Figure
10
.
An additional label is included with each four pole trip
unit. Position the label marked
Fourth Pole Protected
in the location shown in Figure
10
.
THE RATING PLUG MECHANICALLY INTERLOCKS
WITH THE TRIP UNIT. IF THE RATING PLUG IS NOT
CORRECTLY INSTALLED, THE CIRCUIT BREAKER
CANNOT BE RESET OR PLACED IN THE ON POSI-
TION.
Before attempting to install the rating plug, the
arrow in the Push-to-Trip button portion of the plug
must be pointing toward the REMOVE position. This
can be done with a small screwdriver.
Install rating plug. Position the rating plug as shown in
Figure
11
. Insert the rating plug in the trip unit. The two
pins and plunger must align correctly with the matching
receptacles and slot in the trip unit. After the rating plug
is pressed into position, depress the Push-to-Trip button
with a small screwdriver and turn it clockwise one quar-
ter of a turn until the arrow points to ENGAGED. If an
adjustable rating plug is used, four continuous current
settings are possible. Set the switch marked A, B, C, D
to the current rating desired (see Figure
13
).
Reset circuit breaker by moving handle to the reset
position. Move handle to the ON position. Circuit break-
er handle should remain at the ON position.
Press Push-to-Trip button (in rating plug) to check man-
ual tripping of the circuit breaker.
The status light monitors the operation of the trip unit as
explained in Section 4.0.
The reverse procedure is used to remove the rating
plug. Turn the Push-to-Trip button to the remove
position. This action will cause the circuit breaker to
trip. Then grasp the lip of the Push-to-Trip button
and gently pull. A small screwdriver placed under
the left edge of the rating plug will assist in removal.
Figure 10 Cover Screw Installation Positions.
Fourth
Pole
Protected
Label
Screw, .190-32 x 3.125 in. (79.38 mm), Pan Head, Cross-
Screw, No. 8 x 1.63 in. (41.40 mm), Flat Head, Cross-Recessed,
Thread Forming.
!
CAUTION
Figure 11 Installing Rating Plug.
Slot
Plunger
Rating Plug
Receptacles
Trip
Unit
Pins
Push-to-
Trip
Engaged
Remove
NOTICE
NOTICE
Recessed.


