background image


Application Note  Establish Ethernet connection between easyE4 and easySoft V7  04/2020

 AP050013ENEN


 www.eaton.com 

21


6.2


Connecting to easyE4 via "

DHCP

“ 

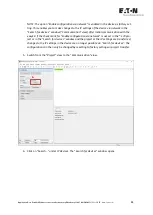
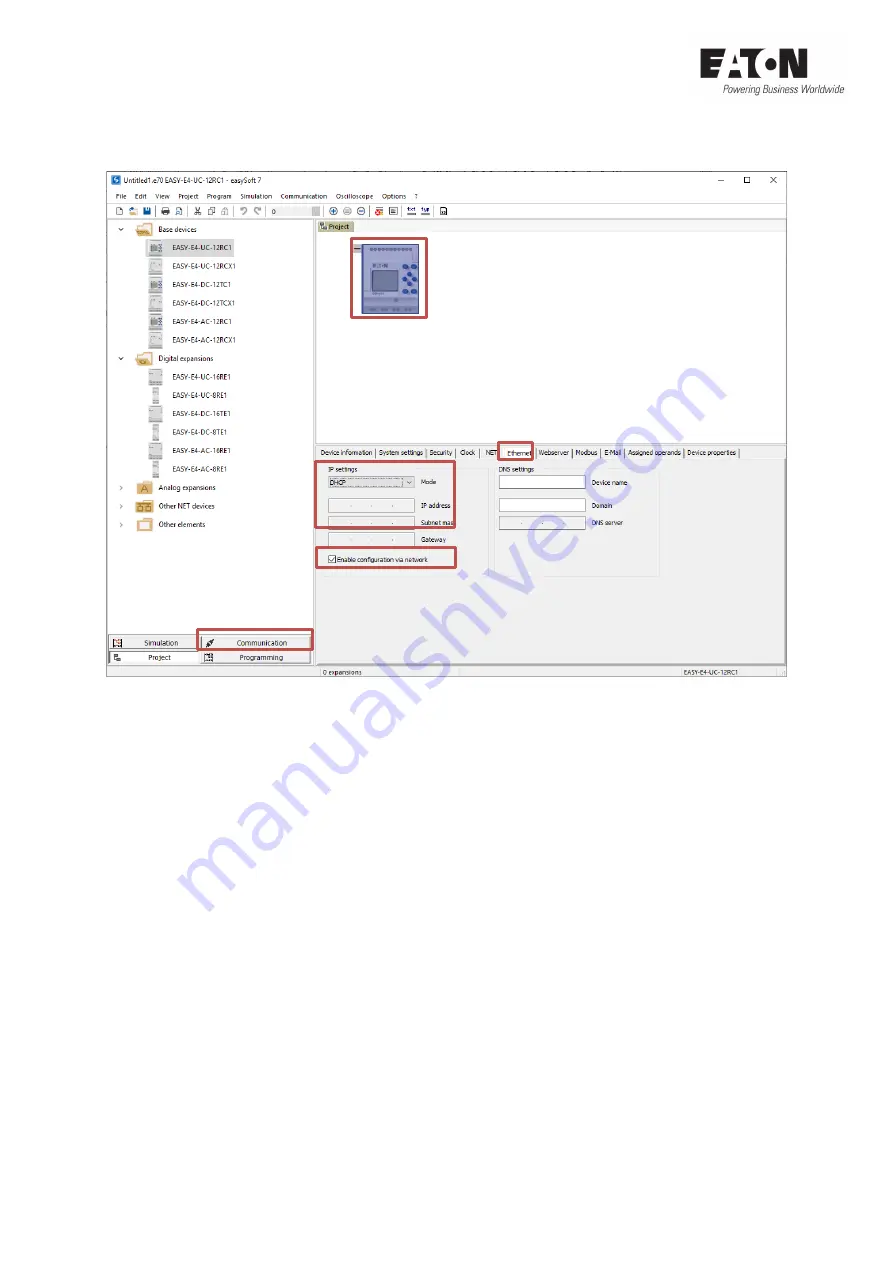
 Connect the easyE4 to your PC via Ethernet and open the easySoft V7. 


1.


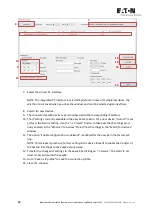
Select the connected device type from the device catalog and add it to the work pane via 
drag and drop. Click on the device to display the tabs below with the detailed properties of 
the device.  

2.


Switch to the register "

Ethernet

".  

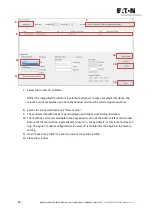
3.


Select "

DHCP

" in the IP settings. 

4.


Decide whether you want to continue to enable the option "

Enable configuration via net-

work

" in the easyE4. If so, check this box. By default, the check mark is not set in a new *.e70 

project. 
 

NOTE: The option "Enable configuration via network" is enabled in the device as factory set-
ting. This enables you to make changes to the IP settings of the device via network in the 
"Search Devices" window ("Communication" view) after initial communication with the 
easyE4. If the check mark for "Enable configuration via network" is not set in the *.e70 pro-
ject or in the "Search devices" window and the project or the IP settings are transferred, 
changes to the IP settings in the device are no longer possible via "Search devices". The con-
figuration can then only be changed by resetting to factory settings or project transfer. 
 

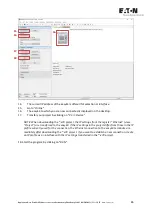
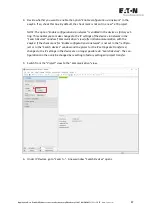
5.


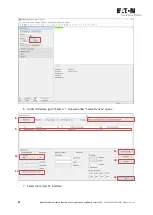
Switch from the "

Project

" view to the "

Communication

" view.


3. 

4. 

2. 

1. 

5.


Summary of Contents for easyE4 series

Page 1: ...V7 Establish Ethernet connection between easyE4 and easySoft V7 Level 2 1 Fundamental No previous experience necessary 2 Basic Basic knowledge recommended 3 Advanced Reasonable knowledge required 4 E...

Page 2: ......

Page 3: ...sures should be implemented for the I O interface so that a line or wire breakage on the signal side does not result in undefined states in the automation devices Deviations of the mains voltage from...

Page 4: ...e with the current state of the art The program examples provided were created to the best of our knowledge and belief and in accordance with the current state of the art However errors cannot be tota...

Page 5: ...ces Window Communication View 7 3 3 IP settings and setting a fixed IP address on the device 9 3 3 1 IP settings on the device 9 3 3 2 Setting a static IP address on the device 10 4 Ethernet connectio...

Page 6: ...easyE4 is via the Auto IP IP setting This IP setting is the factory setting of the easyE4 and enables fast coupling to the device even for network newcomers The IP addresses for PC and device are assi...

Page 7: ...sure that the Ethernet connection described below can function properly with the easyE4 NOTE In this application note a USB to Ethernet adapter is used to connect the easyE4 to the PC You can also con...

Page 8: ...syE4 and easySoft V7 04 2020 AP050013EN www eaton com 2 Click on the Ethernet network to which the easyE4 is connected The network status opens 3 Open the Properties of the network 4 Select Internet P...

Page 9: ...5 a If you now select Obtain IP address automatically the IP address of the PC will be as signed automatically via a DHCP server or via Auto IP b If you select Use the following IP address the PC oper...

Page 10: ...rite the existing IP settings in the easyE4 When creating a new e70 project you define the IP settings of the easyE4 1 Select in the Project view the appropriate device type from the device catalog on...

Page 11: ...E4 If the check mark for Enable configuration via network is not set in the e70 project or in the Search for devices win dow and the e70 project or the IP settings are transferred changes to the IP se...

Page 12: ...P settings currently set in the easyE4 are displayed in the bot tom left of the window You can change the IP settings at this point 6 or use the Project button to transfer the IP settings set in the p...

Page 13: ...ou can also change the IP settings via the easyE4 keyboard Your easyE4 must be in STOP for this Start display of the easyE4 Press OK and proceed with the arrow key to System Opt Press OK and use the a...

Page 14: ...3 3 2 Setting a static IP address on the device If you selected Static IP in the IP settings assign a fixed IP address and subnet mask to the device Use the arrow key to go to IP Address Press OK The...

Page 15: ...t V7 04 2020 AP050013ENEN www eaton com 11 Assign a subnet mask to the device Use the arrow key to go to Subnet Mask Use the arrow keys to define a subnet mask With OK it is accepted and you get to th...

Page 16: ...face of your PC to Obtain IP address automatically Network settings of the PC 4 2 Connecting to easyE4 via Auto IP Connect the easyE4 to your PC via Ethernet and open the easySoft V7 1 Select the conn...

Page 17: ...view after initial communication with the easyE4 If the check mark for Enable configuration via network is not set in the e70 pro ject or in the Search for devices window and the project or the IP set...

Page 18: ...Search for connected devices via New search 9 The connected easyE4 device type is displayed with the corresponding IP address 10 The IP settings currently available in the easyE4 are read in at the b...

Page 19: ...n PC Device NOTE When downloading the e70 project the IP settings from the register Ethernet view Project are transferred to the easyE4 If the IP settings in the project differ from those in the IP pr...

Page 20: ...2 168 1 3 that of the easyE4 192 168 1 4 Set your PC to Use the following IP address Network settings of the PC and assign it a fixed IP address and a subnet mask 5 2 Connecting to easyE4 via Static I...

Page 21: ...es to the IP settings of the device via network in the Search Devices window Communication view after initial communication with the easyE4 If the check mark for Enable configuration via network is no...

Page 22: ...ad in For a new device Auto IP is set as this is the factory setting Use the Project button to take over the IP settings previ ously entered in the Ethernet tab view Project as IP settings in the Sear...

Page 23: ...Device NOTE When downloading the e70 project the IP settings from the register Ethernet view Project are transferred to the easyE4 Depending on how these are set i e different from those in the IP pr...

Page 24: ...the easyE4 base device relevant only if DHCP is se lected in the IP settings The DHCP service will automatically assign the easyE4 base device an IP address and assign this IP address to the device na...

Page 25: ...in the easyE4 If so check this box By default the check mark is not set in a new e70 project NOTE The option Enable configuration via network is enabled in the device as factory set ting This enables...

Page 26: ...e Establish Ethernet connection between easyE4 and easySoft V7 04 2020 AP050013EN www eaton com 6 Under IP Devices go to Search A new window Search Devices opens 7 Select the correct PC interface 6 7...

Page 27: ...IP settings to DCHP 11 The option Enable configuration via network is enabled for the easyE4 in the factory set ting NOTE This release is given as a factory setting in the device ticked to enable the...

Page 28: ...ct are transferred to the easyE4 Depending on how these are set i e different from those in the IP profile currently used for the connection the Ethernet connection to the easyE4 is terminated immedia...

Page 29: ...nehmen das 2017 einen Umsatz von 20 4 Mrd US Dollar erzielte Mit energieeffizienten L sungen un terst tzen wir unsere Kunden bei einem effektiveren siche reren effizienteren und nachhaltigeren Managem...

Reviews: