7
EATON
ET4001 Crimp machine operator´s manual W-EQCR-TM022-E3 March 2019
Operating instructions
Using ET4000AR-002 for
heavy 4-wire and 6-wire fittings
(-20 thru -32 collets)
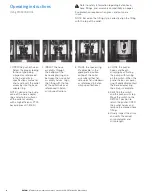
1. OPEN the pusher halves.
NOTE: Lubricate the inside
cone of the base adapter
ring and external surfaces
of the collet assembly
with a high-efficiency PTFE
based lubricant (T-400-G).
2. PULL the pusher tab
upward. The pusher tab
is located behind the top
of the pushers at the
back of the machine.
3. SLIDE pushers to side
while holding the pusher
tab up.
4. PULL spacer ring locator
bracket upward. TURN
the locator bracket 90˚.
5. REMOVE the base
adapter ring from base
plate and PLACE the
ET4000AR-002 base
adapter ring inside the
base plate.
NOTE: Lubricate the
outside diameter of
base adapter ring before
placing into the base
plate.
6. TURN locator bracket 90˚
until aligned properly.
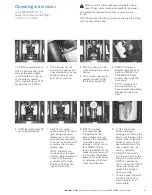
7. SELECT the proper
collet assembly for hose
type being crimped as
referenced in the crimp
specifications manual or
chart and insert the collet
assembly into the base
adapter ring.
NOTE: Lubricate the
inside cone of the base
adapter ring and external
surfaces of the collet
assembly with a high-
efficiency PTFE-based
lubricant (T-400-G).
8. INSERT the hose
assembly through
the bottom of the
base adapter ring and
between the two collet
assembly halves. To
achieve a full flat crimp
for 4SP/6SP fittings,
locate the bottom of the
socket approximately
1
/
8
"
(3mm) from the bottom
edge of the collet halves
as referenced in Eaton
crimp specifications.
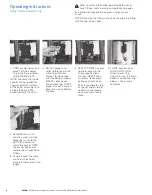
9. CLOSE the pusher
halves and begin
crimping by activating the
pump with turning on the
switch. When the pusher
halves or spacer ring (if
applicable) contacts the
base adapter ring, the
crimp is complete.
10. RELEASE the switch
and the pusher will stop.
Move the switch to the
RETRACT position to
return the pusher. OPEN
the pusher halves and
remove the crimped
hose assembly.
11. Visually inspect the crimp
and verify the correct
crimp diameter and
crimp length.
Refer to safety information regarding Eaton hose,
hose fittings, and assembly compatibility on page 2.
Eye protection required when press and pump are
in use.
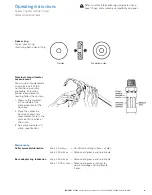
NOTE: Based on the fitting style, correctly align the fitting
with the top of the collet.


