34008236ES/AC - Page 9
2. Instalación
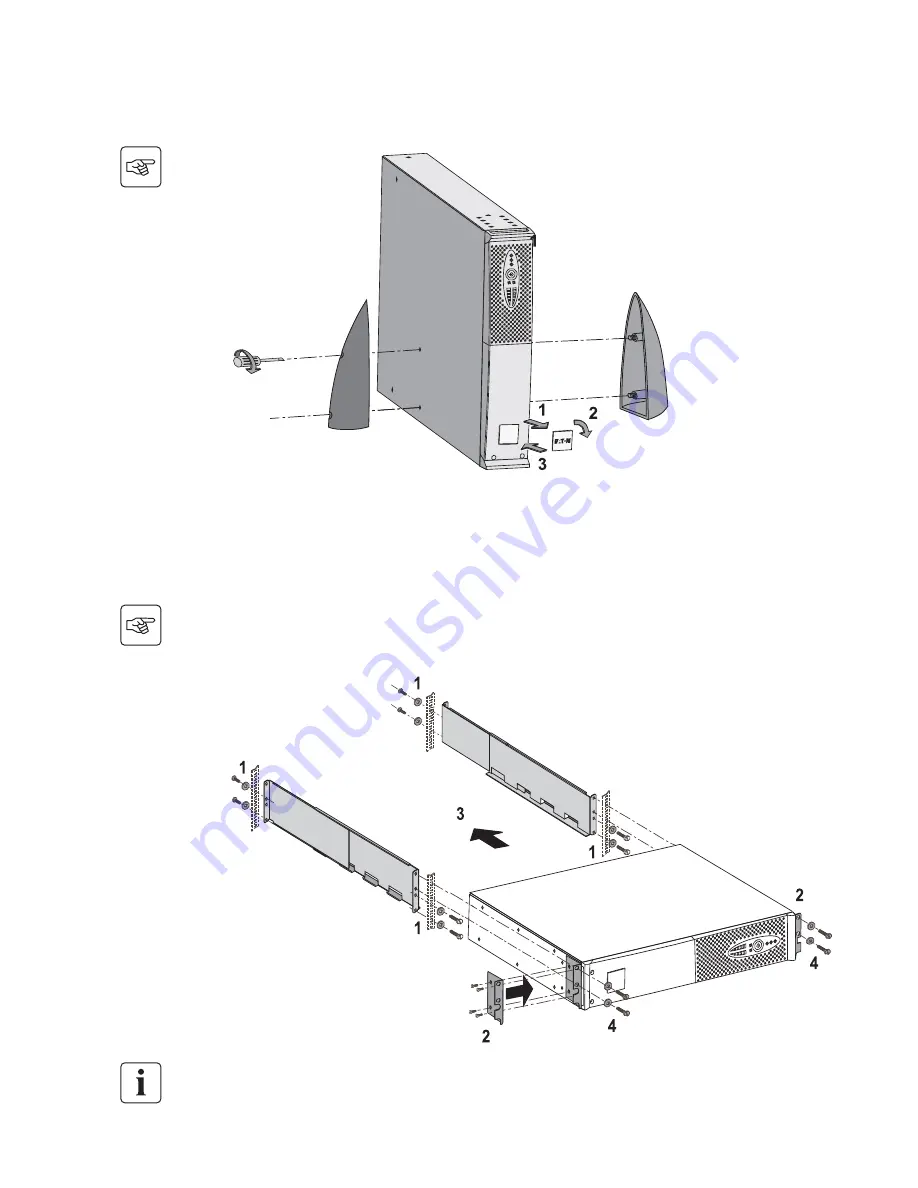
2.2 Instalación en posición de torre
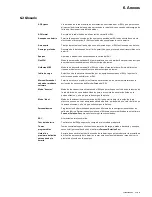
2.3 Instalación en posición de rack
Se recomienda montar el módulo de batería en primer lugar, luego montar el módulo de potencia encima.
Nota:
los soportes de mantenimiento en posición vertical se utilizan únicamente en los modelos RT 2U.
Seguir las etapas 1 a 4 para el montaje del módulo sobre sus rieles.
Los rieles y el material necesario para el montaje son suministrados por EATON.
Summary of Contents for Evolution 1250 RT 2U
Page 2: ...3400823600 AC...
Page 4: ...34008236EN AC Page 2...
Page 24: ...34008236EN AC www eaton com...
Page 26: ...34008236FR AC Page 2...
Page 46: ...34008236FR AC www eaton com...
Page 48: ...34008236DE AC Page 2...
Page 68: ...34008236DE AC www eaton com...
Page 70: ...34008236IT AC Page 2...
Page 90: ...34008236IT AC www eaton com...
Page 92: ...34008236ES AC Page 2...
Page 112: ...34008236ES AC www eaton com...
Page 114: ...34008236NL AC Page 2...
Page 134: ...34008236NL AC www eaton com...
Page 135: ...www eaton com Pulsar Series...
Page 136: ...34008236RU AC 2...
Page 137: ...34008236RU AC 3...
Page 138: ...34008236RU AC 4...
Page 139: ...34008236RU AC 5...
Page 140: ...34008236RU AC 6...
Page 141: ...34008236RU AC 7...
Page 142: ...34008236RU AC 8...
Page 143: ...34008236RU AC 9...
Page 144: ...34008236RU AC 10...
Page 145: ...34008236RU AC 11...
Page 146: ...34008236RU AC 12...
Page 147: ...34008236RU AC 13...
Page 148: ...34008236RU AC 14...
Page 149: ...34008236RU AC 15...
Page 150: ...34008236RU AC 16...
Page 151: ...34008236RU AC 17...
Page 152: ...34008236RU AC 18...
Page 153: ...34008236RU AC 19...
Page 154: ...34008236RU AC 20...
Page 155: ...34008236RU AC 21...
Page 156: ...34008236RU AC www eaton com...
Page 157: ...3400823600 AC...
Page 158: ...3400823600 AC www eaton com...


