background image

2. Installation

86-81700-00EN A02 - Page 14

2.5  Communication Ports

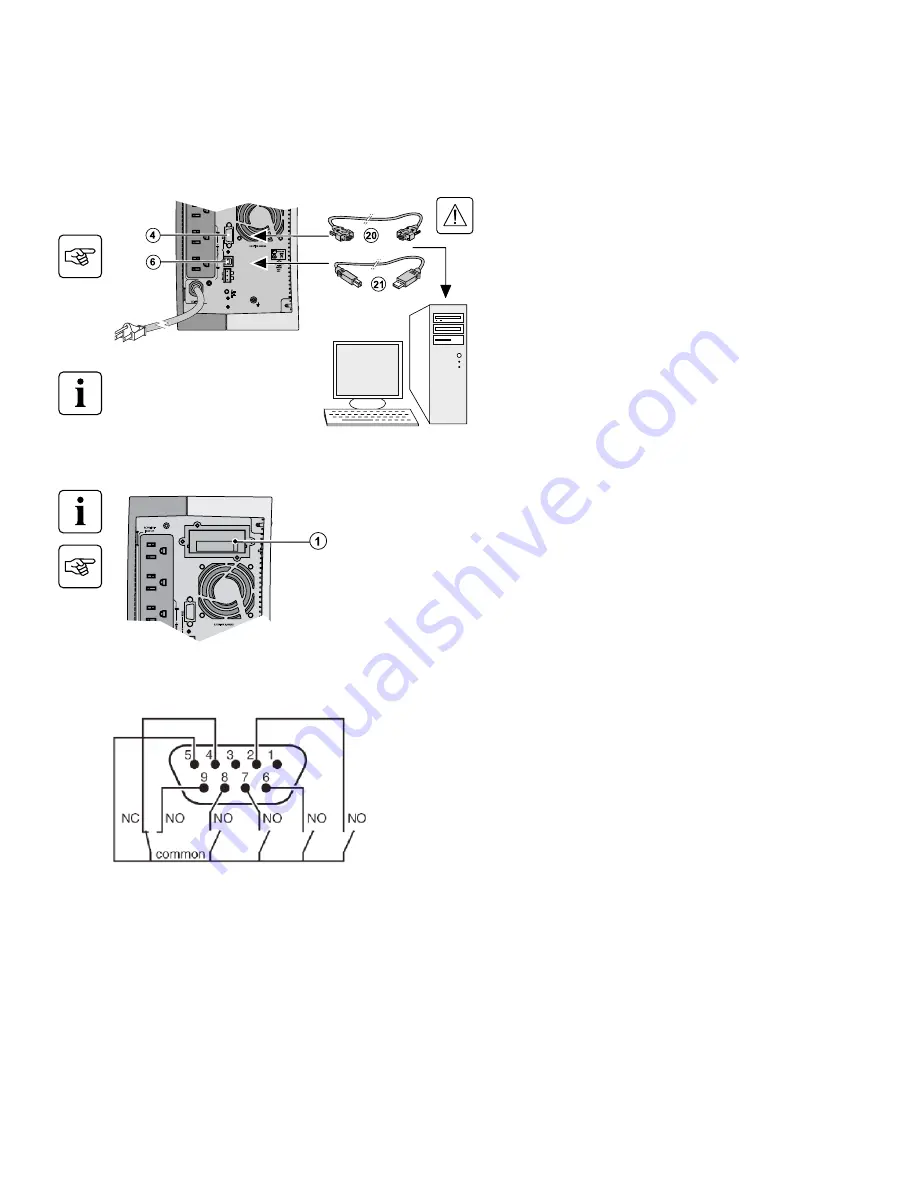
Connection of RS232 or USB communication port (optional)

The RS232 and USB communication ports cannot operate simultaneously.


55K6 

U.P.S. 

AC OUTPUT  

I max 12A 

AC INPUT 

FA

UL

SITE 

WIRING


U.S. PAT. NO.  6,094,363 

36Vdc, 9Ah 

Pb 

Pr

ogrammable 

or


RS232 

ROO   RPO


1.  Connect the RS232 

(20) 

or USB (21) 

communication cable to the serial or USB port 

on the computer equipment.

2.  Connect the other end of the communication 

cable 

(20) 

or 

(21)

 to the USB 

(6) 

or RS232 

(4) 

communication port on the UPS.

The UPS can now communicate with EATON power 

management software.

Installation of the communication cards (optional)

55K6

U.P.S.

R

AC OUTPUT 

I max 12A

AC INPUT

FA

UL

T

SITE WIRING

U.S. PAT. NO.  6,094,363

36Vdc, 9Ah

Pb

2

1

Pr

ogrammabl

e

or

RS232

RO

O

   R

PO

Limited-access slot for the 

communication card


It is not necessary to shutdown the UPS before 

installing a communication card.

1.  Remove the slot cover 

(1)

 secured by screws.

2.  Insert the communication card in the slot.
3.  Secure the card cover with the two screws.

Characteristics of the contact communication port (optional)


w

  Pin 1:  Not used

w

  Pin 2:  Battery fault

w

  Pin 3:  UPS power off

w

  Pin 4:  Load on Utility

w

  Pin 5:  COMMON

w

  Pin 6:  Load on bypass, when available on UPS

w

  Pin 7:  Low battery

w

  Pin 8:  UPS on, load powered

w

  Pin 9:  Load on battery

n.o.: normally open contact

When a signal is activated, the contact is closed between the common (pin 5) and the pin for the corresponding signal.

Please refer to the Network Management Card User Manual for the latest characteristics information.

Contact characteristics (optocoupler)

w

  Voltage: 48 V DC max

w

  Current: 25 mA max

w

  Power: 1.2 W

Summary of Contents for Evolution 650/650 Rack 1UEvolution 850

Page 1: ...r or Customer FAQ please call 800 279 7776 or visit our website www eaton com www eato n co m Installation and User Manual Evolution 650 650 Rack 1U 850 850 Rack 1U 1150 1150 Rack 1U 1550 1550 Rack 1U...

Page 2: ...peration 17 3 2 Operation on Battery Power 17 3 3 Return of AC Input Power 17 3 4 UPS Shutdown 18 3 5 UPS Remote Control 18 4 Access to Measurements and Personalization Data Main Output Personalizatio...

Page 3: ...ts w The cardboard we use comprises over 50 of recycled cardboard w Sacks and bags are made of polyethylene w Packing materials are recyclable and bear the appropriate identification symbol Follow all...

Page 4: ...electrical shock burns The short circuit current may be very high Precautions must be taken for all handling remove watches rings bracelets and any other metal objects use tools with insulated handles...

Page 5: ...Symbol Usage Important instructions that must always be followed Information advice help Visual indication Action Audible signal LED off LED on LED flashing 86 81700 00EN A02 Page 7...

Page 6: ...Evolution 1550 5 8 x 9 2 x 19 4 Weights in lbs Evolution 650 18 8 Evolution 850 24 5 Evolution 1150 27 2 Evolution 1550 36 Dimensions W x H x D in inches Evolution 650 Rack 17 2 x 1 7 x 14 4 Evolution...

Page 7: ...le AC OUTPUT SITE WIRING FAULT U S PAT No 6 094 363 55K6 U P S R or I max 12A Amps 12 96 12 11 34A a 1 3 Control Panel Bargraphs 8 and 11 1 Slot for optional communication card 2 Attached 6 ft input p...

Page 8: ...attached 18 Documentation 19 Solution Pac CD ROM 20 RS232 communication cable 21 USB communication cable 22 Mounting kit for 19 inch bays rack model only Packing materials must be disposed of in compl...

Page 9: ...allation 86 81700 00EN A02 Page 12 2 2 Installation of Tower Model 2 3 Installation of Rack Model Follow steps 1 to 4 for module mounting on the rails The rails and necessary hardware are supplied by...

Page 10: ...2 Installation 86 81700 00EN A02 Page 13 2 4 Installation of the 650 Rack Model Follow steps 1 to 3 for rack mounting Wall mounting The necessary hardware is supplied by EATON...

Page 11: ...094 363 36Vdc 9Ah Pb 2 1 Programmable or RS232 ROO RPO Limited access slot for the communication card It is not necessary to shutdown the UPS before installing a communication card 1 Remove the slot...

Page 12: ...ring operation on battery power and thus optimize the available backup time the EATON communication software is required Evolution 650 850 1150 Evolution 1550 3 5 Load 55K6 U P S R AC OUTPUT I max 12A...

Page 13: ...p time w All the LEDs go OFF w The audio alarms stops The UPS is completely shut down 3 3 Return of AC Power Following an outage the UPS restarts automatically when AC power returns unless the restart...

Page 14: ...d test 1 Check that the UPS is OFF and disconnected from the AC input source 2 Remove connector 7 after unscrewing the screws 3 Connect a normally closed volt free contact 60 V DC 30 V AC max 20 mA ma...

Page 15: ...output personalization Function Factory setting Other available settings Output voltage on battery power 120 Volts AC 100 120 127 Volts AC Overload alarm threshold 105 30 50 70 Voltage threshold pers...

Page 16: ...ON OFF controlled by software Enabled Disabled Battery level before restart 0 0 to 100 Battery personalization Function Factory setting Other available settings Battery test intervals Weekly No test...

Page 17: ...24 to restart 2 Button 10 and LEDs 13 and 14 are ON and all the LEDs on bargraph 8 flash The percent load is greater than the set overload level or UPS capacity Check the power drawn by the connected...

Page 18: ...c CAUTION A battery can present a risk of electrical shock and high short circuit current The following precautions should be observed when working on batteries a Remove watches rings or other metal o...

Page 19: ...Mounting the new battery module Carry out the above instructions in reverse order w To ensure safety and high performance use only batteries supplied by EATON w Take care to firmly press together the...

Page 20: ...d lead acid maintenance free w Tower model w Rack model 1 x 12 V 9 Ah 2 x 6 V 9 Ah 2 x 12 V 7 2 Ah 4 x 6 V 7 2 Ah 2 x 12 V 9 Ah 4 x 6 V 9 Ah 3 x 12 V 9 Ah 6 x 6 V 9 Ah Environment w Operating temperat...

Page 21: ...gs or right click on the PSP power plug located in the SYS Tray 2 Click on the symbol next to UPS Settings to expand the UPS Settings section 3 Click on Startup Timer and change the The group of outle...

Page 22: ...ection entitled Shutdown timer allows the user to define how long the powershare outlet should provide power after a power loss To configure the powershare to power off at the same time as the main ou...

Page 23: ...pment connected to the UPS output Low battery warning This is a battery voltage level indicating that battery power is low and that the user must take action in light of the imminent break in the supp...

Reviews: