background image

28

XCHARGEIN MOBILITY INSTALLATION MANUAL

   MN191005EN   April 2021   www.eaton.com

00 Title

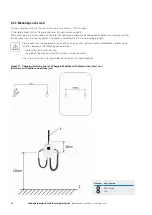
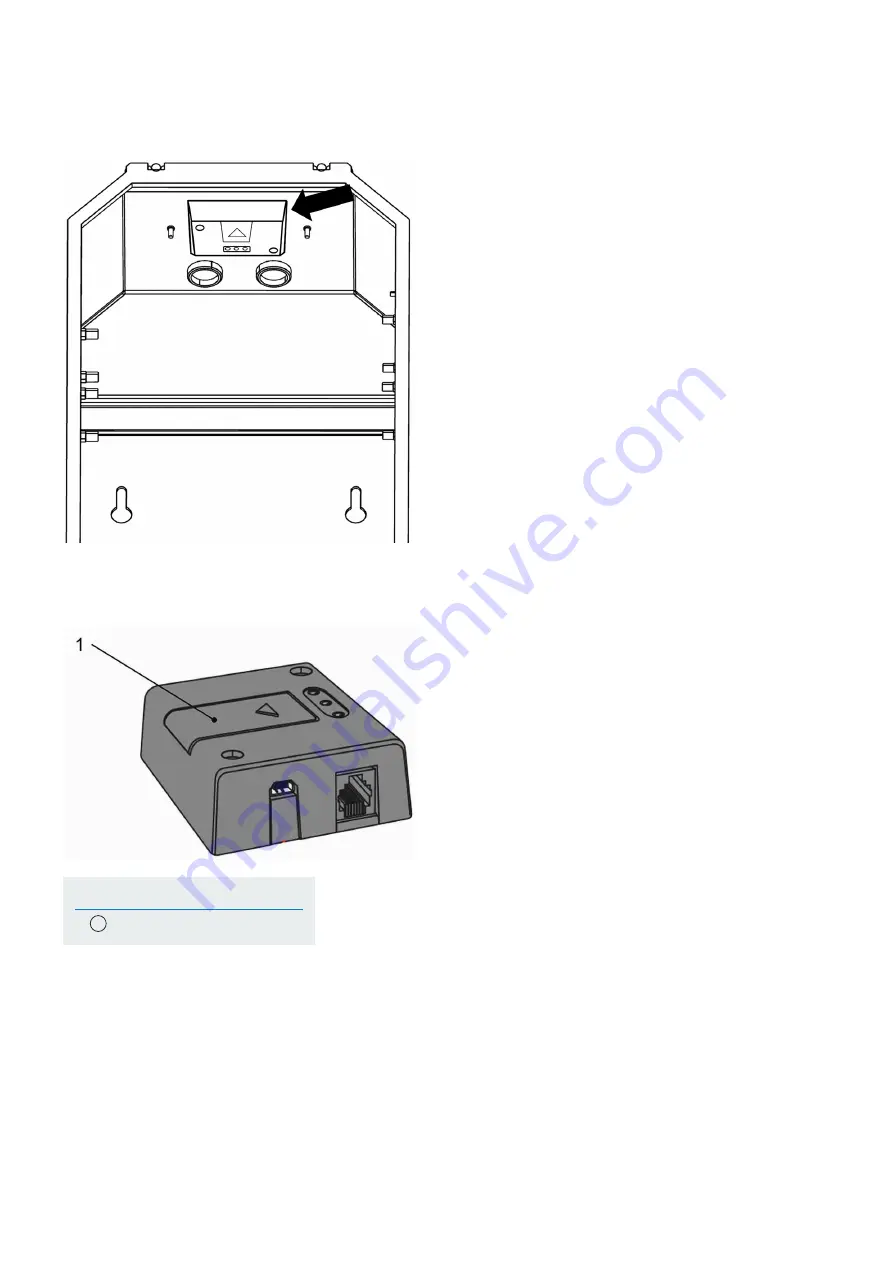
Figure 24.  Location of the 4G modem module inside xChargeIn Mobility

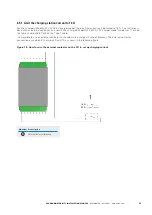
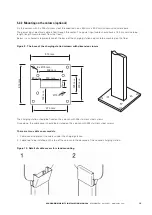
Figure 25.  Illustration showing where to plug in the SIM inside the modem module

Insert the SIM into the SIM card holder located on the top of the modem.

Number Description

1

SIM card holder

Summary of Contents for green motion xChargeIn Mobility

Page 1: ...xChargeIn Mobility Installation Manual xChargeIn Mobility ...

Page 2: ...A PARTICULAR PURPOSE OR MERCHANTABILITY OTHER THAN THOSE SPECIFICALLY SET OUT IN ANY EXISTING CONTRACT BETWEEN THE PARTIES ANY SUCH CONTRACT STATES THE ENTIRE OBLIGATION OF EATON THE CONTENTS OF THIS DOCUMENT SHALL NOT BECOME PART OF OR MODIFY ANY CONTRACT BETWEEN THE PARTIES In no event will Eaton be responsible to the purchaser or user in contract in tort including negligence strict liability or...

Page 3: ...f cables 9 4 RELEVANT INFORMATION PRIOR TO THE INSTALLATION 10 4 1 Tools required for the installation 10 4 2 Checking the box contents 10 4 3 Dimensions and weight 10 4 4 Lifting transportation and unloading instructions 12 4 5 Unpacking 12 5 MOUNTING AND INSTALLATION 13 5 1 Positioning the xChargeIn Mobility 13 5 2 Mounting 13 5 2 1 Site design 13 5 2 2 Mounting on the column optional 15 5 2 3 M...

Page 4: ...odbus protocol settings 30 7 2 3 Modbus register table 30 7 3 Unit switch on 32 7 4 How to start charging 33 7 5 Display indicators 33 8 MAINTENANCE 34 8 1 How to open close the xChargeIn Mobility housing and wire the display 34 8 2 Replace the SIM card 35 8 3 Reset the circuit breaker 35 8 4 Uninstall 36 8 5 Station updates 36 8 6 Disposal 36 9 TROUBLESHOOTING 37 10 TECHNICAL DATA 37 10 1 Rating ...

Page 5: ...he contents of this manual are the copyright of the publisher and may not be reproduced even in extracts without the prior written approval of Eaton Corporation While every care has been taken to ensure the accuracy of the information contained in this manual Eaton assumes no liability for any error or omission Eaton reserves the right to modify the designs of its products The unauthorized copying...

Page 6: ...ingle or double mounting Network interface 4G Access control RFID Warranty Warranty 5 years 1 2 Symbols used in this manual Imminent dangers causing serious injuries Danger of death An electric shock can be fatal Avoid touching internal or external parts normally live while the system is powered on Read the instructions These instructions are intended for professional installers A professional ins...

Page 7: ...nt DC Direct current EMC Electromagnetic compatibility EMI Electromagnetic interference FW Firmware HW Hardware IEC International Electrotechnical Commission IP Internet Protocol LCD Liquid crystal display N Neutral OV Overvoltage PE Protective earth PPE Personal protective equipment RCD Residual current device RCMU Residual current monitoring unit SW Software UI User interface WEEE Waste electric...

Page 8: ...ity if the rules for correct installation are not respected and it is not responsible for the system upstream or downstream of the equipment it supplies The exclusion of protective devices is extremely dangerous and relieves the manufacturer of any responsibility for damage to people and things A first aid kit must be provided 2 1 Operating environment and restrictions Each system must be used exc...

Page 9: ...repairs should be avoided repair work must be carried out only with genuine spare parts which must be installed according to the intended use The responsibilities deriving from the commercial components are delegated to the respective manufacturers Avoid touching the equipment enclosure during the equipment operation In the event of fire CO2 foam extinguishers must be used and self vacuum systems ...

Page 10: ...ystems in place some residual risks will still be present which cannot be removed These risks are listed in the following table along with recommendations to prevent or mitigate them Table 3 Residual risks table Risk assessment Recommended solution Noise pollution caused by installations in unsuitable environments or where professionals work on a regular basis Reassess the installation environment...

Page 11: ...wing images show different views of the xChargeIn Mobility AC EV charger 3 General description 3 1 Front and back views Figure 1 Front and back views of xChargeIn Mobility Number Description 1 Housing 2 Display 3 Type 2 connector 4 RFID reader optional 5 Type 1 connector optional 6 Mounting holes ...

Page 12: ...insertion openings M25 double membrane seals M25 2 Flush mounting cable insertion openings M32 cable gland with lock nut M32 3 Flush mounting cable insertion openings M25 double membrane seals M25 4 Cable gland with lock nut M25 5 Lock nut M5 3 2 Left and right views Figure 3 Top and bottom views of xChargeIn Mobility Number Description 1 Type 1 connector hanger 2 Type 2 connector hanger 3 Product...

Page 13: ... V 400 V 16 A 32 A for either single phase or three phases Number Description 1 Type 1 connector 2 Type 2 connector 1 2 The table below indicates the maximum power that the EV charger can deliver at each plug These values can vary according to variables such as grid power available and car models For those reasons Eaton declines any responsibility on the total power delivered Table 4 Maximum power...

Page 14: ...the charging station must be performed by qualified and authorized electricians who are responsible for complying with existing standards and local installation regulations During the installation ensure the equipment is powered off Table 5 Dimensions and Weight of Eaton xChargeIn Mobility To perform the installation the installer should have the following tools The xChargeIn Mobility box must con...

Page 15: ...e xChargeIn Mobility AC EV charger with dimensions The figure below shows the dimensions of the optional floor mounted column Figure 5 xChargeIn Mobility front rear and lateral views with dimensions in mm Figure 6 xChargeIn Mobility optional stand for floor mounting front elevation and perspective projection with dimensions in mm ...

Page 16: ...or parts of the equipment at the same time unless otherwise stated The xChargeIn Mobility is not equipped with specific lifting tools Remember that the packaging elements cardboard cellophane staples adhesive tape straps etc can cut and or injure if not handled with care They must be removed with appropriate tools and must not be handled by non responsible people i e children The packaging compone...

Page 17: ...the surface where the xChargeIn Mobility will be installed must be able to take its weight max 17 kg The xChargeIn Mobility system must be used at a maximum altitude of 2000 m above sea level It should be fixed at a height of 135 cm from ground level for optimal accessibility The power input electrical cable and the internet connection cable should be above or below the charging station 30 cm away...

Page 18: ... Figure 7 Optimal positioning of charging stations Charging station Alternative positions for the EV charging stations are shown in the figure below If a wall is not available for mounting it is possible to use a floor mounted column Figure 8 Alternative positioning of charging stations ...

Page 19: ... the charging station column to be mounted on the floor Figure 9 The base of the charging station column with dimensions in mm 310 mm 8 x Ø15 mm 204 mm 150 mm 270 mm 80 mm 310 mm 270 mm 125 mm 130 mm 50 mm Ø15 mm The charging station should be fixed on the column with M6 stainless steel screws Once done the cable cover should be installed on the column with M3 stainless steel screws There are two ...

Page 20: ...station 30 cm away from the fixation points The cables should have a 50 cm service loop length Please note that the appropriate types of plastic plugs and screws must be selected by a professional installer based on the following considerations the location of installation and the type of the wall on which the system is to be mounted This is to ensure the safest possible mounting of xChargeIn Mobi...

Page 21: ... to electric shock hazards 6 2 Standard wiring To connect the station to the electrical panel a professional installer or qualified electrician should consider the following guidelines and consult the table below Table 6 Overview of parameters for dimensioning of the protective devices and power supply line xChargeIn Mobility power range 3 7 kW 7 4 kW 11 kW 22 kW Input voltage 230 V AC 230 V AC 40...

Page 22: ...kW models are for single phase connection only Each charging station must be connected via a separate RCD fault current circuit breaker No other consumers may be connected to this circuit The circuit breakers and the power cable minimal cross sections are overvalued to ensure the functionality of the charging station with higher temperatures During installation other important issues such as casca...

Page 23: ... can reach the terminals from the top or from the bottom Please refer to the appropriate section of this manual to open the xChargeIn Mobility housing The power input electrical cable can be inserted above or below the charging station Remove the cable glands if necessary The electrical connection is made on the power supply terminals located at the bottom right of the charger Follow the instructi...

Page 24: ...In case of a single phase connect the phase L1 neutral N and earth PE wires of the AC terminals to the GRID terminal block respecting the correct assignment Phase L1 L1 terminal Neutral N N terminal Earth PE PE terminal Be careful not to reverse the phases with the neutral If this happens the system might malfunction Figure 14 How to wire AC grid connectors to the energy distribution board It is p...

Page 25: ... Figure 15 AC grid cable and connectors 6 4 Earth connection MANDATORY xChargeIn Mobility is equipped with an external earthing contact which must be connected to the protective conductor in addition to the earth connection provided by the GRID terminal block for connection to the public AC grid See the connection instructions shown in the figure below Figure 16 Extended terminal to protective ear...

Page 26: ...iguration is often adopted when two units are mounted on the same floor mounting frame To balance the load across multiple charging stations please refer to xChargeIn Balancer installation manual available from the Eaton website www eaton com 3 Switch the charging station off no power delivered Figure 17 Location of the xChargeIn Mobility CU It is possible to set these configurations via the CU as...

Page 27: ...lt the xChargeIn Mobility 22 kW AC EV charger model will deliver 11 kW on the Type 2 cable and 3 7 kW on the Type 1 cable It is possible to use an external contactor to shut down the charger in case of blackout The external contactor connection is made on CU terminals 9 and 10 as shown in the following figure Figure 18 How to wire the external contactor on the CU to set up charging current 1 16 A ...

Page 28: ...both charging stations is limited to 32 A If two charging stations are used the second charging station is limited to 16 A The back to back connection is made on CU terminals 10 and 12 as shown in the following figure 9 8 7 6 5 4 3 2 1 9 8 7 6 5 4 3 2 1 18 17 16 15 14 13 12 11 10 18 17 16 15 14 13 12 11 10 6 5 3 Switch the charging station off The charging station is deactivated on CU terminal 3 b...

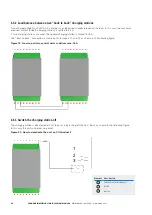
Page 29: ... com for further details It is possible to configure the communication with SW via the internet with a 4G connection SIM card In this case a modem is installed inside the unit By default the CU is configured in Dynamic Host Configuration Protocol DHCP mode Once logged in navigate to the Network page where it is possible to configure the IP address of the station This operation must be carried out ...

Page 30: ...f xChargeIn Mobility Example shows a static IP of the station equal to 162 168 1 72 Click on the OK button then click Apply Settings in the left hand menu The module will reboot to apply the new settings The Eaton xChargeIn Mobility AC EV charger can also communicate with the remote database via cloud infrastructure ...

Page 31: ... SIM card is a mini SIM 2FF format The connection will be established automatically with the Eaton Charging network manager Sometimes the SIM PIN can create connection issues If this happens please contact your Eaton service representative Figure 22 Simplified illustration of xChargeIn Mobility communication Always switch the charging station off before inserting or removing the SIM card The 4G mo...

Page 32: ...on com 00 Title Figure 24 Location of the 4G modem module inside xChargeIn Mobility Figure 25 Illustration showing where to plug in the SIM inside the modem module Insert the SIM into the SIM card holder located on the top of the modem Number Description 1 SIM card holder ...
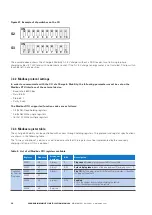
Page 33: ... addresses from 0 to 31 In order to activate and configure communication via Modbus it is necessary to access the dip switches located inside xChargeIn Mobility see the following figure Figure 26 Illustration of dip switches on the CU P1 phase Energy Meter imp kWh RFID Modbus Addr0 Modbus Addr1 Modbus Addr2 P3 Type P1 Current P2 Current S2 S3 P2 phase Modbus Modbus Addr3 Modbus Addr4 1 ON ON 2 3 4...

Page 34: ...s 06 0x06 Write single registers 16 0x10 Write multiple registers 7 2 3 Modbus register table The xChargeIn Mobility can be controlled with access through holding registers The protocol and register specifications are shown in the following table The Always or optional column is used to indicate whether the register must be implemented by the secondary charging station or if this is optional Table...

Page 35: ... R Can be regulated 0 The charger cannot be regulated 1 The charger can accept current regulation command 40010 09 Optional R W Regulated current Controls how many amps the charger can deliver to the vehicle in 100 mA Example 145 14 5 A 40011 10 Optional R Maximum current Maximum current in 100 mA that the charging station can deliver Example 160 16 A 40012 11 Optional R Minimum allowed regulated ...

Page 36: ...R RFID serial number Unsigned integer 64 bit 25 LSB 28 MSB 40027 26 40028 27 40029 28 7 3 Unit switch on Before switching on the station check the effectiveness of the safety measure s of the system in accordance with the local regulations Electrical systems or devices must be checked by the installer of the system before commissioning and switching on the unit Before switching on the product plea...

Page 37: ...atus display If the charging cable is disconnected from the car and there is no power consumption within two minutes the user is automatically deauthenticated 7 5 Display indicators The table below summarizes the possible display indicators during the operation Visual indicator Description Status Charging station ready for use available charging cable or no authenticated user Ready Charging statio...

Page 38: ...and laws Wait at least 10 minutes before removing the xChargeIn Mobility Please use suitable PPE or wait for the equipment to cool down before accessing it 8 1 How to open close the xChargeIn Mobility housing and wire the display Before attempting to open the charging station ensure the external AC line main switch is disconnected and circuit breakers are open When removing the front cover be care...

Page 39: ...ed as follows 1 Remove the existing SIM card from the card slot see previous section 2 Insert the new SIM card into the card slot see previous section 8 3 Reset the circuit breaker The xChargeIn Mobility 22 kW AC EV charger model equipped with a Type 1 3 7 kW cable includes a 20 A circuit breaker In the event of failure a red triangle is displayed on the EV charger status display ...

Page 40: ... the end of its service life the end user should contact a professional installer for disposal instructions The EU Directive on Waste Electrical and Electronic Equipment WEEE Directive 2012 19 EU establishes common rules on the management of electrical and electronic equipment and minimizes its impact from design until disposal on the environment As a manufacturer of electrical and electronic equi...

Page 41: ...aker inside the charging station The car does not charge Check the condition of the Type 1 or Type 2 cable Check the power supply on the electrical panel or the RCD switch off and reset the circuit breaker to restart it Check the circuit breaker inside the charging station 10 Technical data 10 1 Rating plate To locate the rating plate on the equipment refer to the figure below The technical specif...

Page 42: ...1 1 AC charging Rated short time withstand current 10 kA effective value in accordance with EN 61439 1 Insulation EN 60664 1 2007 MID Yes Cable Version Type 1 cable Up to 32 A 230 V AC in accordance with EN 62196 1 and EN 62196 2 Type 2 cable Up to 32 A 400 V AC in accordance with EN 62196 1 and EN 62196 2 Electromagnetic compatibility Product 16 A rated models EN 61000 3 2 2006 A1 2009 A2 2009 an...

Page 43: ... Should any technical problems arise during the operation of the xChargeIn Mobility charging station contact your Eaton technical support representative for assistance The following information should be provided when contacting the Eaton technical support representative Product model and serial number Fault messages ...

Page 44: ...emark All trademarks are property of their respective owners Eaton EMEA Headquarters Route de la Longeraie 7 1110 Morges Switzerland Eaton com xchargeinmobility 2021 Eaton All Rights Reserved Publication No MN191005EN April 2021 ...

Reviews: