i-on30EXL/EXDL
Installation
Page 29
Step 10. Fit and Connect
Battery
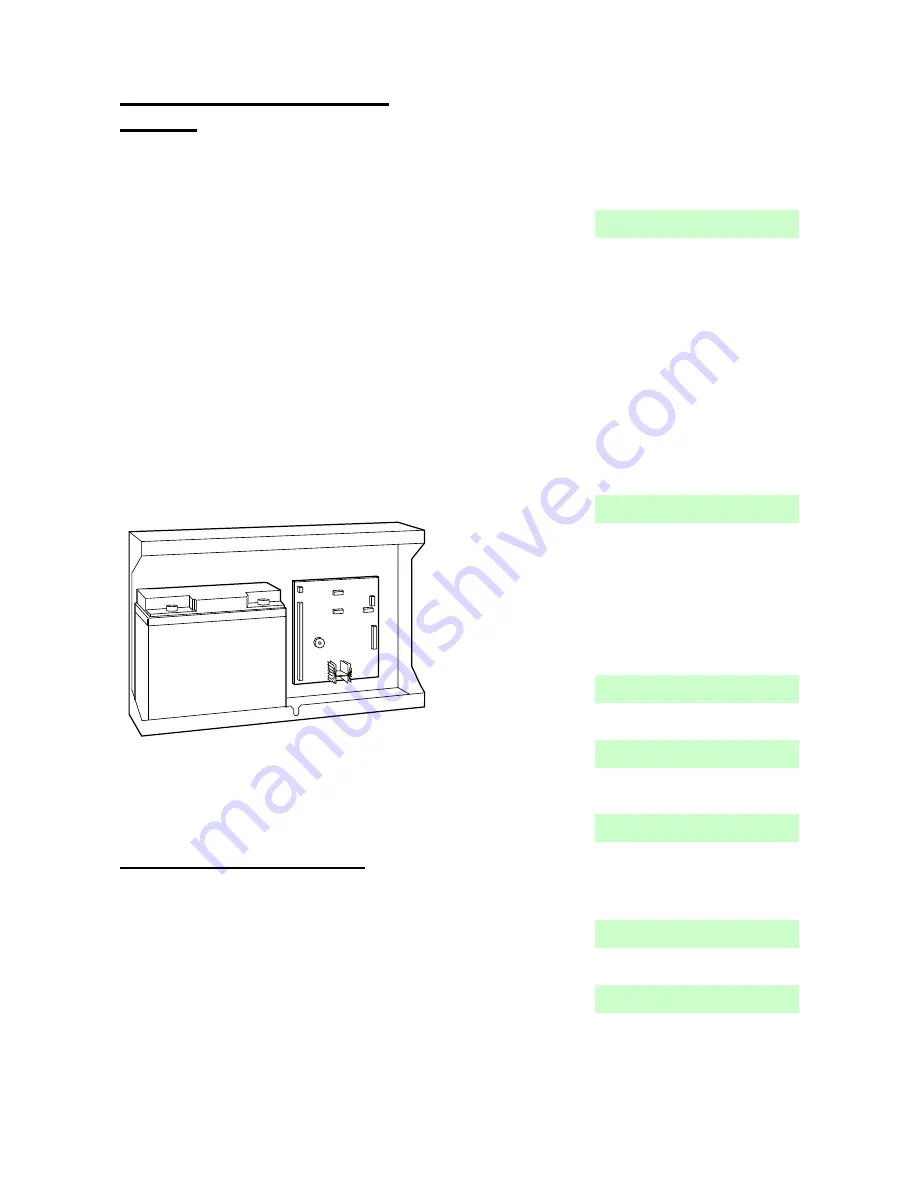
It is possible to fit either a 7Ah or 17Ah Lead Acid
battery into the battery compartment in the bottom
of the control unit (see Figure 56).
When fitting a 17Ah battery, use a battery whose
case material has a minimum rating of UL94V-2 in
order to comply with EN60950 (this standard
applies because of the energy content of 17Ah
batteries).
See page 12 for example calculations of battery
requirements.
WARNING
17Ah lead acid batteries weigh 6kg
each. Do NOT drop.
Ensure that the fixings of the
control unit case to the wall, and the wall itself, are
strong enough to support the weight of the control
unit, its lid and a 17Ah lead acid battery. The total
weight of the control unit plus batteries can be up
to 11kg.
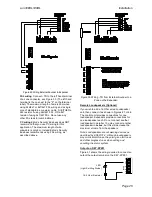
Connect the battery leads, red to the positive,
black to the negative terminals of the battery.
Connect the other ends of the leads to BATT (15
on Figure 3).
Figure 56 Fitting a Battery
Note: Connecting the battery without mains power
will not start the system. (See “Programming
Before Installation” in the i-on Range Engineering
Guide.)
Step 11. Initial Power-Up
Please see the
i-on Range Engineering Guide
for
an explanation of bus addressing.
WARNING:
During initial power-up all the keypad
sounders, internal loudspeakers and wired sirens
MAY give an alarm tone. If you are working at the
top of a ladder make sure that the sudden noise
does not startle you and cause a fall.
1. Apply mains power to the control unit.
The keypads and internal sounder may give
an alarm tone. The heartbeat LED on the
control unit PCB (see 13 on Fig 3) starts
flashing. The navigation keys on any attached
keypad start flashing.
All connected keypads briefly show the
software revision of the keypad itself, followed
by the words “Please wait...” for several
seconds while the control unit scans the bus.
When the control unit has finished scanning
the bus the keypads show:
2. Press and hold keys A and
simultaneously
on the keypad that you wish to use for initial
programming.
NOTE: Hold the keys down
for at least three seconds.
After a short pause the keypad gives a
confirmation tone. The display briefly shows
the bus address of the keypad. If there are no
other keypads connected to the bus it should
be “b1-d51”(bus 1 device 51). Keypads take
bus device addresses 51 upwards.
(If you are installing a UK control unit please
go to step 6.)
On an EUR control unit the keypad display
then shows:
3. Press
or
followed by
to select the
language you want. (In the i-on30EXL/EXDL
English is the only language available.)
From this point on, the display operates in the
selected language. If you want to change the
language later use
Installer Menu - System
Options - Language
.
On an EUR control unit the display shows:
4. Press
or
to show other countries, for
example
5. Press
to select the country you wish to use.
The display shows:
6. Press A or B to select either a Partitioned
system or a Part Setting system.
Note: To change to Partition or Part Set mode at a
later date you will have restore factory defaults.
7. Press
or
to show the range of zone
wiring types available, for example:
8. Press
to select the wiring type you intend to
use for the wired zones.
Note: This initial choice fixes the wiring type for
the control unit and any attached wired
expanders. If you wish to use a different wiring


