background image

2

TC-1 Timeclock User Guide

www.eaton.com/lightingsystems

Welcome and Introduction

If time clock functionality is required, it is typical to have a single, active time clock device in the iLumin Plus network. The 
TC1 provides the astronomical time clock functionality and has the added capability of basic scene programming and manual 
scene command.

Optional iLumin Plus software may be used to program TC1 functions. The software provides advanced functionality that 
may not be available for editing from the TC1 onboard interface. If it has been purchased, use the iLumin Plus software to 
administer all TC1 programming changes.

This user guide is intended for the facility manager or user that is maintaining basic time clock programming using the 
onboard TC1 interface. The TC1 interface allows the facility manager to:

•  Configure the operational settings for the time clock including, the time, date, and day of week.

•  Review and update previously configured astronomical clock coordinates, and if not previously programmed, initiate annual 

daylight savings time dates.

•  Program up to 255 time clock events to issue scenes to pre-defined areas, to issue specific zones to a desired light level, 

or to start, stop or pause pre-defined sequences.*

•  Program or update scene light levels for pre-defined areas.*

•  Manually issue scene commands or zone level commands to the iLumin Plus system.*

*Areas, zones, and sequences must be configured before they will respond to the TC1 commands. This manual assumes that this configuration has been 
previously completed.

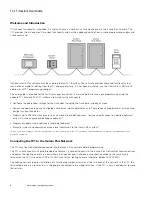
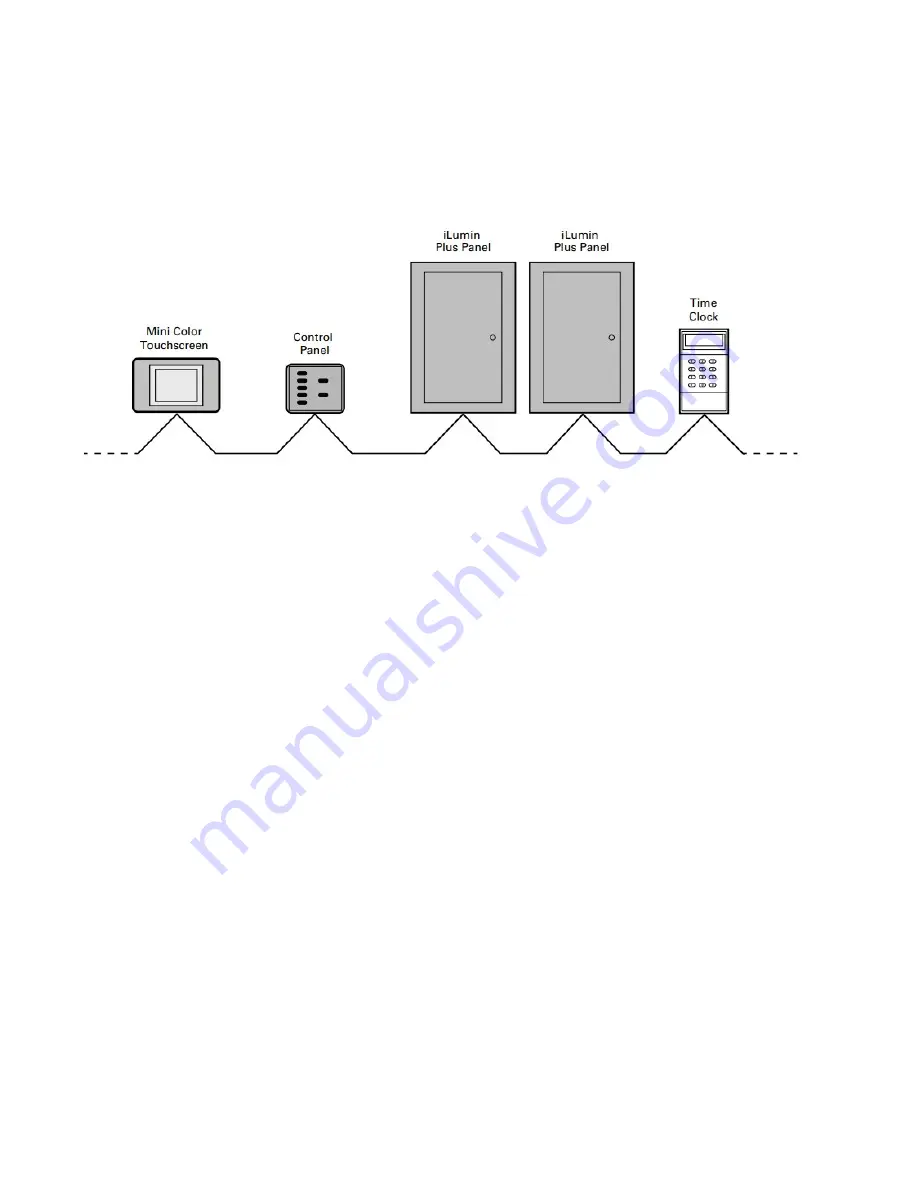
Connecting the TC1 to the iLumin Plus Network

The TC1 must be mounted and connected into the iLumin Plus network before programming. 

The TC1 surface mounts using the provided wall bracket. It connects directly to the iLumin Plus Network for communications 
and power. The lighting network is a daisy-chain that requires one in and one out connection made to the same wiring 
terminal on the TC1. Use Eaton LCCP or LCCNP wire for the lighting network (alternate: Belden 1502, 1502P).

The lighting network requires installation of a terminating jumper or resistor at the two ends of the network. In the TC1, the 
terminating device is a resistor that is shipped pre-connected to the wiring terminals. If the TC1 is not an end device, remove 
the resistor.

Summary of Contents for iLumin Plus TC1

Page 1: ...ht SavingsTime Review 6 Firmware Version Review 7 Programming Modifying or Reviewing Events 7 Programming Modifying or Reviewing an Event that Occurs at a Specific Time 8 Programming Modifying or Revi...

Page 2: ...light savings time dates Program up to 255 time clock events to issue scenes to pre defined areas to issue specific zones to a desired light level or to start stop or pause pre defined sequences Progr...

Page 3: ...Guide www eaton com lightingsystems TC1 Navigation Overview The TC1 onboard keypad is used to input the necessary information Main functions are accessed from the main time clock display using the nu...

Page 4: ...ese items are set up during the initial site programming and should not need adjustment Warning If the iLumin Plus software has been used to set astronomical and daylight savings time some parameters...

Page 5: ...time and date screen press 3 3 Enter the number corresponding to the current day of week 0 Sun 1 Mon 2 Tues 3 Weds 4 Thurs 5 Fri 6 Sat Once the day is selected press the ent key to save 0 6 for day A...

Page 6: ...e Review Some daylight savings time DST settings are only available from the iLumin Plus software If the software has been used previously to program the TC1 the TC1 online display may not be able to...

Page 7: ...een programmed in the system and how they relate the rooms in the facility The scene numbers that have been used in each area and what effect the scenes have on the light levels If sequences have been...

Page 8: ...ance the screen Date 7 If the event will run only on the date specified press 1 to select YES for running on the exact date and skip to step 10 If the event is an ongoing event press 0 for NO Press th...

Page 9: ...lock event the event number will have the letter A before it or 4 To have the event occur using the astronomical clock press the B key 5 If the event is being newly setup as an astronomical clock even...

Page 10: ...ress the ent key to advance the screen or 13 Program the desired action For information on action programming see Pro gramming the Event Action Command on page 10 Programming the Event Action Command...

Page 11: ...n event execute ensure that the action type is set to the desired command Programming a Set Zone Channel to Level Event Setting the event action to Set Zone channel to Level will cause a specific ligh...

Page 12: ...nowledge of the sequence numbers that are used and a clear understanding of the sequence s actions and purpose An event sequence command may start the sequence stop the sequence or pause the sequence...

Page 13: ...een press 2 3 In the edit scene screen press the ent key to advance the screen 4 Use the number keys to enter the area number areas 0 through 255 supported Press ent to advance to the channel entry fi...

Page 14: ...each room being controlled in the facility The scene numbers that have been used in each area To issue a manual scene command follow the steps below Screen Instructions Keypad 1 From the main display...

Reviews: