D e l u x e I n t e g r a t e d
W o r k s u r f a c e
84567
Tools Required
-5/32” Hex key (provided)
-1/4” Hex key (provided)
-Phillips head screwdriver
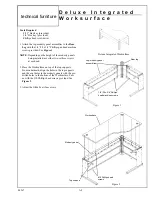
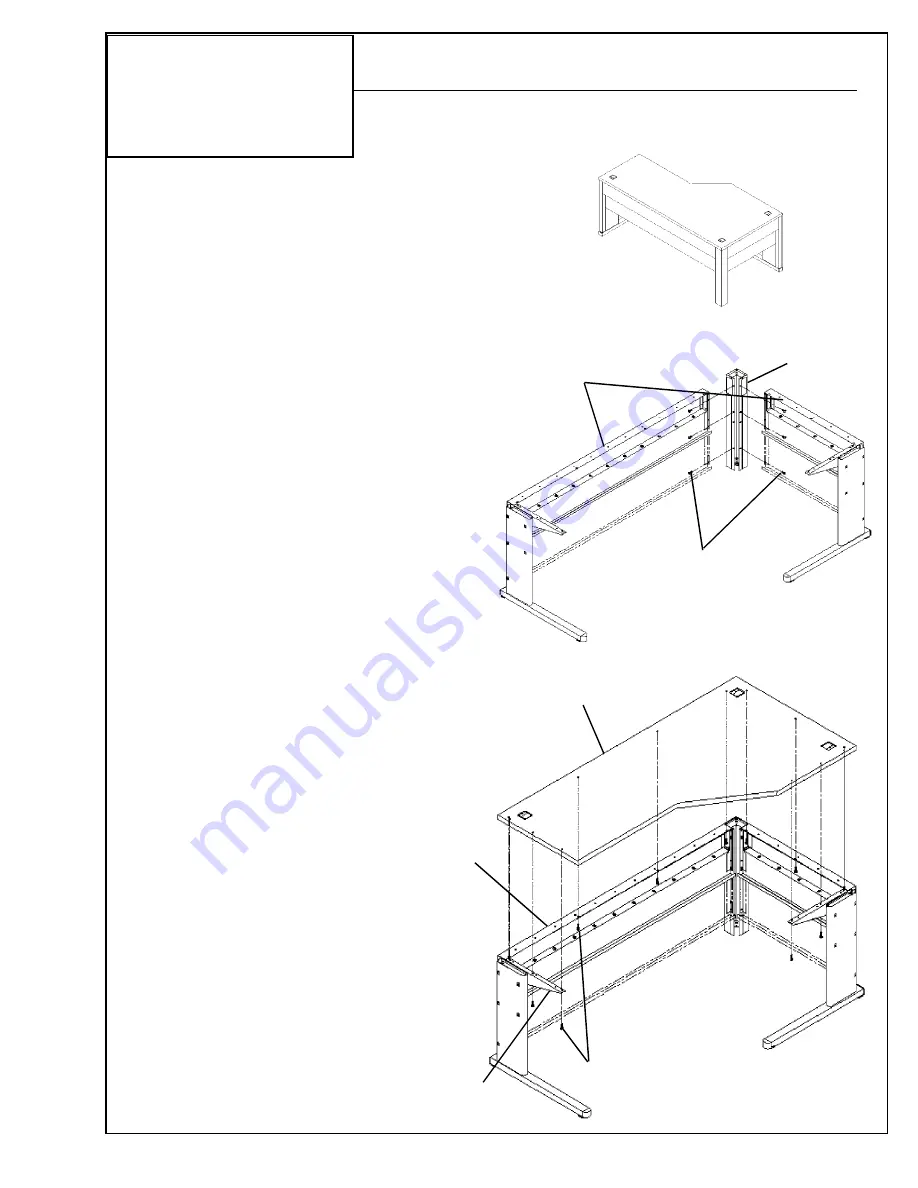
1. Attach the leg/modesty panel assemblies to the
Rear
Leg
with the 1/4”-20 x 3/4” Phillips pan head machine
screws provided. See
Figure 1
.
NOTE
: Depending on the height of the modesty panels
being installed, use either two or three screws
at each end.
2. Place the Worksurface on top of the top supports.
From underneath, align the holes in the top supports
and the oval holes in the modesty panels with the pre-
drilled holes in the bottom of the Worksurface. Fast-
en with the #10 Phillips head screws provided. See
Figure 2
.
3. Adjust the Glide Feet if necessary.
Figure 1
1/4”-20 x 3/4” Phillips
head machine screws
Leg/modesty panel
assemblies
Rear leg
Figure 2
Top support
#10 Phillips head
screws
Worksurface
Modesty panel
Deluxe Integrated Worksurface
technical furniture
A-5
Summary of Contents for LINX
Page 1: ...Modular Furniture LINX Modular Furniture Installation manual...
Page 24: ...84913 Bolt on Peninsula P e n i n s u l a B o l t o n technical furniture...
Page 41: ...R e t r o f i t K i t N o v a c o n t 86270 technical furniture A 34...
Page 51: ...84571 Triangular Connector T r i a n g u l a r C o n n e c t o r technical furniture A 44...
Page 53: ...84252 85217 Conference End C o n f e r e n c e E n d technical furniture A 46...
Page 56: ...81071 B C o n f e r e n c e T a b l e technical furniture A 49...
Page 57: ...84085 Posting Shelf P o s t i n g S h e l f technical furniture A 50...
Page 58: ...81046 Storage Shelf S t o r a g e S h e l f technical furniture A 51...
Page 78: ...80954LX L o c k i n g C o m p a r t m e n t s c o n t technical furniture D 11...
Page 112: ...85089 W h i t e P e g A n d B i n B o a r d s c o n t technical furniture E 12...
Page 119: ...85082 F a b r i c T e c h W a l l c o n t technical furniture E 19...
Page 122: ...85093 C o r n e r L a m i n a t e H o o k O n S h e l v e s c o n t technical furniture E 22...

