background image

INS #

Brand Logo  

reversed out of 

black

INS #

IB519101EN

Installation Instructions – FPX Surface Kit
Instructions d’installation – Trousse de panneau plat à montage en 

surface
Instrucciones de instalación – Kit de superficie de panel FPX

Risk of Fire, Electrical Shock, Cuts or other Casualty Hazards- Installation and maintenance of this 

product must be performed by a qualified electrician. This product must be installed in accordance 

with the applicable installation code by a person familiar with the construction and operation of 

the product and hazards involved. 

Risk of Fire and Electric Shock- Make certain power is OFF before starting installation or 

attempting any maintenance. Disconnect power at fuse or circuit breaker.

Risk of Fire- Minimum 90°C supply conductors.

Risk of Burn- Disconnect power and allow fixture to cool before handling or servicing.

Risk of Personal Injury- Due to sharp edges, handle with care.

Failure to comply with these instructions may result in death, serious bodily injury and property 

damage.

WARNING

DISCLAIMER OF LIABILITY: Eaton assumes no liability for damages or losses of any kind that may arise from the 

improper, careless, or negligent installation, handling or use of this product. 
IMPORTANT:

 Read carefully before installing fixture. Retain for future reference. 

NOTICE:

 Green ground screw provided in proper location. Do not relocate.

NOTICE:

 Fixture may become damaged and/or unstable if not installed properly.

ote:

N

Specifications and dimensions subject to change without notice.

ATTENTION Receiving Department:

 Note actual fixture description of any shortage or noticeable damage on 

delivery receipt. File claim for common carrier (LTL) directly with carrier. Claims for concealed damage must be 

filed within 15 days of delivery. All damaged material, complete with original packing must be retained.

Metalux

Summary of Contents for Metalux FPX

Page 1: ...cool before handling or servicing Risk of Personal Injury Due to sharp edges handle with care Failure to comply with these instructions may result in death serious bodily injury and property damage WA...

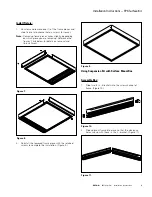
Page 2: ...w to fasten frame pieces together to form a corner Figures 3 4 4 Repeat steps to form the other three 3 corners of the surface mount box Figure 5 Mounting Box to Ceiling IMPORTANT Ensure ceiling can s...

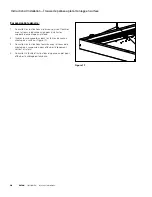
Page 3: ...e pieces varies slightly depending on which piece you are removing Reference the figures 7 8 below for details on removal and re installment Using Suspension Kit with Surface Mount Box Assemble Box 1...

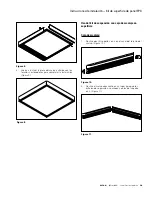
Page 4: ...steps to form the other corners of the surface mount box Install Fixture 1 Slide fixture into channel of surface box and use included screws to fasten final frame piece into place Note N Fastening fra...

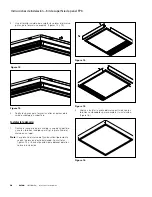
Page 5: ...Refer to the instructions included with the suspension kit for fixing mounting brackets to ceiling 2 Clip carabiners to slots in surface mount box Figure 17 3 Refer to instructions included with the s...

Page 6: ...dommages mat riels AVERTISSEMENT EXON RATION DE RESPONSABILIT Eaton n assume aucune responsabilit pour les dommages ou pertes de toute nature pouvant d couler d une installation inappropri e impruden...

Page 7: ...adre au plafond IMPORTANT Assurez vous que le plafond pourra supporter jusqu un poids de 4 5 kg 10 lb pour des 2 x 2 1 x 4 et de 9 0 kg 20 lb pour des 2 x 4 1 Positionnez le cadre sur la surface et ma...

Page 8: ...tirer peut varier l g rement compte tenu de la pi ce que vous retirez Consultez les figures 7 et 8 ci dessous pour voir les d tails du retrait et de la r insertion 2 R installez la pi ce du cadre reti...

Page 9: ...mer les autres coins du cadre monter en surface Installation du luminaire 1 Glissez le luminaire dans le profil du cadre en surface en utilisant les vis fournies pour mettre la derni re pi ce du cadre...

Page 10: ...urnies avec la trousse de suspension pour installer les supports de montage au plafond 2 Ins rez les mousquetons dans les fentes du cadre montage en surface Figure 17 3 Consultez les instructions four...

Page 11: ...os a la propiedad ADVERTENCIA RENUNCIA DE RESPONSABILIDAD Eaton no asume ninguna responsabilidad por da os o p rdidas de ning n tipo que puedan surgir por la instalaci n manipulaci n o uso inadecuado...

Page 12: ...icie y marque los orificios de montaje Instalar la luminaria 1 Desatornille y retire una 1 de las piezas del marco y deslice la luminaria en el canal conserve los tornillos para volver a utilizarlos N...

Page 13: ...a pieza del marco extra da con los tornillos sostenedores para completar la instalaci n Figura 9 2 Deslice el marco adyacente en su lugar para que los orificios de separaci n se alineen con los del so...

Page 14: ...ras esquinas de la caja de montaje en superficie Instalar la luminaria 1 Deslice la luminaria en el canal de la caja de superficie y use los tornillos incluidos para fijar la pieza final del marco en...

Page 15: ...trucciones incluidas con el kit de suspensi n para fijar los soportes de montaje al cielo raso 2 Sujete los mosquetones a las ranuras en la caja de montaje en superficie Figura 17 3 Consulte las instr...

Page 16: ...com LightingWarrantyTerms para conocer nuestros t rminos y condiciones FCC Statement Note This equipment has been tested and found to comply with the limits for a Class A digital device pursuant to p...

Reviews: