background image

Eaton Power Xpert 9395C UPS Installation and Operation Manual 164000821—Rev 06

89

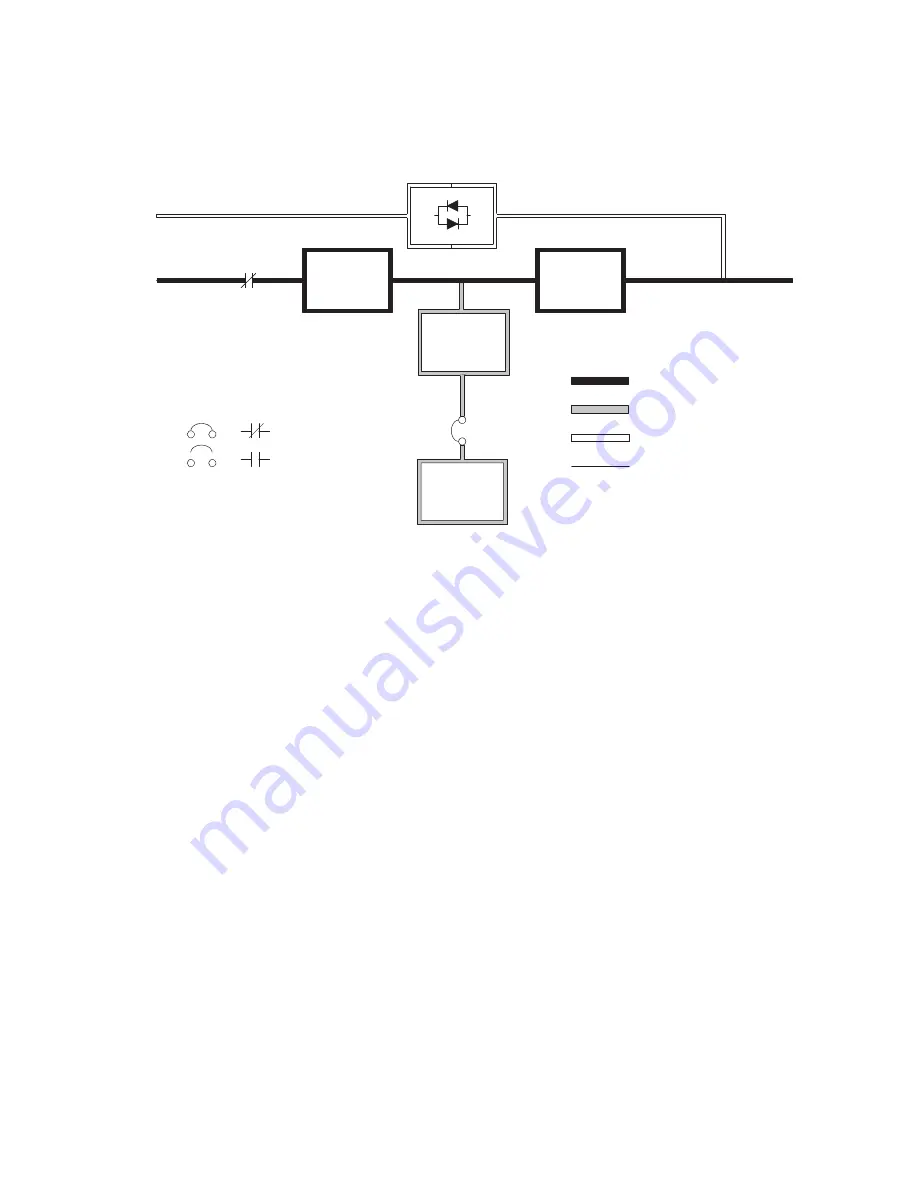
Figure 54. Path of Current Through the UPS in Online Mode

Static

Switch

r

e

tr

e

v

n

I

r

e

if

it

c

e

R

Battery

Converter

Battery

Battery

Breaker

Main Power Flow

Trickle Current

Energized

De-Energized

Static

Switch

r

e

tr

e

v

n

I

r

e

if

it

c

e

R

Main Power Flow

Trickle Current

Energized

De-Energized

Bypass Input

Rectifier

Input

Output

K1

Closed

Open

Breakers

Contactors

If the utility AC power is interrupted or is out of specification, the UPS automatically switches to Battery mode
to support the critical load without interruption. When utility power returns, the UPS returns to Normal mode.

If the UPS becomes overloaded or unavailable, the UPS switches to Bypass mode. The UPS automatically
returns to Normal mode when the overload condition is cleared and system operation is restored within
specified limits.

If the UPS suffers an internal failure, it switches automatically to Bypass mode and remains in that mode until
the failure is corrected and the UPS is back in service.

66..22..33

EEnneerrggyy S

Saavveerr S

Syysstteem

m ((EES

SS

S)) M

Mooddee

When the UPS is operating in ESS mode, commercial AC power is supplied directly to the critical load through
the continuous static switch. Power line filtering and spike protection for the load are provided by the input and
output filter networks, and the UPS actively monitors the critical bus for power disturbances. When in this
mode, the input contactor is closed and the link is maintained through the diode bridge.

If commercial power voltage or frequency disturbances are detected, the system forward transfers to Battery
mode for minor disturbances and then to double-conversion mode for more severe disturbances. During a
complete power outage, the transfer takes place within 2 ms to ensure loads being fed by the system output
are not interrupted. All forward transfers transfer to Battery mode before returning to double-conversion mode.

In High Alert mode the unit transfers from ESS mode to double-conversion mode or if in double-conversion
mode remains in double-conversion mode for a default time period of one hour (customer configurable). At the
completion of the time period, the unit defaults back to ESS mode. If the High Alert command is received
during the time period, the timer will be restarted.

ESS mode is a normal operating mode, and not an alarm condition. While the UPS is in this mode, the Online
light on the front display will illuminate.

Understanding UPS Operation

Summary of Contents for Power Xpert 9395C

Page 1: ...p n 164000821 Revision 06 1000kW 1000kVA 1000kW 1100kVA or 1100kW 1100kVA Installation and Operation Manual Eaton Power Xpert 9395C UPS...

Page 2: ...IONS This manual contains important instructions that you should follow during installation and maintenance of the UPS Please read all instructions before operating the equipment and save this manual...

Page 3: ...m a host of threats including power outages surges lighting strikes and enable you to monitor and control your power infrastructure We trust that your Eaton 9395 Uninterruptible Power Supply system wi...

Page 4: ...e license to use the Firmware in conjunction with the operation of the product to which the Firmware pertains or other products as described by Eaton in the Documentation Licensee does not acquire any...

Page 5: ...CT IS AT LICENSEE S SOLE RISK 5 0 GENERAL PROVISIONS 5 1 Update Policy Eaton may from time to time but has no obligation to create Updates of the Firmware or components thereof 5 2 Limitation on Liabi...

Page 6: ...nctions Programs Pages Programs aspx or to any national of any such country wherever located who intends to transmit or transport the Firmware back to such country ii to any end user who Licensee know...

Page 7: ...nfidential aspects of the Firmware shall not be disclosed to third parties without the prior written consent of Eaton Accordingly Eaton will be entitled to preliminary and permanent injunctive and oth...

Page 8: ......

Page 9: ...8 Warranty 6 2 2 S Sa af fe et ty y W Wa ar rn niin ng gs s 7 7 3 3 U UP PS S I In ns st ta alllla at tiio on n P Plla an n a an nd d U Un np pa ac ck kiin ng g 1 11 1 3 1 Creating an Installation Pla...

Page 10: ...4 5 3 Installing an Optional Remote Monitor Panel II 77 5 4 Installing an Optional Relay Interface Module II 80 5 5 Installing an Optional Supervisory Contact Module II 81 5 6 Accessory Mounting Dimen...

Page 11: ...Emergency Power off Switch 131 7 5 Multiple UPS Distributed Bypass Operation 133 7 5 1 Starting the Distributed Bypass System in Online Mode 133 7 5 2 Starting the Distributed Bypass System in Bypass...

Page 12: ...9 2 4 ANNUAL Maintenance 151 9 2 5 BATTERY Maintenance 151 9 3 Installing Batteries 152 9 3 1 Recycling the Used Battery or UPS 152 9 4 Maintenance Training 153 1 10 0 P Pr ro od du uc ct t S Sp pe e...

Page 13: ...Figure 17 Section Joining 39 Figure 18 ISBM to PM Access 40 Figure 19 ISBM Section Intercabinet Power Terminal Locations 43 Figure 20 ISBM Section Output Power to PM Terminal Detail 44 Figure 21 UPS...

Page 14: ...Common Rectifier Feed Common Battery Dual Feed Configuration 94 Figure 58 Simplified Dual Feed UPS with Maintenance Bypass Panel 95 Figure 59 Path of Current through the UPSs in Online Mode Distribut...

Page 15: ...r Log Detail Screen 123 Figure 93 Battery Log Screen 124 Figure 94 Battery Log Detail 124 Figure 95 Battery Log Summary Screen 125 Figure 96 Statistics Basic Screen 125 Figure 97 Statistics Data Detai...

Page 16: ...xvi Eaton Power Xpert 9395C UPS Installation and Operation Manual 164000821 Rev 06 List of Figures...

Page 17: ...nts Error Report Questions Describe Feedback Suggestions Name E mail Please complete the form and submit it to Eaton Technical Publications by clicking on the following link Document numbers can be fo...

Page 18: ...pikes sags and other irregularities that are inherent in commercial utility power Working with a building s electrical system the UPS system supplies clean consistent power that sensitive electronic e...

Page 19: ...d must be installed in accordance with Class 1 wiring methods 1 1 1 1 2 2 C Co on nt tr ro oll P Pa an ne ell The control panel located on the front of the UPS is a 7 inch color touchscreen to control...

Page 20: ...ansion using an external module Consult the Eaton Power Xpert 9395C Integrated Battery Cabinet Models 1085 and 1085HR Installation Manual TBD for specifics on battery cabinet usage with the 9395C 1 1...

Page 21: ...bile app Apple and Android giving subscribers insights about past and current performance a list of all active alarms and asset management data i e battery date codes last and next scheduled service d...

Page 22: ...nt WEEE in the trash For proper disposal contact your local recycling reuse or hazardous waste center Eaton Powerware and BladeUPS are registered trademarks of Eaton Corporation or its subsidiaries an...

Page 23: ...tive Please use the following e mail address for manual comments suggestions or to report an error in this manual E ESSDocumentation eaton com 1 1 8 8 W Wa ar rr ra an nt ty y To view the UPS warranty...

Page 24: ...t terminals may carry live voltage even when the UPS is disconnected from an AC source To reduce the risk of fire or electric shock install this UPS in a temperature and humidity controlled indoor env...

Page 25: ...oduit Lors de la v rification du fonctionnement de l UPS ne pas enlever la mise la terre si des charges y sont raccord es Ne pas ouvrir ni ab mer les batteries L lectrolyte qu elles contiennent est da...

Page 26: ...l onduleur ferm es et les panneaux avant en place pour garantir une circulation ad quate de l air de refroidissement et pour prot ger le personnel des tensions dangereuses dans l unit Ne pas installe...

Page 27: ...ompl tement les fourches dans les passages de fourche de la base NE PAS ins rer partiellement les fourches dans les passages pour d placer l armoire Il est possible d ins rer partiellement les fourche...

Page 28: ...pter 4 UPS System Installation to create a logical plan for installing the system 3 3 2 2 P Pr re ep pa ar riin ng g t th he e S Siit te e For the UPS system to operate at peak efficiency the installa...

Page 29: ...ata center There are two aspects of this increased operating environment that can if ignored create issues One is the creation of microclimates which are persistent variations of temperature and or RH...

Page 30: ...abinet Maximum Weights Model Section Maximum Weight kg lb Shipping Installed Eaton 9395C 1000 1000 UPS Total 2539 8 5599 2401 8 5295 Eaton 9395C 1000 1100 ISBM 817 4 1802 773 4 1705 Eaton 9395C 1100 1...

Page 31: ...nt Price Book for more information These documents can be found at www eaton com powerquality or contact an Eaton service representative to obtain copies The UPS ventilation requirements are shown in...

Page 32: ...t 9395C UPS Installation and Operation Manual 164000821 Rev 06 15 Figure 3 UPS Cabinet Dimensions Right Side View Dimensions are in millimeters inches 868 8 34 2 38 8 1 5 830 32 7 UPS Installation Pla...

Page 33: ...0821 Rev 06 Figure 4 ISBM Section Dimensions Front View 1964 77 3 Dimensions are in millimeters inches 1508 59 4 Figure 5 ISBM Section Dimensions Top View 770 30 3 32 1 2 32 1 3 438 17 2 Front Dimensi...

Page 34: ...and Operation Manual 164000821 Rev 06 17 Figure 6 ISBM Section Dimensions Bottom View CONDUIT LANDING FOR AC INPUT AND OUTPUT AND DC INPUT OPTIONAL TOP OR BOTTOM Figure 7 PM Section Dimensions 1880 7...

Page 35: ...9395C UPS Installation and Operation Manual 164000821 Rev 06 Figure 8 PM Dimensions Top View 720 7 28 37 720 8 28 38 720 7 28 37 2192 6 86 3 Dimensions are in millimeters inches Front UPS Installatio...

Page 36: ...re 9 UPS Center of Gravity Side View DIMENSIONS MM IN CENTER OF GRAVITY POWER CABINET A B 453 17 8 416 16 4 470 18 5 A B UPS ISBM 1160 45 7 1220 48 1 1132 44 6 1964 77 3 Front View ISBM 1508 59 4 POWE...

Page 37: ...by designated personnel If installing a maintenance bypass a minimum of two separate feeds with upstream feeder breakers or a single feed with two upstream feeder breakers must be provided one for th...

Page 38: ...ect wire size according to the UPS nameplate Do not use wire larger than the largest size listed in Table 5 Use terminal recommendations from Table 11 Size and number of conduits must not exceed those...

Page 39: ...rformance and battery run time Battery Cable Routing Requirements Conduit applications Each conduit must have a Positive Negative and Ground conductor There must be an equal number of positive and neg...

Page 40: ...se B 4 stud mounting 14 2 10 4 M8 E2A Phase C 4 stud mounting 14 2 10 4 M8 AC Input from ISBM E9A Phase A 4 stud mounting 14 2 10 4 M8 E10A Phase B 4 stud mounting 14 2 10 4 M8 E11A Phase C 4 stud mou...

Page 41: ...2 NOTE Customer ground sized in accordance with NEC Table 250 122 can be run in any conduit listed in Table 11 Table 9 Supplied External Wiring Terminal Hardware Kit Part Size Quantity Terminals Used...

Page 42: ...copper wiring only Table 11 480V Power Cable Conduit Recommendations UPS Model Voltage Terminal Number of Wires in Conduit Minimum Conduit Trade Size Number of Conduits Eaton 9395C 1000 1000 Eaton 93...

Page 43: ...ble 5 The recommended line to line load unbalance is 50 or less Bypass and output overcurrent protection and bypass and output disconnect switches are to be provided by the customer Module Output Brea...

Page 44: ...du r seau Une isolation renforc e des r seaux est n cessaire Read and understand the following notes while planning and performing the installation Use Class 1 wiring methods as defined by the NEC fo...

Page 45: ...slower walk in to ease the load step on the generator initially and HIGH ALERT mode for ESS NOTE 2 HIGH ALERT mode is desired because any loads with a leading power factor will not be seen by the gen...

Page 46: ...f the forks are kept in a horizontal position with no upward angling If these instructions are not followed damage to the wiring channel and wiring will occur Pour viter d endommager le c blage et son...

Page 47: ...slots see the caution statement at the beginning of this procedure Do not tilt the UPS cabinet more than 10 from vertical or the cabinet may tip over Ne pas incliner les armoires d onduleur plus de 1...

Page 48: ...Eaton Power Xpert 9395C UPS Installation and Operation Manual 164000821 Rev 06 31 Figure 11 UPS Cabinet as Shipped on Pallet ISBM Section UPS Installation Plan and Unpacking...

Page 49: ...32 Eaton Power Xpert 9395C UPS Installation and Operation Manual 164000821 Rev 06 Figure 12 UPS Cabinet as Shipped on Pallet PM Section UPS Installation Plan and Unpacking...

Page 50: ...uring installation Remove the conduit landing plates to add conduit landing holes as required Plate material is 16 gauge steel 1 5 mm 0 06 thick If perforated floor tiles are required for ventilation...

Page 51: ...riot l vateur pour viter de les endommager Pour viter d endommager le c blage et son canal la base de la section de l onduleur lorsque l armoire est soulev e ou d plac e Soulever ou d placer la sectio...

Page 52: ...nts If the sections must be moved using the cabinet front or rear fork lift slots see the caution statements at the beginning of this procedure 2 Remove the three bolts securing the left side shipping...

Page 53: ...see the caution statement at the beginning of this procedure raise the cabinet until the cabinet bottom clears the pallet by approximately 3 mm 1 8 5 Pull the pallet from under the cabinet Discard or...

Page 54: ...ation and Operation Manual 164000821 Rev 06 37 Figure 15 Removing the PM Section Left Side Shipping Bracket Shipping Bracket Bolts Shipping Bracket Bolts Pallet Left Side Shipping Bracket Removable Fr...

Page 55: ...g Bracket 4 4 3 3 I In ns st ta alllliin ng g a an nd d C Co on nn ne ec ct tiin ng g t th he e U UP PS S S Se ec ct tiio on ns s 4 4 3 3 1 1 P Pr re ep pa ar riin ng g t th he e U UP PS S S Se ec ct...

Page 56: ...e Figure 17 Lift the panel straight up to remove it from the panel hanger brackets at the top of the cabinet 3 Remove the screws securing the top and bottom internal safety shield panels and remove th...

Page 57: ...PM gap Temporary for Electrical Connection Access ISBM PM ISBM Wireway Power wiring harnesses are coiled in this area 4 4 3 3 2 2 E Elle ec ct tr riic ca alllly y C Co on nn ne ec ct tiin ng g t th he...

Page 58: ...and negative cable lug connections to the DC Input to PM terminals Follow the callout details in Figure 19 to connect the correct cable lug to the proper terminals See paragraph 3 2 4 UPS System Powe...

Page 59: ...ing P56 connector in the PM section wireway see Figure 21 and connect the J56 connector to the J56 connector 16 Locate the mating J60 connector in the PM section wireway see Figure 21 and connect the...

Page 60: ...Eaton Power Xpert 9395C UPS Installation and Operation Manual 164000821 Rev 06 43 Figure 19 ISBM Section Intercabinet Power Terminal Locations Power Module PM UPS System Installation...

Page 61: ...er Out Orange 2 ISBM Cable Power Out Orange ISBM Cable Power Out Orange PM Cable Power In Brown 2 PM Cable Power In Brown IPM Cable Power In Brown PM Cable Power Out Brown 2 PM Cable Power Out Brown P...

Page 62: ...ocation of RJ 45 Coiled CAN Cable Location of P61 Harness PM Section Left Side View ISBM Section Right Side View Looking in Front FRONT Location of J50 J51 J56 J61 J70 and P60 Coiled Harnesses Locatio...

Page 63: ...pert 9395C UPS Installation and Operation Manual 164000821 Rev 06 Figure 22 Pl1 Interface Board Location ISBM Section Right Side Inside View Looking out Pl1 Interface Board Front ISBM Interior UPS Sys...

Page 64: ...e U UP PS S S Se ec ct tiio on ns s NOTE Clearance between the ISBM and the PM sections must be less than 1 2 so that joining brackets can be installed 1 Using a forklift with the forks in the front...

Page 65: ...BM and PM sections Secure the bracket with the screws from the hardware kit see Figure 25 Figure 25 ISBM Section to PM Section Joining Brackets Front View Base Bracket UPM Section Base ISBM Section Ba...

Page 66: ...graphs to connect the external and battery power wiring 4 4 6 6 1 1 E Ex xt te er rn na all P Po ow we er r W Wiir riin ng g I In ns st ta alllla at tiio on n To install wiring to connections 1 Remove...

Page 67: ...50 Eaton Power Xpert 9395C UPS Installation and Operation Manual 164000821 Rev 06 Figure 26 ISBM and PM Section Debris Shields PM Top ISBM Top Debris Shields UPS System Installation...

Page 68: ...DC INPUT OPTIONAL TOP OR BOTTOM 4 Locate the external wiring terminal hardware kit packed on the bottom left side of the ISBM section 5 Using hardware from the external wiring terminal hardware kit se...

Page 69: ...he external wiring terminal hardware kit see Table 9 connect phase A B and C power wiring from output terminals to the critical load See paragraph 3 2 4 UPS System Power Wiring Preparation for wiring...

Page 70: ...m the rectifier to the AC bypass input terminals is used for single feed UPS units E7 E8 E6 ISBM SECTION A A GROUND BUS A A AC OUTPUT TO CRITICAL LOAD Phase E11 Phase E9 Phase E10 VIEW C VIEW B VIEW A...

Page 71: ...tern There must be a ground cable running in the raceway with the battery cables 1 Route the battery cables between the ISBM section and the battery system or battery disconnect See Figure 27 Figure 2...

Page 72: ...5 4 4 7 7 I In ns st ta alllliin ng g I In nt te er rf fa ac ce e C Co on nn ne ec ct tiio on ns s Hazardous voltages are present near the user interface terminal area if the UPS is not totally discon...

Page 73: ...unication bay To gain access to terminal block TB1 TB2 and the left interface entry conduit landing plates remove the screws securing the top internal safety shield panel and remove the panel Retain t...

Page 74: ...Eaton Power Xpert 9395C UPS Installation and Operation Manual 164000821 Rev 06 57 Figure 31 ISBM Section Interface Terminal Locations ISBM UPS System Installation...

Page 75: ...escription 1 Pull Chain Output Backup control for parallel operation 2 Pull Chain Common 3 Alarm Relay NC Output General purpose normally closed NC relay contact 4 Alarm Relay Common 5 Alarm Relay NO...

Page 76: ...S alarm activated by a remote dry contact closure Default function set for maintenance bypass 10 Building Alarm 5 Return NOTE Return indicates connection to electronics circuit ground Common indicates...

Page 77: ...contacts have a maximum current rating of 5A and a switched voltage rating of 30 Vac and 28 Vdc NOTE Alarm relay normally open and normally closed return terminals are separated on the terminal board...

Page 78: ...TE The building alarms can be programmed to display the alarm functional name NOTE A jumper wire must be connected between pins 1 and 2 on TB1 if the normally closed REPO contact is not used UPS TB1 T...

Page 79: ...see paragraph 3 2 4 UPS System Power Wiring Preparation Table 15 and Figure 31 through Figure 35 NOTE duit must be installed between the UPS and battery system 6 Remove the left interface entry condu...

Page 80: ...wiring to X Slot terminals route the wiring through the internal opening in the X Slot communication bay For installation and setup of an X Slot card contact an Eaton service representative see 1 7 G...

Page 81: ...install conduit between the device and the UPS cabinet for wiring the switch NOTE Remove the UPS cabinet interface entry conduit landing plates to drill or punch holes see Figure 27 NOTE The REPO swi...

Page 82: ...les see Figure 27 7 Reinstall the interface entry plate and install conduit 8 To locate the appropriate terminals and review the wiring and termination requirements see paragraph 3 2 4 UPS System Powe...

Page 83: ...from the REPO switch to the trip circuitry of the upstream protective devices A second contact block is provided on the REPO switch for this function see Figure 37 The REPO switch wiring must be in a...

Page 84: ...Open REPO Switch Wiring 3 NO UPS TB1 REPO Switch NO Twisted Wires 1 NC 2 Return 4 Return REPO Switch NC NOTE REPO switch rating is 24 Vdc 1A minimum NOTE The REPO switch must be a latching type switch...

Page 85: ...aton Customer Service Engineer must verify the operation of the UPS system and commission it to support the critical load The service representative cannot perform any installation tasks other than ve...

Page 86: ...ll LAN connections have been completed o A ground conductor is properly installed o Air conditioning equipment is installed and operating correctly o The area around the installed UPS system is clean...

Page 87: ...____________________ _________________________________________________________________________ _________________________________________________________________________ _______________________________...

Page 88: ...wiring should be a minimum of 22 AWG and a maximum of 14 AWG The wire should be rated for 1A minimum Use only 75 C copper wire 120 Vac for the RMP II RIM II or SCM II should be provided from the criti...

Page 89: ...rify the UPS system is turned off and all power sources are removed See Chapter 7 UPS Operating Instructions for shutdown instructions 2 Unfasten the front door latch and swing the door open see Figur...

Page 90: ...t Sync CAN Bridge Card Interface Connections J3 Terminal Name Description 1 Alarm Programmable UPS alarm Activated by a remote dry contact closure 2 Alarm Return 3 Alarm Relay NC Normally closed conta...

Page 91: ...left interface entry conduit landing plates remove the screws securing the top internal safety shield panel and remove the panel Retain the hardware for later use 4 Remove the interface entry conduit...

Page 92: ...Bridge Card Wiring Terminations From UPS 1 CAN Bridge Card From UPS 2 CAN Bridge Card To UPS 3 CAN Bridge Card If Installed To UPS 4 CAN Bridge Card If Installed J3 8 L J3 8 L J3 8 L J3 8 L J3 9 H J3...

Page 93: ...TE Always confirm contact operation prior to wiring 1 2 3 4 5 6 7 8 9 10 2 S P U 1 S P U 2 B T 2 B T 2 B T TB2 1 B T 1 B T 1 B T UPS 3 If Installed UPS 4 If Installed 1 2 3 4 5 6 7 8 9 10 1 2 3 4 5 6...

Page 94: ...TB2 1 Pull Chain MOB 3 Aux 2 NO Pull Chain UPS 3 TB2 2 Pull Chain Common UPS 4 TB2 2 Pull Chain Common Pull Chain Common UPS 4 CAN Bridge Card J3 1 Alarm MOB 4 Aux 1 NC MOB Open Alarm UPS 4 CAN Bridge...

Page 95: ...wiring information and Figure 48 Figure 46 and Table 21 for the SCM II terminal location and wiring information NOTE 120 Vac for the RMP II should be supplied from the critical bus by facility planner...

Page 96: ...11 To check the operation of the RMP II ensure that the UPS is supplying the load via inverter or bypass If the indicators on the RMP II show the appropriate status then it is operating correctly If t...

Page 97: ...are Hot Sync CAN Bridge Card terminal location and wiring information and Figure 45 Figure 46 and Table 21 for the RIM II terminal location and wiring information NOTE 120 Vac for the RIM II should be...

Page 98: ...Instructions for shutdown instructions NOTE If mounting to a hollow wall secure the enclosure to a wood or metal stud within the wall Do not use hollow wall anchors 2 Perform the procedure listed in...

Page 99: ...the terminal location and wiring information Figure 48 Supervisory Contact Module II Terminal Location Ground Terminal Terminal TB1 Signal Connections from the UPS Terminal TB3 120 Vac Power Terminal...

Page 100: ...l No Redundancy On Generator Bypass Not Available On Battery UPS Alarm On Bypass Shutdown Imminent NOTE Supervisory contacts are rated at 2 0A at 28 Vdc or 120 Vac and 0 15A at 115 Vdc NOTE Supervisor...

Page 101: ...hrough Figure 52 show the dimensions of the RMP II the RIM II and the SCM II Figure 50 Remote Monitor Panel II Dimensions Flush Mount using 10 Pan Head Screws Mount with vent holes facing up Surface M...

Page 102: ...lay Interface Module II Dimensions Knockouts Provided on Five Surfaces Surface Mount using 10 Pan Head Screws for Hanging Mount with vent holes facing up Flush Mount using 10 Pan Head Screws Mount wit...

Page 103: ...rvisory Contact Module II Dimensions Knockouts Provided on Five Surfaces Surface Mount using 10 Pan Head Screws for Hanging Mount with vent holes facing up Flush Mount using 10 Pan Head Screws Mount w...

Page 104: ...ility power returns For extended power outages the UPS system allows you to either transfer to an alternative power system such as a generator or shut down your critical load in an orderly manner Figu...

Page 105: ...de of operation 6 6 2 2 2 2 O On nlliin ne e M Mo od de e Figure 54 shows the path of electrical power through the UPS system when the UPS is operating in Online mode During normal UPS operation power...

Page 106: ...is operating in ESS mode commercial AC power is supplied directly to the critical load through the continuous static switch Power line filtering and spike protection for the load are provided by the i...

Page 107: ...the Bypass mode of operation The internal bypass is comprised of a SCR continuous static switch The static switch is used instantaneously anytime the inverter is unable to support the applied load Th...

Page 108: ...ckwards through the static switch and rectifier snubber components and re entering the input source If the input power fails to return or is not within the acceptance windows required for normal opera...

Page 109: ...tenance Bypass 1 Place the UPS in Bypass mode See the applicable UPS Operation Installation manual for details on transferring the UPS to Bypass mode NOTE Key K MB cannot be released from the SKRU unt...

Page 110: ...S to Bypass mode NOTE Key K UO CANNOT be released from the SKRU until the UPS is in Bypass mode Once key K UO is turned and released from the SKRU the UPS transfer to normal On Inverter will be inhibi...

Page 111: ...ms Alarm Relays Fuse Battery Converter Inverter Fuse Rectifier Input Contactor K1 Fuse PM Battery Breaker BATTERY SYSTEM E4 E5 Not supplied with the UPS A B C D Single Feed Kit EXTERNAL BATTERY CABINE...

Page 112: ...a minimum of two separate feeds with upstream feeder breakers or a single feed with two upstream feeder breakers must be provided one for the UPS or rectifier input breaker RIB if installed and one fo...

Page 113: ...tem ESS Mode In Bypass mode the critical load is directly supported by utility power through the bypass circuit in each UPS In Battery mode the battery provides DC power which maintains UPM operation...

Page 114: ...stem automatically switches to Bypass mode if it detects a UPS system overload or load fault If one UPS becomes unavailable the distributed bypass system dynamically updates the redundancy calculation...

Page 115: ...orded Bypass may also be used when the UPSs or UPMs in the system must be shut down to perform routine maintenance or repairs In the Parallel Redundant N 1 arrangement the bypass circuitry in each UPS...

Page 116: ...Flow UPS 1 UPS 2 Output to Critical Load Battery UPS Input Tie Cabinet UPS 1 Output UPS 2 Output Battery Closed Open Breakers If at any time during the battery discharge the input power becomes availa...

Page 117: ...n 9395C 1100 1100 Multiple UPS Distributed Bypass Continuous Static Switch 1 1 and 2 0 Configurations Figure 63 Eaton 9395C 1000 1000 Eaton 9395C 1000 1100 Eaton 9395C 1100 1100 Multiple UPS Distribut...

Page 118: ...CABINET E AC Output to Critical Load E4 E5 BATTERY SYSTEM MOB 1 MOB 2 Not supplied with the UPS C E9 E10 E11 E12 D Battery Breaker Battery Converter Inverter K3 Fuse Rectifier K1 K2 Fuse Fuse Fuse E6...

Page 119: ...E11 E12 D Battery Breaker Battery Converter Inverter K3 Fuse Rectifier K1 K2 Fuse Fuse Fuse E6 E7 E8 E12 K5 Static Switch Fuse E1 E2 E3 CB1 optional UPS 2 A B E4 E5 BATTERY SYSTEM Not supplied with t...

Page 120: ...K5 Static Switch Fuse E1 E2 E3 CB1 optional UPS 2 A B E4 E5 BATTERY SYSTEM Not supplied with the UPS C E9 E10 E11 E12 D Battery Breaker Battery Converter Inverter K3 Fuse Rectifier K1 K2 Fuse Fuse Fu...

Page 121: ...104 Eaton Power Xpert 9395C UPS Installation and Operation Manual 164000821 Rev 06 Understanding UPS Operation...

Page 122: ...n of the manual and have thorough knowledge of UPS operation before attempting to operate any of the controls NOTE The UPS displays two minutes of battery runtime at the initial startup After a 24 hou...

Page 123: ...T To ou uc ch hs sc cr re ee en n C Co on nt tr ro oll P Pa an ne ell This section describes how the various screens are used to control and monitor UPS operation Figure 66 shows the location of the c...

Page 124: ...67 UPS Color Touchscreen Control Panel Typical 2 Symbols enlarged to show detail 1 The color touchscreen control panel consists of A color liquid crystal touch screen display 1 A horizontal row of LED...

Page 125: ...n Battery mode Because Battery mode is a normal condition of the UPS the Online indicator also remains illuminated Yellow Lit Steady The UPS is in Bypass mode The critical load is supported by the byp...

Page 126: ...rms active notices and load percent and battery run time for the UPS If the Eaton Environmental Monitoring Probe is installed the temperature and humidity sensed by the probe will also be displayed Th...

Page 127: ...o display data in the information area to help you monitor and control UPS operation Table 27 shows the basic menu structure Table 27 Display Function Menu Map Menu Option Description HOME Displays th...

Page 128: ...s s S Su um mm ma ar ry y S Sc cr re ee en n Figure 71 shows the Meters Summary screen This screen allows selection of the various metering readout functions of Input Output and overall System status...

Page 129: ...821 Rev 06 Figure 71 Meters Summary Screen See Average Efficiency Figure See Consumption Figure Figure 72 shows the Input Meters screen This screen displays the individual phase and total power values...

Page 130: ...e system in additional detail The Bypass Output and Battery meters screens display similar values relevant to their monitoring of the system Figure 73 Input Meters Detail Screen The Input Meters Selec...

Page 131: ...Meters Screen shown in Figure 75 displays values pertaining to the Bypass conditions Figure 75 Bypass Meters Screen Indicates an Event System on Bypass The Output Meters Screen shown in Figure 76 dis...

Page 132: ...lecting the Output Meters Show Details button displays the Output Meters Details screen shown in Figure 77 Figure 77 Output Meters Details Screen Select the Battery Meters tab in Figure 78 shows the B...

Page 133: ...ansfer to bypass and LOAD OFF commands are controlled through this screen In addition the screen displays the current status of the UPS indicates whether the UPS is in Maintenance Bypass or Bypass and...

Page 134: ...shows the Module Control Detail screen By selecting any of the modules shown on the previous screen Figure 80 the user can observe full details of an individual module It also allows the user to move...

Page 135: ...after entering the access code or when the Power Maps tab from the Home screen menu is pressed The Power Maps screen shows a real time graphical representation of the operating status Figure 82 Main...

Page 136: ...fficiency screen shown in Figure 84 Figure 84 Average Efficiency Screen from Home Screen Pressing the CONSUMPTION Total kWh button displays the screen shown in Figure 85 Figure 85 Consumption Screen f...

Page 137: ...wer right side of the screen takes the user directly to that information screen Figure 86 Bypass Screen See Output kVA figure See Output kVA Efficiency figure See Consumption figure The UPS Module Map...

Page 138: ...ical Command Confirmation Screen Charger Off 7 7 3 3 7 7 S Sy ys st te em m E Ev ve en nt ts s M Ma aiin n S Sc cr re ee en n When the UPS system is running in Online mode it continually monitors itse...

Page 139: ...indicator is visible during normal UPS system operation The other indicators illuminate to indicate alarms or events When an alarm occurs first check these indicators to see what type of event has tak...

Page 140: ...Figure 91 User Log Screen 1 2 Selecting an event opens the User Log Detail screen shown in Figure 92 This screen details the specifics of the event Figure 92 User Log Detail Screen The Battery Log sc...

Page 141: ...821 Rev 06 Figure 93 Battery Log Screen Pressing the Battery Log button shows the Battery Log Detail screen Figure 94 Figure 94 Battery Log Detail The Battery Summary button from the Battery Log scree...

Page 142: ...a at tiis st tiic cs s B Ba as siic c S Sc cr re ee en n The Statistics Basic screen shown in Figure 96 allows the operator to query the system for various operational statistics such as shown in Figu...

Page 143: ...and Operation Manual 164000821 Rev 06 Figure 97 Statistics Data Detail Screen The ESS Comparison screen shown Figure 98 allows the operator to visually obtain EAA mode efficiency values Figure 98 ESS...

Page 144: ...as serial number installed firmware version etc Pressing the CLEAN SCREEN button disables the screen for 30 seconds to allow the user to safely clean the screen without affecting operation Figure 99...

Page 145: ...an nt ta ag ge e A Ar rc ch hiit te ec ct tu ur re e E EA AA A S Sc cr re ee en n The screen shown in Figure 101 allows the operator to activate the various energy saving and power efficiency modes o...

Page 146: ...e screen shown in Figure 102 asks the operator to verify disabling the ESS mode if installed running at that time ESS Mode is described in section 6 2 3 Energy Saver System ESS Mode Figure 102 Disable...

Page 147: ...ng logic power 4 Press the LOCK icon on any screen The Sign In screen is displayed Use operator password to log in factory default password is 0101 see Figure 68 and Figure 69 5 Select the Power Maps...

Page 148: ...in any system information follow the on screen prompts to get to the proper screen The operator cannot inadvertently cause a system dump or disconnect unless they override a warning pop up Value or in...

Page 149: ...distance avant d avoir d termin la raison du d clenchement 2 To deactivate the REPO switch in preparation for restarting the UPS insert the supplied key and rotate clockwise until the red pushbutton...

Page 150: ...indicating logic power 5 Press the LOCK icon on any screen The Sign In screen is displayed Use operator password to log in factory default password is 0101 see Figure 68 and Figure 69 6 Select the Pow...

Page 151: ...the Power Maps tab on the Home screen and verify the UPS status on the UPS Power Map screen and Power Module status on the UPS Module Map screen see Figure 82 and Figure 89 6 Return to the Home screen...

Page 152: ...PS status is SHUTDOWN and on the UPS Module Map screen verify the UPM status is SHUTDOWN 6 Verify no alarms are active on UPS being restarted 7 Verify the External Communications Failure alarm has cle...

Page 153: ...off Logic power remains on Power is present inside the UPS cabinet until the upstream input feeder circuit breaker is opened 3 Open systems MOBs 4 Open the input and bypass feeder circuit breakers on...

Page 154: ...e UPS to be shut down The System Controls screen is displayed see Figure 79 2 On the System Controls screen select LOAD OFF The Load Off screen is displayed providing a choice to proceed or abort the...

Page 155: ...e The battery breaker or disconnect is tripped and the power module is turned off immediately without asking for verification on all UPSs Do not attempt to restart the system after the Load Off until...

Page 156: ...ent System BMS using the Modbus RTU protocol Relay Interface Card AS 400 has isolated dry contact Form C relay outputs for UPS status Utility failure Low battery UPS alarm OK or On bypass when interfa...

Page 157: ...board and mobile app This allows you to collaborate and Eaton to notify the most appropriate person responsible for a specific site or device Real time access to key performance information alarms and...

Page 158: ...maintenance easy which minimizes the effort required and benefits the bottom line Eaton s cost effective Intelligent Power Software manages up to ten devices at no charge with licences for up to 100 d...

Page 159: ...ation of the UPS system from virtually any location within the facility up to 150m 500 ft from the UPS The RMP II contains backlit status indicators and a local horn The RMP II can be flush mounted or...

Page 160: ...is supplying the critical load The utility power is either interrupted or out of specification The SYSTEM NORMAL indicator is also illuminated BYPASS UNAVAILABLE The UPS system is in Online mode but...

Page 161: ...BLE Pins 1 and 12 Contacts are closed when the UPS is operating in Online mode or ready to supply the load UPS OFFLINE Pins 3 and 13 Contacts are open when the UPS is offline Contacts are closed when...

Page 162: ...flush mounted or surface mounted on a desktop or secured to a wall Figure 108 shows the SCM II Figure 108 Supervisory Contact Module II The SCM II provides signals for the indications shown in Table...

Page 163: ...146 Eaton Power Xpert 9395C UPS Installation and Operation Manual 164000821 Rev 06 Communication...

Page 164: ...lified service personnel only LETHAL VOLTAGE PRESENT This unit should not be operated with the cabinet doors open or protective panels removed Do not make any assumptions about the electrical state of...

Page 165: ...ing free access to the unit 2 Ensure the air intakes vents on the front door or panels and the exhaust openings on top of the PM section are not blocked 3 Ensure the operating environment is within th...

Page 166: ...nels removed in Step a and secure with the retained hardware e Remove one top screw and two bottom screws securing each ISBM section front panel see Figure 14 Lift the panel straight up to remove it f...

Page 167: ...n Power Xpert 9395C UPS Installation and Operation Manual 164000821 Rev 06 Figure 109 ISBM Section Air Filter Locations Continuous Static Switch Bottom ISBM Air Filters Middle ISBM Air Filter UPS Main...

Page 168: ...ntion should be given to bolted connections Maintenance procedures should specify that the bolted connections be retorqued to values listed in this manual 9 9 2 2 4 4 A AN NN NU UA AL L M Ma aiin nt t...

Page 169: ...r l onduleur ou ses batteries aux ordures Ce produit contient des batteries au plomb scell es il est important de l liminer convenablement Pour plus de renseignements communiquer avec le centre r gion...

Page 170: ...t your local recycling reuse or hazardous waste center Eaton Powerware and BladeUPS are registered trademarks of Eaton Corporation or its subsidiaries and affiliates Phillips and Pozidriv are register...

Page 171: ...154 Eaton Power Xpert 9395C UPS Installation and Operation Manual 164000821 Rev 06 UPS Maintenance...

Page 172: ...0 1000 kW 1000 kVA 50 60 Hz 1000 kW 1100 kVA 50 60 Hz 1100 kW 1100 kVA 50 60 Hz 1 10 0 2 2 S Sp pe ec ciif fiic ca at tiio on ns s The following sections detail the input output environmental and batt...

Page 173: ...pF Lagging Overload Capability kVA or kW 110 for 10 minutes 125 for 120 seconds 150 for 15 seconds NOTE The 125 and 150 overloads are based on the non derated hardware capability of the UPS 1 10 0 2...

Page 174: ...ev 06 157 1 10 0 2 2 4 4 B Ba at tt te er ry y R Ru un nT Tiim me e R Ra at tiin ng gs s kVA kW Ambient Temperature Battery Runtime minutes 1100 1100 35 C 95 F 12 1100 1000 40 C 104 F 20 1000 1000 40...

Page 175: ...16400082106 164000821 06...

Reviews: