background image

4.4 Electrical Installation

Install FI-UPM battery wiring from the battery cabinet to the FI-UPM battery terminal location in the 
UPS (refer to the applicable UPS manual listed in Section 1.4 on page 3). Wiring between the FI-UPM 
and the UPS, and FI-UPM battery terminals will be installed by an Eaton Customer Service Engineer. 
This service is offered as part of the sales contract for the FI-UPM. Contact an Eaton service 
representative in advance (usually a two-week notice is required) to request service.

4.5 Initial Startup

Startup and operational checks must be performed by an authorized Eaton Customer Service Engineer, 
or the warranty terms specified on page 23 become void. This service is offered as part of the sales 
contract for the FI-UPM. Contact an Eaton service representative in advance (usually a two-week 
notice is required) to reserve a preferred startup date.

4.6 Completing the Installation Checklist

The final step in installing the FI-UPM is completing the following Installation Checklist. This checklist 
ensures that all hardware, cables, and other equipment have been completely installed. Complete all 
items listed on the checklist to ensure a smooth installation. Make a copy of the Installation Checklist 
before filling it out, and retain the original.

After the installation is complete, an Eaton Customer Service Engineer must verify the operation of the 
FI-UPM and UPS system and commission it to support the critical load. The service representative will 
verify software and operating setup parameters. Service personnel may request a copy of the 
completed Installation Checklist to verify all applicable equipment installations have been completed.

NOTE

The Installation Checklist MUST be completed prior to starting the FI-UPM and UPS system for 
the first time.

Summary of Contents for Power Xpert 9395P

Page 1: ...Mechanical Installation Manual Power Xpert 9395P Field Installed UPM P 16400478...

Page 2: ......

Page 3: ...Power Xpert 9395P Field Installed UPM Mechanical Installation Manual...

Page 4: ...tenance des batteries et de l onduleur Veuillez consulter enti rement ces instructions avant de faire fonctionner l quipement et conserver ce manuel afin de pouvoir vous y reporter ult rieurement WARN...

Page 5: ...tion Plan and Unpacking 7 3 1 Creating an Installation Plan 7 3 2 Preparing the Site 7 3 3 Inspecting and Unpacking the FI UPM Cabinet 11 4 Field Installed UPM Installation 15 4 1 Preliminary Installa...

Page 6: ......

Page 7: ...e 3 4 FI UPM Cabinet Dimensions Bottom View dimensions are in millimeters inches 10 Figure 3 5 FI UPM Cabinet Dimensions Bottom View with Mounting Brackets dimensions are in millimeters inches 10 Figu...

Page 8: ......

Page 9: ...t of the sales contract for the FI UPM Contact an Eaton service representative in advance usually a two week notice is required to request service 1 1 Using This Manual This manual describes how to me...

Page 10: ...Figure 1 1 Eaton 9395P Field Installed UPM 1 3 Symbols controls and indicators The following are examples of symbols used on the UPS or accessories to alert you to important information...

Page 11: ...bilities of the UPS system Visit www eaton com power quality or contact Eaton service representative for information on how to obtain copies of these manuals 1 5 Getting Help If help is needed with an...

Page 12: ...Regional locations and telephone numbers A question about any of the information in this manual A question this manual does not answer Please call your local service representative...

Page 13: ...nected from an AC source To reduce the risk of fire or electric shock install this UPS and FI UPM in a temperature and humidity controlled indoor environment free of conductive contaminants Ambient te...

Page 14: ...6...

Page 15: ...applies to the system being installed Use the procedures and illustrations in Section 3 2 and Chapter 4 to create a logical plan for installing the system 3 2 Preparing the Site For the FI UPM to ope...

Page 16: ...erating Range 20 25 C Maximum Relative Humidity 95 noncondensing The FI UPM ventilation requirements are shown in Table 3 3 Table 3 3 FI UPM Air Conditioning or Ventilation Requirements During Full Lo...

Page 17: ...net Dimensions Front View dimensions are in millimeters inches Figure 3 2 FI UPM Cabinet Dimensions Right Side View dimensions are in millimeters inches 1871 5 73 7 732 28 8 871 34 3 831 5 32 7 39 5 1...

Page 18: ...ttom View dimensions are in millimeters inches Figure 3 5 FI UPM Cabinet Dimensions Bottom View with Mounting Brackets dimensions are in millimeters inches 1 12 7 0 5 X 15 8 0 62 Slot 6X 758 8 20 37 1...

Page 19: ...bolted to a wooden pallet and protected with outer protective packaging material see Figure 3 7 WARNING The FI UPM cabinet is heavy see Table 3 1 on page 8 If unpacking and unloading instructions are...

Page 20: ...cal or the cabinet may tip over 3 Set the pallet on a firm level surface allowing a minimum clearance of 3m 10 ft on each side for removing the cabinet from the pallet NOTE The FI UPM cabinet is shipp...

Page 21: ...Figure 3 7 Eaton 9395P FI UPM Cabinet as Shipped on Pallet...

Page 22: ......

Page 23: ...tallation is complete However remove the shield before operating the UPS system Once the debris shield is removed do not place objects on the ventilation grill A FI UPM is always designated as UPM 4 4...

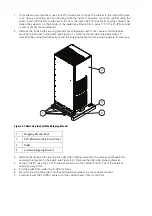
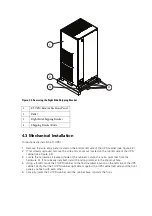
Page 24: ...side shipping bracket If installing the cabinet permanently retain the shipping bracket and securing hardware for later use Figure 4 1 Removing the Left Side Shipping Bracket 3 Remove the three bolts...

Page 25: ...d inside of the cabinet Locate the nylon grommet from the hardware kit If not already installed install the nylon grommet in the knockout hole 4 Using a forklift move the FI UPM cabinet to the final i...

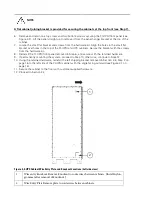
Page 26: ...ll the FI UPM front panel removed in Step 6 and secure with the retained hardware 9 If permanently mounting the system proceed to Step 10 otherwise continue to Step 12 10 Using the retained hardware r...

Page 27: ...advance usually a two week notice is required to reserve a preferred startup date 4 6 Completing the Installation Checklist The final step in installing the FI UPM is completing the following Installa...

Page 28: ......

Page 29: ...nstalled and operating correctly The area around the installed UPS system is clean and dust free It is recommended that the UPS be installed on a level floor suitable for computer or electronic equipm...

Page 30: ...Notes...

Page 31: ...lternation or ambient conditions of the equipment do not fulfil the requirements specified in the documentation delivered with the unit and other relevant documentation Equipment subjected to misuse n...

Reviews: