background image

User’s Guide P-164000628

P-164000628—Rev 05

9

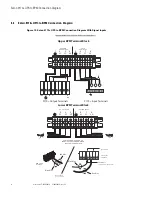
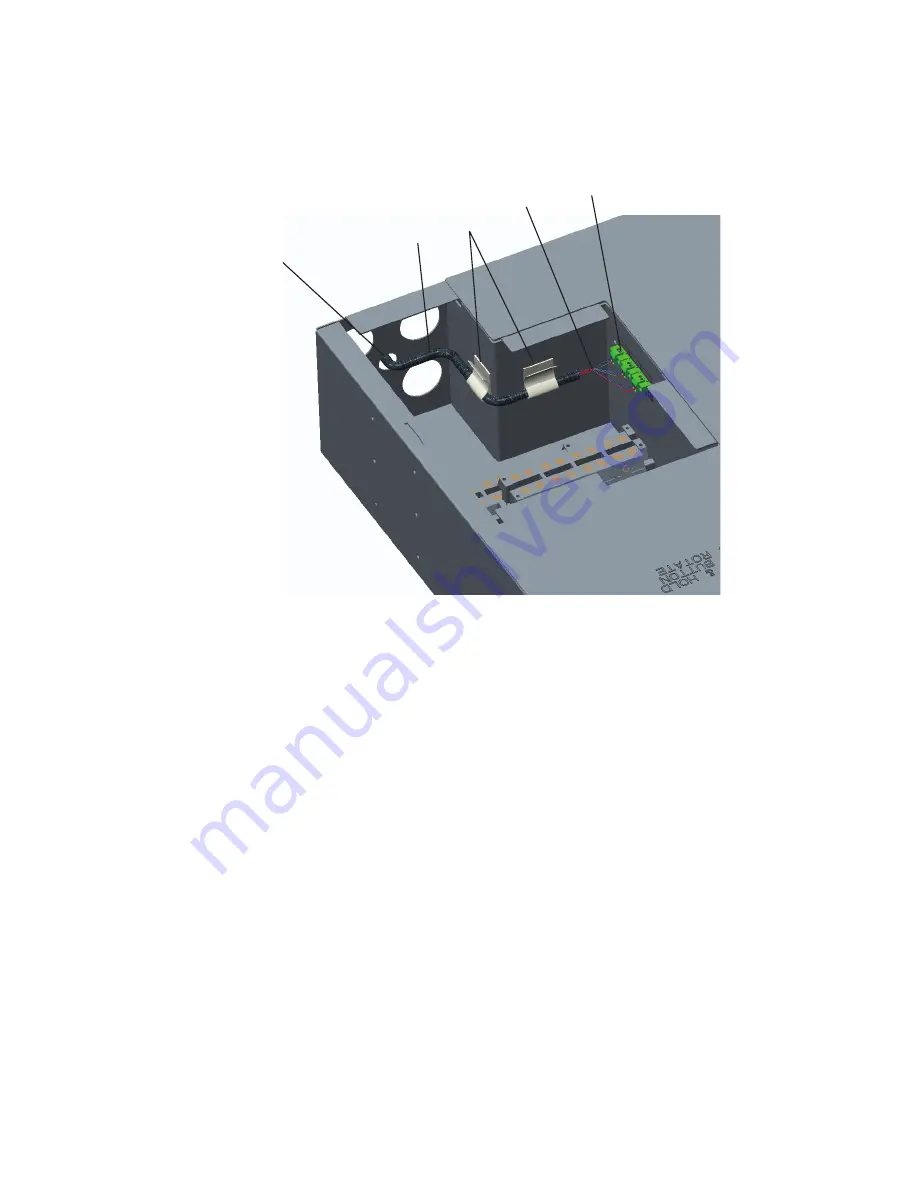
Figure 10. Signal Wire RoutingSignal Wire Routing

Signal Wire

Openin g

Rear of

BPM

Wire

Clips

Signal Wirings

Terminal

Blocks

Insulation

Signal Wire Routing

Summary of Contents for Powerware 9155

Page 1: ...164000628 Revision 05 For use with the Following Eaton 9155 UPS 8 15kVA Eaton 9170 UPS 3 18kVA Eaton 9PX Split Phase UPS 6 10kVA Eaton 9PXM Split Phase UPS 4 20kVA Eaton Bypass Power Module BPM Users...

Page 2: ...r s manual for additional information such as important operating and maintenance instructions This symbol indicates that you should not discard the product in the trash This product must be disposed...

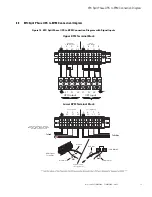
Page 3: ...nt and Wire Ratings 7 2 6 Signal Wire Routing 8 3 3 B BP PM M t to o U UP PS S C Co on nn ne ec ct tiio on n D Diia ag gr ra am ms s 1 11 1 3 1 Eaton 9155 UPS to BPM Connection Diagram 11 3 2 Eaton 91...

Page 4: ...iv User s Guide P 164000628 P 164000628 Rev 05 Table of Contents...

Page 5: ...e 8 BPM with Wallmount Brackets 6 Figure 9 BPM Hardwired Overview 7 Figure 10 Signal Wire RoutingSignal Wire Routing 9 Figure 11 Eaton 9155 UPS to BPM Connection Diagram Using Signal Inputs 11 Figure...

Page 6: ...vi User s Guide P 164000628 P 164000628 Rev 05 List of Figures...

Page 7: ...User s Guide P 164000628 P 164000628 Rev 05 vii L Liis st t o of f T Ta ab blle es s Table 1 BPM Positions 1 Table 2 RBPM Terminal Block Sizing 8...

Page 8: ...viii User s Guide P 164000628 P 164000628 Rev 05 List of Tables...

Page 9: ...igh levels of voltage and current The BPM should only be operated by an experienced user familiar with UPS behavior and functionality Installation for models requiring hardwire connections should be p...

Page 10: ...PS remains powered which is often beneficial for troubleshooting obtaining logs or updating firmware SERVICE Like the LINE position the SERVICE position connects the load directly to AC input power an...

Page 11: ...verify that the Eaton UPS is OFF before you remove the entrance panel The circuit breaker or disconnect switch must also be off at the AC input service panel Also turn OFF the AC disconnect and bypass...

Page 12: ...4 post rail kit included with the BPM see Figure 2 Figure 2 Install Rail Kit 2 Place the BPM on the rails and push the BPM into the rack Verify that the breakers are facing the front of the rack and t...

Page 13: ...ring is complete replace the covers removed in Step 4 and Step 5 8 Push the BPM past the front of the rack to allow access for the mounting ears installation 9 Install the mounting ears to the BPM usi...

Page 14: ...ocation for the bypass switch within sight of the UPS NOTE The bypass switch should be mounted securely to a sturdy surface You may need to turn the cabinet 90 degrees on its side to enable operator a...

Page 15: ...lection Refer to the UPS manual for recommended input breaker size To easily expand the system it is recommended that initial installation of the BPM and UPS contains wiring to support the maximum cap...

Page 16: ...he conduit or long service runs Follow local code requirements 2 2 6 6 S Siig gn na all W Wiir re e R Ro ou ut tiin ng g The auxiliary contacts must be wired to the BPM from the UPS for proper functio...

Page 17: ...User s Guide P 164000628 P 164000628 Rev 05 9 Figure 10 Signal Wire RoutingSignal Wire Routing Signal Wire Openin g Rear of BPM Wire Clips Signal Wirings Terminal Blocks Insulation Signal Wire Routing...

Page 18: ...10 User s Guide P 164000628 P 164000628 Rev 05 Signal Wire Routing...

Page 19: ...put Output 1 2 3 4 5 6 7 8 L2 N L1 L2 N L1 AC TO LOADS CABLES FROM UPS AND AC INPUT OUTPUT THROUGH BPM BOTTOM ACESS PLATE AC LINE INPUT BPM Signal Terminals Install conduit over signal wires To Signal...

Page 20: ...N L1 1 2 3 4 5 6 7 8 L2 N L1 L2 N L1 AC TO LOADS CABLES FROM UPS AND AC INPUT OUTPUT THROUGH BPM BOTTOM ACESS PLATE AC LINE INPUT To Load To Utility DC X3 X2 X1 N DC 9170 Output Terminals 3 2 1 9170...

Page 21: ...2 3 4 5 6 7 8 AC TO UPS INPUT AC FROM UPS OUTPUT L2 N L1 L2 N L1 1 2 3 4 5 6 7 8 L2 N L1 L2 N L1 AC TO LOADS CABLES FROM UPS AND AC INPUT OUTPUT THROUGH BPM BOTTOM ACESS PLATE AC LINE INPUT L1 N L2 L...

Page 22: ...L2 N L1 L2 N L1 AC TO LOADS CABLES FROM UPS AND AC INPUT OUTPUT THROUGH BPM BOTTOM ACESS PLATE AC LINE INPUT To Load To Utility L1 L2 N L1 L2 N 9PXM Output Terminals 9PXM Input Terminals Install condu...

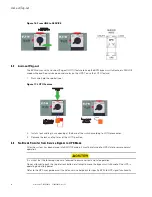
Page 23: ...ress and hold the red button and turn the switch to LINE see Figure 15 NOTE Pressing the red button sends the UPS into Internal Bypass mode This allows the UPS output to synchronize with utility for s...

Page 24: ...res 3 Remove the lock and tag to reset the LOTO position 4 4 3 3 N No o B Br re ea ak k T Tr ra an ns sf fe er r f fr ro om m S Se er rv viic ce e B By yp pa as ss s t to o U UP PS S M Mo od de e Afte...

Page 25: ...he switch to UPS see NOTE 1 Pressing the red button sends the UPS into Internal Bypass mode This allows the UPS output to synchronize with utility for safe uninterrupted transfer NOTE 2 In UPS mode th...

Page 26: ...18 User s Guide P 164000628 P 164000628 Rev 05 No Break Transfer from Service Bypass to UPS Mode...

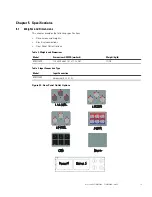
Page 27: ...es the following specifications Dimensions and weights Electrical connections Rear Panel Outlet Options Table 3 Weights and Dimensions Model Dimensions HXWXD mm inch Weight kg lb BPM125XX 130 x 440 x...

Page 28: ...P 16400062805 P 164000628 05...

Reviews: