background image

Chapter 6—Installation Requirements

DG1 Series VFD

MN040002EN—March 2014

www.eaton.com

27

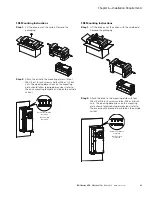
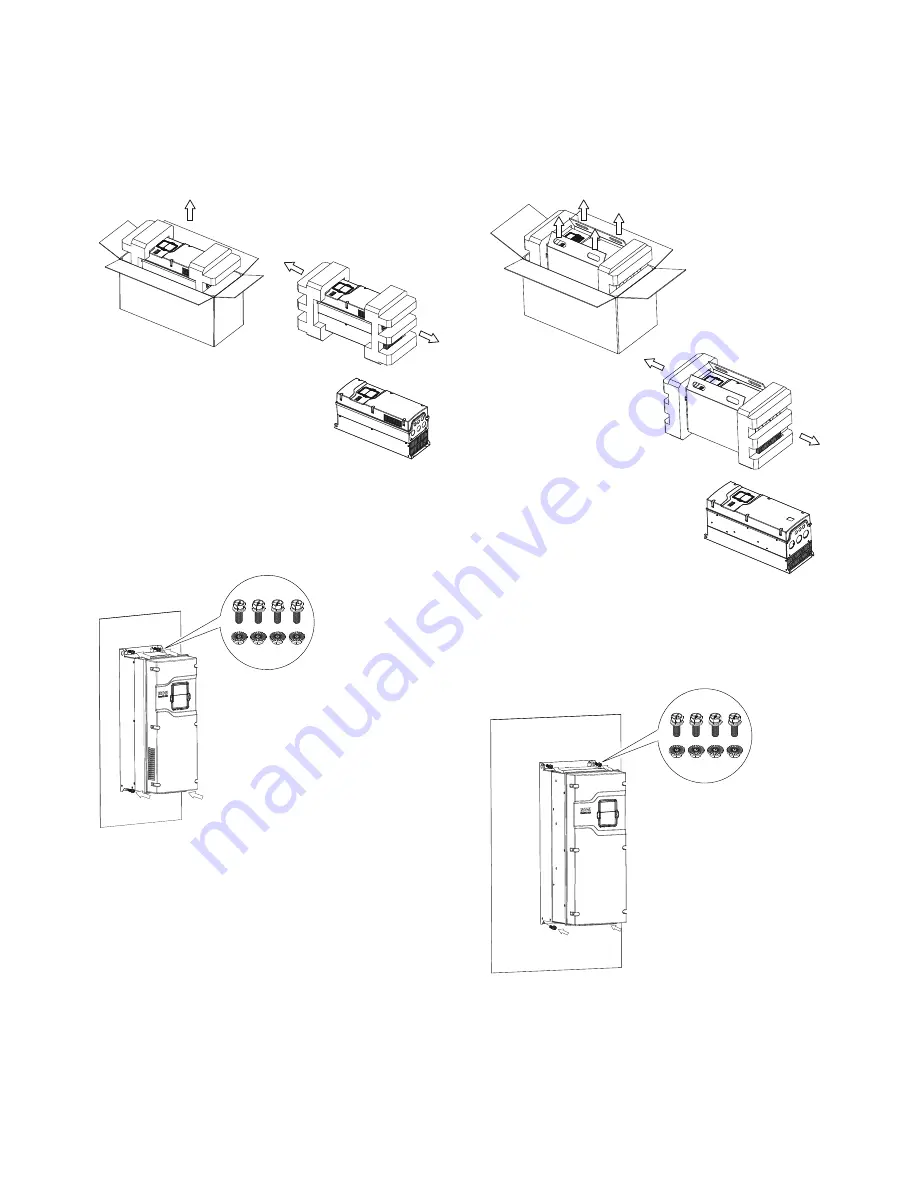
FR3 Mounting Instructions

Step 1:

Lift the drive out of the carton. Remove the 
packaging.

Step 2:

Attach the drive to the mounting plate with four 
M6x15 or 1/4 inch screws and four M6 or 1/4 inch 
nuts. The opening dimensions on the mounting 
plate should follow required dimensions (refer to 
the drive mounting template printed on the outside 
carton).

FR4 Mounting Instructions

Step 1:

Lift the drive out of the carton with the cardboard. 
Remove the packaging.

Step 2:

Attach the drive to the mounting plate with four 
M8x15 or 3/8 inch screws and four M8 or 3/8 inch 
nuts. The opening dimensions on the mounting 
plate should follow required dimensions (refer to 
the drive mounting template printed on the outside 
carton).

Screw: Four M6x15

or 1/4 inch

Nut: Four M6

or 1/4 inch

Screw: Four M8x15

or 3/8 inch

Nut: Four M8

or 3/8 inch

Summary of Contents for PowerXL DG1-32011FB-C21C

Page 1: ...PowerXL DG1 Series VFD Installation Manual Effective March 2014 New Information ...

Page 2: ......

Page 3: ...CHANTABILITY OTHER THAN THOSE SPECIFICALLY SET OUT IN ANY EXISTING CONTRACT BETWEEN THE PARTIES ANY SUCH CONTRACT STATES THE ENTIRE OBLIGATION OF EATON THE CONTENTS OF THIS DOCUMENT SHALL NOT BECOME PART OF OR MODIFY ANY CONTRACT BETWEEN THE PARTIES In no event will Eaton be responsible to the purchaser or user in contract in tort including negligence strict liability or otherwise for any special ...

Page 4: ... product information You can also find information on local distributors or Eaton s sales offices Website Address www eaton com drives EatonCare Customer Support Center Call the EatonCare Support Center if you need assistance with placing an order stock availability or proof of shipment expediting an existing order emergency shipments product price information returns other than warranty returns a...

Page 5: ...NGINEERING CONSIDERATIONS Introduction 9 Electrical Power Network 10 Input Voltage and Frequency 10 Input Voltage Balance 10 Total Harmonic Distortion THD 11 Reactive Power Compensation Devices 11 CHAPTER 3 PRODUCT OVERVIEW Component Identification 12 Selection Criteria 14 Proper Use 14 Maintenance and Inspection 15 Storage 15 Service and Warranty 15 CHAPTER 4 SAFETY AND SWITCHING Fuses and Cable ...

Page 6: ...nnection to Power Section 38 Three Phase Input Connection 38 Terminal Designations in the Power Section 38 Ground Connection 39 Product Modified Sticker 39 Checking the Cable and Motor Insulation 39 CHAPTER 7 EMC INSTALLATION EMC Measures in the Control Panel 40 Earthing 40 Screen Earth Kit 40 Installation Requirements 41 International EMC Protection Cable Requirements 42 Installation in Corner Gr...

Page 7: ...25 Figure 18 Input Power and Motor Cable Stripping Lengths 30 Figure 19 Ground Wiring 33 Figure 20 Terminal Block Layout 35 Figure 21 Basic Internal Control Wiring Diagram 36 Figure 22 DG1 Series Adjustable Frequency Drive 37 Figure 23 Thermistor STO Wiring Diagram 38 Figure 24 Connection to Power Section 38 Figure 25 Grounding 39 Figure 26 Product Modified Sticker 39 Figure 27 EMC Compliant Setup...

Page 8: ...ngths 30 Table 23 I O Connection 34 Table 24 I O Specifications 35 Table 25 1st Environment 2nd Environment EMC Levels According to EN 61800 3 2004 42 Table 26 Control Wiring Requirements 42 Table 27 Cable Categories 42 Table 28 PowerXL Series DG1 44 Table 29 North America Cable and Fuse Sizes 208 Vac to 240 Vac Ratings 46 Table 30 International Cable and Fuse Sizes 208 Vac to 240 Vac Ratings 47 T...

Page 9: ...rograms interrupted after a voltage dip or failure This should not cause dangerous operating states even for a short time If necessary emergency stop devices should be implemented Wherever faults in the automation system may cause injury or material damage external measures must be implemented to ensure a safe operating state in the event of a fault or malfunction for example by means of separate ...

Page 10: ...checking components Always work with another person in case an emergency occurs Disconnect power before checking controllers or performing maintenance Be sure equipment is properly earthed Wear safety glasses whenever working on electronic controllers or rotating machinery WARNING The components in the drive s power section remain energized after the supply voltage has been switched off After disc...

Page 11: ...B is allowed on the supply side of this product WARNING Carry out wiring work only after the drive has been correctly mounted and secured WARNING Before opening the drive covers Disconnect all power to the drive including external control power that may be present Wait a minimum of five minutes after all the lights on the keypad are off This allows time for the DC bus capacitors to discharge A haz...

Page 12: ...ions that are directly exposed to sunlight or have high concentrations of dust corrosive gas explosive gas inflammable gas grinding fluid mist etc Improper installation may result in a fire hazard CAUTION When selecting the cable cross section take the voltage drop under load conditions into account The consideration of other standards is the responsibility of the user The user is responsible for ...

Page 13: ...Prior to any tests or measurements of the motor or the motor cable disconnect the motor cable at the drive output terminals U V W to avoid damaging the drive during motor or cable testing CAUTION Do not touch any components on the circuit boards Static voltage discharge may damage the components CAUTION Before starting the motor check that the motor is mounted properly and aligned with the driven ...

Page 14: ...iod turn the drive on at least every six months for at least 5 hours to restore the performance of the capacitors and then check its operation It is recommended that the drive is not connected directly to the line voltage The voltage should be increased gradually using an adjustable AC source Failure to follow these instructions can result in injury and or equipment damage For more technical infor...

Page 15: ...L040016EN Quick Start Guide MN040006EN User Manual CD CD040002EN and accessory packet The accessory packet includes Rubber grommets Control cable grounding clamps Additional grounding screw Inspect the unit to ensure it was not damaged during shipment Make sure that the part number indicated on the nameplate corresponds with the catalog number on your order If shipping damage has occurred please c...

Page 16: ... 2 DG1 Series VFD MN040002EN March 2014 www eaton com Rating Label Figure 2 Rating Label Carton Labels U S and Europe Same as rating label shown above Contains SN PN Type Date Contains EAN Code Date Code 20131118 Contains NAED Code ...

Page 17: ...00 hp 2D2 2 2A 0 75 kW 1 hp 3D3 3 3A 1 1 kW 1 5 hp 4D3 4 3A 1 5 kW 2 hp 5D6 5 6A 2 2 kW 3 hp 7D6 7 6A 3 kW 5 hp 9D0 9A 4 kW 7 5 hp VT 012 12A 5 5 kW 7 5 hp 016 16A 7 5 kW 10 hp 023 23A 11 kW 15 hp 031 31A 15 kW 20 hp 038 38A 18 kW 25 hp 046 46A 22 kW 30 hp 061 61A 30 kW 40 hp 072 72A 37 kW 50 hp 087 87A 45 kW 60 hp 105 105A 55 kW 75 hp 140 140A 75 kW 100 hp 170 170A 90 kW 125 hp 205 205A 110 kW 15...

Page 18: ...32088FN C21C FR5 30 37 40 50 114 143 DG1 32114FN C21C 37 45 50 60 143 170 DG1 32143FN C21C 45 55 60 75 170 211 DG1 32170FN C21C FR6 1 55 75 75 100 211 261 DG1 32211FN C21C 75 90 100 125 261 312 DG1 32261FN C21C Frame Size 230V 50 Hz kW Rating CT IH 230V 50 Hz kW Rating VT IL 230V 60 Hz hp CT IH 230V 60 Hz hp VT IL Current A CT IH Current A VT IL Catalog Number FR1 0 55 0 75 0 75 1 3 7 4 8 DG1 323D...

Page 19: ... 105 140 DG1 34105FN C21C 75 90 100 125 140 170 DG1 34140FN C21C 90 110 125 150 170 205 DG1 34170FN C21C FR6 1 110 132 150 200 205 261 DG1 34205FN C21C 132 160 200 250 261 310 DG1 34261FN C21C Frame Size 400V 50 Hz kW Rating CT IH 400V 50 Hz kW Rating VT IL 460V 60 Hz hp CT IH 460V 60 Hz hp VT IL Current A CT IH Current A VT IL Catalog Number FR1 0 75 1 1 1 1 5 2 2 3 3 DG1 342D2FB C54C 1 1 1 5 1 5...

Page 20: ...cover DXG SPR FR1MCC DXG SPR FR1MCC 2 Outer housing DXG SPR FR1OH DXG SPR FR1OH 2 UL conduit plate DXG SPR FR1CPUL DXG SPR FR1CPUL 2 IEC conduit plate DXG SPR FR1CPIEC DXG SPR FR1CPIEC 2 Catalog Number Catalog Number Catalog Number Description 230V 480V 575V Standard keypad 1 DXG KEY LCD DXG KEY LCD DXG KEY LCD Main control board 1 DXG SPR CTRLBOARD DXG SPR CTRLBOARD DXG SPR CTRLBOARD Control boar...

Page 21: ...DXG SPR FR3MCC 2 Outer housing DXG SPR FR3OH DXG SPR FR3OH 2 UL conduit plate DXG SPR FR3CPUL DXG SPR FR3CPUL 2 IEC conduit plate DXG SPR FR3CPIEC DXG SPR FR3CPIEC 2 Catalog Number Catalog Number Catalog Number Description 230V 480V 575V Standard keypad 1 DXG KEY LCD DXG KEY LCD DXG KEY LCD Main control board 1 DXG SPR CTRLBOARD DXG SPR CTRLBOARD DXG SPR CTRLBOARD Control board cover DXG SPR BCOVE...

Page 22: ... FR5CVR 2 Main fan kit 1 DXG SPR FR5FAN DXG SPR FR5FAN 2 Control fan DXG SPR FR5CF DXG SPR FR5CF 2 Bus capacitor DXG SPR FR5BC DXG SPR FR5BC 2 Main power board DXG SPR 2FR5MPB DXG SPR 4FR5MPB 2 EMI 1 board DXG SPR 2FR5E1B DXG SPR 4FR5E1B 2 EMI 2 board DXG SPR 2FR5E2B DXG SPR 4FR5E2B 2 EMI 3 board DXG SPR FR5E3B DXG SPR FR5E3B 2 IGBT module DXG SPR FR5IGBT DXG SPR FR5IGBT 2 Rectifier module DXG SPR...

Page 23: ...No Description 1 Power grid configuration input voltage input frequency interactions with PF correction systems 2 Breakers fuses cable cross sections 3 Protection of persons and animals with residual current protective devices 4 Input contactor disconnector 5 Frequency inverter mounting installation power connection EMC measures circuit examples 6 Output contactor disconnector 7 Output reactor dV ...

Page 24: ...es further steps are superfluous Input Voltage and Frequency The standardized input voltages IEC 60038 VDE017 1 for energy suppliers EVU guarantee the following conditions at the transition points Deviation from the rated value of voltage Max 10 Deviation in voltage phase balance Max 3 Deviation from rated value of the frequency Max 4 The board tolerance band of the DG1 frequency inverter consider...

Page 25: ...ined in standard IEC EN 61800 3 as the ratio of the rms value of all harmonic components to the rms value of the fundamental frequency It is given in percent of the total value The THD value of the harmonic distortion is stated in relation to the rms value of the total signal as a percentage On a variable frequency drive the total harmonic distortion is around 120 To assist in the calculation of s...

Page 26: ...igure 6 Description of the DG1 Series Features The DG1 frequency inverter converts the voltage and frequency of an existing AC network into a DC voltage This DC voltage is used to generate a three phase AC voltage with adjustable frequency and assigned amplitude values for the variable speed control of three phase asynchronous motors ...

Page 27: ...e IGBT based inverter converts the DC voltage of the DC link UDC into a three phase AC voltage U2 with variable amplitude and frequency f2 Sinusoidal pulse width modulation PWM with V f control can be switched to speed control with slip compensation 6 Motor connection U T1 V T2 W T3 with output voltage U2 0 100 Ue and output frequency f2 0 400 Hz output current I2 DG1 32 3 7A to 261A DG1 34 2 2A t...

Page 28: ...e frequency inverter Switching in the output of the frequency inverter is only permitted with V Hz characteristic curve control Proper Use The DG1 frequency inverters are electrical apparatus for controlling variable speed drives with three phase motors They are designed for installation in machines or for use in combination with other components within a machine or system After installation in a ...

Page 29: ... this the DG1 variable frequency drive must be supplied with power with a controlled DC power supply unit via two mains DC bus connection terminals Please consult the factory for detailed instructions Service and Warranty In the unlikely event that you have a problem with your DG1 frequency inverter please contact your local sales office When you call have the following information ready the exact...

Page 30: ...respond with local standards For an installation in accordance with UL guidelines Use UL recognized Class T fuses for the branch circuit protection Use 75 C copper wire only Use UL listed conduit fittings with the same type rating Type 1 Type 12 as the enclosure See Appendix D Safety Instructions for UL and cUL for details Use power cables with insulation according to the specified input voltages ...

Page 31: ...e original protective earthing conductor must be connected or the cross section of the equipment grounding conductor must be at least 10 mm2 Cu Residual current circuit breakers must be suitable for the protection of installations with DC current component in case of fault scenario RCD type B high leakage currents brief discharges of pulse current spikes Input Contactor The input contactor enables...

Page 32: ...individual components in a PDS compliant with IEC EN 61800 3 do not apply These component manufacturers however must offer solutions that ensure standards compliant use In Europe maintaining the EMC guidelines is mandatory A declaration of conformity CE always refers to a typical power drive system PDS The responsibility to comply with the legally stipulated limit values and thus the provision of ...

Page 33: ...lasses apart Ensure that the motor is not over dimensioned If a motor in speed control mode is under dimensioned the motor rating must only be one rating level lower Connecting Motors in Parallel The DG1 frequency inverters allow parallel operation of several motors using multi pump application control mode Multi pump application several motors with the same or different rated operational data The...

Page 34: ...er s output can lead to nuisance tripping Motor and Circuit Type The motor s stator winding can be connected in a star or delta configuration in accordance with the rated operational data on the nameplate Figure 12 Example of a Motor Ratings Plate Figure 13 Star and Delta Circuit Types The three phase motor with the rating plate based on Figure 13 can be run in a star or delta connection The opera...

Page 35: ...r Circuit See Figure 14 Notes 1 Star connection 400V 50 Hz 2 Delta connection 230V 50 Hz 3 Delta connection 400V 87 Hz 4 Note the permitted limit values of the motor Frequency Inverters DG1 323D7FB DG1 343D3FB DG1 344D3FB Rated operational current 3 7A 3 3A 4 3A Input voltage 3 AC 230V 3 AC 400V 3 AC 400V Motor circuit Delta Star Delta V Hz characteristic curve 2 1 3 Motor current 3 5A 2 0A 3 5A M...

Page 36: ...nly when frequency inverter T1 is at zero current Contactors and switches S1 in the frequency inverter output and for the direct start must be designed based on utilization category AC 3 for the rated operational current of the motor Connecting EX Motors Note the following when connecting explosion protected motors The frequency inverter must be installed outside the EX area Note the branch and co...

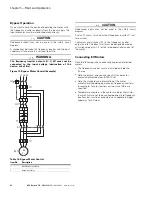
Page 37: ...to discharge Pay attention to hazard warnings Standard Mounting Instructions Select the mounting location based on requirements listed in this chapter Mounting surface must be a vertical flat non flammable surface DG1 Series open drives may be mounted side by side or stacked vertically as outlined in this chapter Surface must be strong enough to support the drive and not subject to excessive motio...

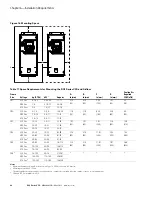
Page 38: ...230 Vac 0 75 3 0 55 2 2 3 7 11 0 79 20 0 79 20 3 94 100 1 97 50 22 38 480 Vac 1 5 0 75 3 7 2 2 7 6 575 Vac 3 2 5 1 5 3 7 3 3 7 5 FR2 230 Vac 4 7 5 3 5 5 12 5 25 1 18 30 1 18 30 6 30 160 2 36 60 55 94 480 Vac 7 5 15 5 5 11 12 23 575 Vac 3 7 5 15 5 5 11 10 18 FR3 230 Vac 10 15 7 5 11 31 48 1 97 50 1 97 50 7 87 200 3 15 80 126 214 480 Vac 20 30 15 22 31 46 575 Vac 3 20 30 15 22 22 34 FR4 230 Vac 20 3...

Page 39: ... 5 28 134 1 3 54 90 0 3 54 90 0 0 28 7 0 23 37 10 6 480 Vac 7 5 15 5 5 11 12 23 575 Vac 1 7 5 15 5 5 11 10 18 FR3 230 Vac 10 15 7 5 11 31 48 10 44 265 1 21 97 558 0 21 46 545 0 20 43 518 9 8 06 204 6 7 24 183 9 4 92 125 0 4 92 125 0 0 35 9 0 49 82 22 6 480 Vac 20 30 15 22 31 46 575 Vac 1 20 30 15 22 22 34 FR4 230 Vac 20 30 15 22 61 88 11 57 294 0 24 80 629 9 34 31 617 5 23 27 591 1 9 36 237 7 9 13...

Page 40: ...e should follow required dimensions refer to the drive mounting template printed on the outside carton FR2 Mounting Instructions Step 1 Lift the drive out from the carton Remove the packaging Step 2 Attach the drive to the mounting plate with four M5x15 or 3 16 inch screws and four M5 or 3 16 inch nuts The opening dimensions on the mounting plate should follow required dimensions refer to the driv...

Page 41: ...uired dimensions refer to the drive mounting template printed on the outside carton FR4 Mounting Instructions Step 1 Lift the drive out of the carton with the cardboard Remove the packaging Step 2 Attach the drive to the mounting plate with four M8x15 or 3 8 inch screws and four M8 or 3 8 inch nuts The opening dimensions on the mounting plate should follow required dimensions refer to the drive mo...

Page 42: ...he pallet with an M8 or 3 8 inch wrench Step 3 Use a hook to lift the drive Step 4 Attach the drive to the mounting plate with four M8x20 or 3 8 inch screws and four M8 or 3 8 inch nuts with an M8 or 3 8 inch wrench The opening dimensions on the mounting plate should follow required dimensions refer to the drive mounting template printed on the outside carton Screw Four M8x20 or 3 8 inch Nut Four ...

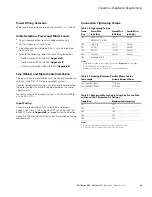
Page 43: ...G1 rated input and output current Use Class T UL and cUL CSA or type gG gL IEC 60269 1 Refer to Appendix B for proper fuse size selection Consult with Eaton Electrical for further information on fusing requirements Connection Tightening Torque Table 19 Tightening Torque 1 2 Notes 1 Strip the motor and power cables as shown in Figure 18 on next page 2 Both UL and IEC tools may be used 3 Applies to ...

Page 44: ...cables alongside or parallel to any other wiring If it is necessary to run motor cables with other wiring then maintain spacing between motor cables and other wiring in accordance with the table on Page 30 Wiring the VFD Refer to the table on Page 30 for maximum cable lengths by frame size If three or more motor cables are used each conductor must have its own overcurrent protection Frame Size Pow...

Page 45: ...e power wiring protection plate Use power motor cable tables on Appendix B 3 Add attachable grounding clamps qty 2 one on each side of drive 4 Pass motor input power wires cables through base wiring plate 5 If shielded cable is used connect the shields of input power and motor cables shields to ground 6 Wire power terminals L1 L2 L3 motor terminal U V W and grounding terminals per Figure 19 Power ...

Page 46: ... Step 2 Measure the outside diameter of the rubber grommet D2 and select a suitable D2 D1 D2 D1 2 mm Step 3 Cut the rubber grommet at the selected diameter Step 4 Run the cable through the rubber grommet Step 5 Insert the rubber grommet into the conduit plate together with the cable Step 6 Fasten the rubber grommet and cable with a self locking cable tie D1 Cable D2 Grommet D1 D2 D1 2 mm Self Lock...

Page 47: ...Cables sized per Appendix B Provide dedicated wire for low impedance ground between drive and motor DO NOT USE conduit as ground CAUTION Improper grounding could result in damage to the motor and or drive and could void warranty Control Wiring 7 Wire the control terminals following the details for the specific option boards shown on the following pages Note For ease of access the board terminals b...

Page 48: ...s ready to run 15 24Vo 24 Vdc Output Control voltage output 100 mA max 16 GND I O Signal Ground I O Ground for Reference and Control 17 AO1 Analog Output 1 Output Frequency Shows Output frequency to motor 0 60 Hz 4 mA to 20 mA 18 AO2 Analog Output 2 Motor Current Shows Motor current of motor 0 FLA 4 mA to 20 mA 19 24Vi 24 Vdc Input External control voltage input 20 DIN1 Digital Input 1 Run Forward...

Page 49: ...A Ri 250 ohm differential Digital inputs 8 Positive or negative logic 18 to 30 Vdc one input can be used as thermistor input 24V output Auxiliary Voltage 24V 15 total max 250 mA on board include optional cards 10 VREF Output Reference Voltage 10V 3 max load 10 mA Analog Outputs 0 4 to 20 mA RL max 500 ohm 0 to 10V 10 mA Digital Output Open collector output 50 mA 48V for CE 50 mA 36V for UL Relay O...

Page 50: ...Chapter 6 Installation Requirements 36 DG1 Series VFD MN040002EN March 2014 www eaton com Figure 21 Basic Internal Control Wiring Diagram ...

Page 51: ...IEC EN 61800 3 2004 Run 240 Vac and 24 Vdc control I O in separate conduit Control I O terminals must be tightened to 4 5 in lb 0 5 Nm Wiring or ferrule size 28 12 Sol AWG 30 12 Str AWG or 0 2 2 5 mm2 Connect DSP Part to Power Board Keypad Connect MCU Part to Power Board Battery Standard RJ45 EtherNet IP BACnet IP Modbus TCP Optional Card A Optional Card B RS 485 Terminating Resistor Removable MOV...

Page 52: ...ble with safety relays Figure 23 Thermistor STO Wiring Diagram Connection to Power Section Figure 24 shows the general connections for the frequency inverter in the power section Three Phase Input Connection Figure 24 Connection to Power Section Terminal Designations in the Power Section L1 L2 L3 Connection terminals for the supply voltage input input voltage U V W Connection terminals for the thr...

Page 53: ...ified Sticker Checking the Cable and Motor Insulation 1 Check the motor cable insulation as follows Disconnect the motor cable from terminals U V and W of the DG1 Series drive and from the motor Measure the insulation resistance of the motor cable between each phase conductor as well as between each phase conductor and the protective ground conductor The insulation resistance must be 1M ohm 2 Chec...

Page 54: ...ood contact and be connected with short HF braided cables Avoid using painted surfaces anodized chromized An overview of all EMC measures is provided in the figure on Page 41 Install the frequency inverter as directly as possible without spacers on a metal plate mounting plate Route input and motor cables in the switch cabinet as close to the ground potential as possible This is because free movin...

Page 55: ...al lines 1 to 36 fieldbus connection Large area connection of all metallic control panel components Mounting surfaces of frequency inverter and cable shielding must be free from paint Connect the cable shielding in the output of the frequency inverter with a large surface area contact to the ground potential PES Large area cable shield contacts with motor Large area earth connection of all metalli...

Page 56: ...soidal filters or terminals the shielding of the motor cable can be interrupted close to these subassemblies and connected to the mounting plate PES with a large area connection Free or non screened connection cables should not be any longer than about 300 mm Table 25 1st Environment 2nd Environment EMC Levels According to EN 61800 3 2004 Note 1 360 earthing of the shield with cable glands in moto...

Page 57: ...orm any modifications on the AC drive when it is connected to mains WARNING Electric shock hazard risk of injuries Carry out wiring work only if the unit is de energized After disconnecting the supply wait at least five minutes before removing the cover to allow the intermediate circuit capacitors to discharge WARNING Failure to follow these instructions will result in death or serious injury Fram...

Page 58: ... 6 kHz Automatic switching frequency derating in case of overload Frequency reference Analog input resolution 0 1 10 bit accuracy 1 Panel reference resolution 0 01 Hz Field weakening point 20 Hz to 400 Hz Acceleration time 0 1 s to 3000 s Deceleration time 0 1 s to 3000 s Braking torque DC brake 30 x Motor Rated Torque Tn without brake chopper Dynamic braking with optional brake chopper using an e...

Page 59: ... 61000 4 2 4 kV CD or 8 kV AD Criterion B Fast transient burst Second environment IEC 61000 4 4 2 kV 5 kHz Criterion B Dielectrical strength Primary to secondary 3600 Vac 5100 Vdc Primary to earth 2000 Vac 2828 Vdc Approvals EN 61800 5 1 2007 CE UL and cUL see nameplate for more detailed approvals Fieldbus connections EtherNet IP Modbus TCP Modbus RTU BACnet Safety protections Overvoltage protecti...

Page 60: ...t 208V Current CT IH at 50 C Current VT IL at 40 C Fuse Rating Class T NEC Wire Size AWG Terminal Connection Size AWG Line and Motor Ground Line and Motor Ground FR1 3D7 3 2 4 4 4 2 4 6 3 7 4 8 10 14 14 24 10 18 10 4D8 4 4 6 1 6 0 6 6 4 8 6 6 10 14 14 24 10 18 10 6D6 6 1 7 2 6 8 7 5 6 6 7 8 10 14 14 24 10 18 10 7D8 7 2 10 2 9 6 10 6 7 8 11 15 14 14 24 10 18 10 011 10 2 11 6 11 12 5 15 12 14 24 10 ...

Page 61: ...H 208V Input Current VT IL Current CT IH at 50 C Current VT IL at 40 C Fuse Rating gG gL Mains and Motor Cable Cu mm2 Terminal Cable Size Main Terminal Cu mm2 Earth Terminal Cu mm2 FR1 3D7 3 2 4 4 3 7 4 8 6 3 1 5 1 5 0 2 6 solid or 0 2 4 stranded 0 75 6 4D8 4 4 6 1 4 8 6 6 10 3 1 5 1 5 0 2 6 solid or 0 2 4 stranded 0 75 6 6D6 6 1 7 2 6 6 7 8 16 3 1 5 1 5 0 2 6 solid or 0 2 4 stranded 0 75 6 7D8 7 ...

Page 62: ... Class T NEC Wire Size AWG Terminal Connection Size AWG Line and Motor Ground Line and Motor Ground FR1 2D2 2 0 3 1 3 0 2 1 3 0 10 14 14 30 10 18 10 3D3 3 1 4 3 4 3 0 3 4 10 14 14 30 10 18 10 4D3 4 0 5 2 4 8 3 4 4 8 10 14 14 30 10 18 10 5D6 5 2 7 1 7 6 4 8 7 6 10 14 14 30 10 18 10 7D6 7 1 8 4 7 6 9 15 14 14 30 10 18 10 9D0 8 4 11 2 11 9 12 15 14 14 30 10 18 10 FR2 012 11 2 15 14 11 14 20 12 12 20 ...

Page 63: ...Input Current CT IH 400V Input Current VT IL Current CT IH at 50 C Current VT IL at 40 C Fuse Rating gG gL Mains and Motor Cable Cu mm2 Terminal Cable Size Main Terminal Cu mm2 Earth Terminal Cu mm2 FR1 2D2 2 0 3 1 2 2 3 3 6 3 1 5 1 5 0 2 6 solid or 0 2 4 stranded 0 75 6 3D3 3 1 4 3 3 4 3 6 3 1 5 1 5 0 75 6 4D3 4 0 5 2 4 3 5 6 10 3 1 5 1 5 0 75 6 5D6 5 2 7 1 5 6 7 6 16 3 1 5 1 5 0 75 6 7D6 7 1 8 4...

Page 64: ...0 0 100 0 100 0 97 8 95 6 93 4 91 2 87 4 83 6 79 8 FR5 100 0 100 0 100 0 100 0 95 5 91 0 86 5 82 0 78 4 74 7 71 1 FR6 1 1 1 1 1 1 1 1 1 1 1 50 C FR1 84 0 84 0 84 0 84 0 84 0 84 0 84 0 80 8 77 6 74 4 69 6 64 8 FR2 87 1 87 1 87 1 87 1 87 1 87 1 87 1 84 4 81 7 79 0 75 0 71 0 FR3 93 4 93 4 93 4 93 4 93 4 93 4 93 4 93 4 93 4 93 4 90 2 86 9 FR4 87 7 87 7 87 7 87 7 85 5 83 3 81 1 78 9 76 0 73 1 70 2 FR5 ...

Page 65: ...100 0 100 0 96 2 92 3 88 5 FR5 100 0 100 0 100 0 100 0 100 0 100 0 100 0 100 0 96 1 92 2 88 2 FR6 1 1 1 1 1 1 1 1 1 1 1 50 C FR1 100 0 100 0 100 0 100 0 100 0 97 7 95 5 91 8 88 2 84 5 79 1 73 6 FR2 100 0 100 0 100 0 100 0 100 0 100 0 100 0 98 0 96 0 94 0 91 0 88 0 FR3 100 0 100 0 100 0 100 0 100 0 100 0 100 0 100 0 100 0 100 0 100 0 100 0 FR4 100 0 100 0 100 0 100 0 97 1 94 3 91 4 88 5 84 7 80 8 7...

Page 66: ... 0 95 7 91 4 87 1 81 8 76 4 71 1 65 7 FR5 100 0 100 0 100 0 100 0 94 8 89 6 84 4 77 8 71 2 64 6 58 0 FR6 1 1 1 1 1 1 1 1 1 1 1 50 C FR1 75 0 75 0 75 0 75 0 75 0 75 0 75 0 70 8 66 7 62 5 58 3 50 0 FR2 80 6 80 6 80 6 80 6 80 6 80 6 80 6 77 4 74 2 71 0 67 7 61 3 FR3 84 9 84 9 84 9 84 9 84 9 84 9 84 9 81 1 77 2 73 4 69 5 61 8 FR4 87 6 87 6 87 6 87 6 83 7 79 8 75 8 70 9 66 0 61 1 56 2 FR5 82 9 82 9 82 ...

Page 67: ...00 0 100 0 94 8 89 7 84 5 79 3 FR5 100 0 100 0 100 0 100 0 94 1 88 2 82 4 75 0 67 6 60 3 52 9 FR6 1 1 1 1 1 1 1 1 1 1 1 50 C FR1 100 0 100 0 100 0 100 0 100 0 95 7 91 4 87 1 82 9 78 6 72 2 65 8 FR2 100 0 100 0 100 0 100 0 100 0 95 7 91 3 87 0 82 6 78 3 71 7 65 2 FR3 100 0 100 0 100 0 100 0 100 0 94 6 89 1 83 7 78 3 72 8 64 7 56 5 FR4 100 0 100 0 100 0 100 0 96 0 92 0 87 9 82 9 77 9 72 8 67 8 FR5 1...

Page 68: ... IL 110 Pv W CT IH 150 Pv W FR1 2D2 3D3 4D3 5D6 7D6 9D0 180 98 136 88 FR2 012 016 023 390 330 360 292 FR3 031 038 046 700 494 603 472 FR4 061 072 087 1083 870 1080 875 FR5 105 140 170 1906 1479 1755 1429 FR6 205 261 230V 460V 575V Frame Size Brake Chopper Nominal Current at 80 C A Minimum Resistance Ohm Brake Chopper Nominal Current at 80 C A Minimum Resistance Ohm Brake Chopper Nominal Current at...

Page 69: ...nd drive B Space between two drives or drive and cabinet C Free space above drive D Free space below drive Minimum Dimensions For Class IP54 dimension A and B 0 0 41 10 5 6 02 153 0 1 38 35 0 1 20 30 5 1 73 44 0 Ø 0 89 22 5 1 73 44 0 1 28 32 5 1 28 32 5 3 95 100 3 2 24 57 0 4 80 122 0 7 89 200 4 3 94 100 0 12 28 312 0 0 28 7 0 Ø 0 28 7 0 Ø 0 28 7 0 Ø 0 47 12 0 3 94 100 0 3 94 100 0 12 87 327 0 3 8...

Page 70: ...e drive D Free space below drive Minimum Dimensions For Class IP54 dimension A and B 0 4 80 122 0 0 28 7 0 Ø 0 28 7 0 3 94 100 0 Ø 0 47 12 0 12 64 321 0 Ø 0 26 6 5 7 01 178 0 0 26 6 5 6 31 160 4 3 94 100 0 2 84 72 2 1 40 35 5 10 63 270 0 3 83 97 2 13 94 354 0 6 31 160 4 10 63 270 0 1 40 35 0 1 20 30 5 1 70 44 0 Ø 0 89 22 5 1 40 35 5 1 70 44 0 1 30 32 5 1 30 32 5 2 20 57 0 3 90 100 3 0 85 21 5 11 5...

Page 71: ...ives or drive and cabinet C Free space above drive D Free space below drive Minimum Dimensions For Class IP54 dimension A and B 0 C 6 30 160 0 1 77 44 9 Ø 1 11 28 3 5 80 147 2 A B 1 18 30 0 1 54 39 0 2 36 60 0 2 00 51 9 1 30 32 0 1 54 39 0 A B 1 18 30 0 1 91 48 5 Ø0 89 22 5 1 30 32 0 0 45 11 4 0 55 14 0 9 63 244 7 3 54 90 0 0 22 5 5 Ø0 28 7 0 15 98 406 0 16 50 419 0 3 83 97 2 9 22 234 2 6 61 167 8...

Page 72: ... STOP BACK RESET LOCAL REMOTE OK START MS NS A Air gap around drive B Space between two drives or drive and cabinet C Free space above drive D Free space below drive Minimum Dimensions For Class IP54 dimension A and B 0 C 6 30 160 0 A B 1 18 30 0 2 36 60 0 A B 1 18 30 0 0 22 5 5 Ø0 28 7 0 15 98 406 0 3 54 90 0 3 54 90 0 Ø0 28 7 0 Ø0 51 13 0 14 96 380 0 9 63 244 7 0 98 25 0 1 07 27 1 1 28 32 4 0 55...

Page 73: ...between two drives or drive and cabinet C Free space above drive D Free space below drive Minimum Dimensions For Class IP54 dimension A and B 0 C 7 87 200 0 D 3 15 80 0 A B 1 97 50 0 13 49 342 6 3 83 97 2 21 46 545 0 4 92 125 0 10 44 265 1 0 45 11 3 0 59 15 0 20 41 518 5 8 06 204 6 4 92 125 0 2 77 70 3 1 26 32 0 3 Ø0 89 Ø22 5 1 93 49 0 6 23 158 3 2 03 51 5 1 92 48 8 2 19 55 5 0 18 4 5 4 92 125 0 0...

Page 74: ...ace above drive D Free space below drive Minimum Dimensions For Class IP54 dimension A and B 0 C 7 87 200 0 D 3 15 80 0 A B 1 97 50 0 9 51 241 6 8 66 220 0 5 28 134 0 1 09 27 8 10 44 265 1 0 96 24 5 4 15 105 5 6 28 159 6 2 42 61 5 8 86 225 0 3 83 97 2 23 19 589 0 14 28 362 8 21 46 545 0 2 77 70 3 1 26 32 0 3 Ø0 89 Ø22 5 1 93 49 0 6 23 158 3 2 03 51 5 1 92 48 8 2 19 55 5 0 18 4 5 4 92 125 0 0 35 Ø9...

Page 75: ...wo drives or drive and cabinet C Free space above drive D Free space below drive Minimum Dimensions For Class IP54 dimension A and B 0 C 11 81 300 0 D 3 94 100 0 A B 3 15 80 0 A B 3 15 80 0 0 43 11 0 8 07 205 0 Ø0 35 Ø9 0 Ø0 71 Ø18 0 0 18 4 5 24 31 617 5 3 83 97 2 15 72 399 2 24 80 630 0 9 36 237 7 8 07 205 0 9 36 237 7 3 Ø0 89 Ø22 5 2 04 51 9 2 80 71 0 2 48 63 0 2 48 63 0 6 79 172 5 3 89 98 9 1 3...

Page 76: ...pace above drive D Free space below drive Minimum Dimensions For Class IP54 dimension A and B 0 C 11 81 300 0 D 3 94 100 0 A B 3 15 80 0 A B 3 15 80 0 8 07 205 0 Ø0 35 Ø9 0 Ø0 71 Ø18 0 0 18 4 5 24 31 617 5 8 07 205 0 23 26 590 7 0 59 15 0 0 47 12 0 9 36 237 7 11 57 294 0 3 83 97 2 16 91 429 5 7 87 200 0 8 07 205 0 8 07 205 0 7 87 200 0 7 87 200 0 26 81 681 0 3 94 100 0 7 64 194 0 1 59 40 5 1 62 41...

Page 77: ...two drives or drive and cabinet C Free space above drive D Free space below drive Minimum Dimensions For Class IP54 dimension A and B 0 C 11 81 300 0 D 7 87 200 0 A B 3 15 80 0 1 14 29 0 A B 3 15 80 0 11 34 288 0 11 10 282 0 8 66 220 0 Ø0 35 Ø9 0 Ø0 71 Ø18 0 Ø0 89 Ø22 5 Ø2 95 Ø75 0 5 51 140 0 2 52 64 0 4 21 107 0 7 76 197 0 29 65 753 0 1 57 40 0 4 09 104 0 3 83 97 2 22 57 573 3 29 65 753 0 1 08 27...

Page 78: ...rives or drive and cabinet C Free space above drive D Free space below drive Minimum Dimensions For Class IP54 dimension A and B 0 C 11 81 300 0 D 7 87 200 0 A B 3 15 80 0 A B 3 15 80 0 30 51 775 0 Ø0 79 Ø20 0 37 32 948 0 1 08 27 5 5 20 132 0 1 38 35 0 8 22 208 7 1 52 38 5 0 77 19 5 8 66 220 0 13 41 340 7 2 58 65 5 8 66 220 0 8 66 220 0 8 66 220 0 8 66 220 0 3 50 89 0 0 43 11 0 Ø0 35 Ø9 0 3 83 97 ...

Page 79: ...table for Overvoltage Category III and shall provide protection for a rated impulse withstand voltage peak of 4 kV Motor Overload and Over Temperature Protection This drive provides solid state motor overload protection that reacts when it reaches 102 5 of FLA This drive can accept and act upon a signal from a thermal sensor or switch embedded in the motor or from an external protective relay to a...

Page 80: ...x xxxx 600V 15A DG1 32011xx xxxx 600V 15A 2 DG1 32012xx xxxx 600V 20A DG1 32017xx xxxx 600V 30A DG1 32025xx xxxx 600V 35A 3 DG1 32031xx xxxx 600V 60A DG1 32048xx xxxx 600V 80A 4 DG1 32061xx xxxx 600V 100A DG1 32075xx xxxx 600V 110A DG1 32088xx xxxx 600V 125A 5 DG1 32114xx xxxx 600V 175A DG1 32143xx xxxx 600V 200A DG1 32170xx xxxx 600V 250A Catalog Number Terminal Type Required Torque in lbs Requir...

Page 81: ...WG DG1 32048xx xxxx 40 4 2 AWG FR4 DG1 32061xx xxxx L1 L2 L3 DC DC R R U V W 95 3 1 0 AWG DG1 32075xx xxxx 95 2 1 0 AWG DG1 32088xx xxxx 95 1 0 AWG 1 FR5 DG1 32114xx xxxx L1 L2 L3 DC DC R R U V W 354 3 0 AWG 350 kcmil DG1 32143xx xxxx 354 4 0 AWG 350 kcmil DG1 32170xx xxxx 354 300 350 kcmil All Frames Sizes FR1 FR5 All models Control terminal block 4 5 28 12 Sol AWG 30 12 Str AWG Catalog Number Te...

Page 82: ...10 AWG DG1 324D8xx xxxx 10 14 10 AWG DG1 326D6xx xxxx 10 14 10 AWG DG1 327D8xx xxxx 10 14 10 AWG DG1 32011xx xxxx 10 14 10 AWG FR2 DG1 32012xx xxxx Grounding terminal 10 12 6 AWG DG1 32017xx xxxx 10 10 6 AWG DG1 32025xx xxxx 10 10 6 AWG FR3 DG1 32031xx xxxx Grounding terminal 10 10 4 AWG DG1 32048xx xxxx 10 10 4 AWG FR4 DG1 32061xx xxxx Grounding terminal 14 8 1 0 AWG DG1 32075xx xxxx 14 6 1 0 AWG...

Page 83: ......

Page 84: ...egrated solutions to solve our customers most critical challenges Our focus is on delivering the right solution for the application But decision makers demand more than just innovative products They turn to Eaton for an unwavering commitment to personal support that makes customer success a top priority For more information visit www eaton com electrical Eaton 1000 Eaton Boulevard Cleveland OH 441...

Reviews: