background image

7

Sonix Pbx Technical Manual

SONIX PBX TECHNICAL MANUAL  

TM372 / A  June 2022  www.eaton.com
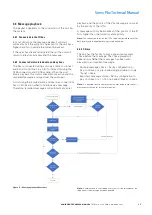
2  Introduction

These instructions are intended for all users who have to 

install, commission, configure and setup the Sonix  PBx 

Record and Replay Unit. For this, the manual is action-

oriented and explains how to achieve a certain objective 

on a step-by-step basis. It is assumed that you have 

necessary electrical, electronic and telecommunications 

experience to undertake the work. If in doubt, please 

consult your Eaton representative.

2.1  Eaton quality assurance

Eaton design, manufacture, install and commissions all 

our products to the highest standards of quality. This 

quality process is embraced and adopted throughout the 

group in all areas of our operations. This is demonstrated 

by our compliance and strict adherence to ISO 9001, 

14001, ATEX, IECEX policies. On receipt of the 

product, ensure that the cartons are undamaged and 

that the contents are all correct and complete. Should 

this product reach you in an unsatisfactory condition 

please report this to Eaton to enable us to rectify and 

investigate the fault in a speedy manner.

2.2  Packaging

In the interest of preserving the environment, Eaton 

aims to use recycled packaging wherever practical. 

Due to the physical nature of our products, we provide 

adequate packaging to protect the goods during transit. 

Please ensure that once unpacked, checked and 

installed that all packaging is disposed / recycled in a 

responsible manner.

2.3  ESD (Electro Static Discharge)

The Sonix PA/GA system is largely constructed from 

electronic printed circuit boards. These printed circuit 

boards are sensitive to static electricity, ESD discharge 

on to any of the Eaton products could cause permanent 

and irreparable damage to the equipment. All such 

PCB’s are shipped to you in ESD protective bags for 

transit. Prior to opening the transit bags please ensure 

that you are wearing either an ESD, earthed wrist strap 

or other suitable means of protection.

2.4  Safe working practice

Whilst working on or within the Sonix PA/GA system it 

is our prime interest that you remain safe throughout. 

During this work you will be exposed to potentially 

hazardous voltages, currents, confined spaces and 

potentially industrial environments.

Prior to undertaking any work please ensure relevant 

permits and regulations are adhered to.

2.5  Required tools

To install and commission this part you will need the 

following tools.

• 

Flat-blade terminal screw driver

• 

Small Flat-blade terminal screw driver up to 2.5 mm

• 

Multi-meter

2.6  In the box

This item is shipped with the following items.

• 

1 x PBx Record and Replay Unit

• 

1 x Product Manual

This item is sold as a complete module therefore, no 

spares are necessary.

2.7  Warnings 

2.7.1  Handling
  

Beware of sharp edges or corners
Careful when handling

IEC 60417-6043  

(2011-01)

Summary of Contents for SONIX Pbx

Page 1: ...SONIXTM Pbx Record and Replay Unit SonixTM Pbx Technical Manual...

Page 2: ...FOR A PARTICULAR PURPOSE OR MERCHANTABILITY OTHER THAN THOSE SPECIFICALLY SET OUT IN ANY EXISTING CONTRACT BETWEEN THE PARTIES ANY SUCH CONTRACT STATES THE ENTIRE OBLIGATION OF EATON THE CONTENTS OF T...

Page 3: ...feedback 2Mx Sonix 2Mx Central controller Amp 350 d Sonix 350 W Power Amplifier with 100 V line output Eol1 Sonix Remote End of Line unit Eol8 Sonix Amplifier to 100 V line interface unit 8 channel SP...

Page 4: ...er connections 11 3 3 5 General fault output connections 11 4 UNIT OPERATION 12 4 1 Data and audio communications 12 4 1 1 PA GA mounted using CAT6A cabling 12 4 1 2 PA GA mounted using isolated audio...

Page 5: ...1 Monitor speaker 18 4 7 2 Message abort 18 4 8 Other features 18 4 8 1 VOX sensitivity 18 4 8 2 Unit monitoring 18 4 8 3 Fault output 19 4 8 4 Link Settings 19 4 8 5 Front panel operation 19 5 CONFIG...

Page 6: ...ONT PANEL INDICATIONS AND CONTROLS 9 TABLE 2 REAR PANEL CONNECTORS 9 TABLE 3 IO BUS DESCRIPTION 10 TABLE 4 TELEPHONE INTERFACE DESCRIPTION 10 TABLE 5 MESSAGE MONITORING INTERFACE DESCRIPTION 11 TABLE...

Page 7: ...ging to protect the goods during transit Please ensure that once unpacked checked and installed that all packaging is disposed recycled in a responsible manner 2 3 ESD Electro Static Discharge The Son...

Page 8: ...systems The unit occupies a standard 1U 19 rack footprint within the cabinet User access to the unit is through calling the assigned extension number connected to the Pbx i p and allowing the unit to...

Page 9: ...t Reset DCPSU 2w E M 2w Global Message Zoned Message Message Cancel Monitor Active Pbx playback Pbx record Power 8 7 6 5 4 3 2 1 Pbx I P MONITOR A SIDE O P B SIDE O P 48V DC I P Fault O P N C Com K1 K...

Page 10: ...us is usually connected as a loop from the 2Mx to provide redundant paths for the control data status data and audio should they be needed A second set of RJ45 connectors provides a full duplicate aud...

Page 11: ...s A side B side Figure 5 Isolated audio and Keyline outputs 3 3 4 Power connections The Sonix Pbx is powered via a 2 core 48 V dc input on the rear of the unit This input should be connected to the ma...

Page 12: ...ue to operate without any loss of functionality A flashing IO fault is logged on the 2Mx status display to warn of the fault and differentiate it from any other internal cable loop fault 4 1 2 PA GA m...

Page 13: ...ff 2 wire E M operation not configured or available Solid green Set for 2 wire E M operation Flashing options Front panel configuration see section 4 8 5 Table 12 2 wire E M LED description 4 2 6 Zone...

Page 14: ...condary unit interconnection Once the unit has answered the user will be instructed to follow a series of prompts or messages to enter zoning information or be directed to leave a message see sections...

Page 15: ...ecific zones the user enters the required zoning information when indicated by the unit according to the flow chart below Each zone requested is entered using the telephones key pad as shown below Zon...

Page 16: ...imited to 120 seconds of audio The user can cancel the message by pressing or press to start playback at any time during the recording On finishing leaving a message the user can hang up or leave the...

Page 17: ...when to hold queue a message Therefore recorded messages will automatically enter playback and the priority of the Pbx message is now set by the priority of the IO Tu A message will only be broadcast...

Page 18: ...ort tone a series of bleeps relayed over the telephone at the start of recording 4 8 Other features 4 8 1 VOX sensitivity The unit relies on a VOX voice operated switch to maintain the recording of a...

Page 19: ...tus ote N Changing either zoned or source via the front panel will only be a temporary change and will revert to stored configuration on a power cycle 5 Configuration The Pbx like most Sonix units has...

Page 20: ...nit for visible damage scratches bumps Check connections and cable integrity replace damaged cables tighten terminal connectors loose screws Check unit fixing to the rack tighten loose screws Remove d...

Page 21: ...21 Sonix Pbx Technical Manual SONIX PBX TECHNICAL MANUAL TM372 A June 2022 www eaton com...

Page 22: ...aton and SONIX are registered trademarks All other trademarks are property of their respective owners Changes to the products to the information contained in this document and to prices are reserved s...

Reviews: