38
Operation
EATON TFX INSTALLATION AND OPERATION MANUAL
6046279-001
September 2019
www.eaton.com
3
3
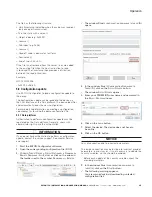
The remote firmware update is loaded to the Data
platform.
3
3
In the
f
irmware
D
ownloaD
l
og
field, the message
f
irmware
D
ownloaDeD
s
uCCessfully
appears when the
update file has been sent to the
Data
pla
tform.
3
3
The download of the firmware update to the device
memory starts automatically as soon as the device
is online.
3
3
During the firmware update, the LEDs light up in a
certain sequence.
INFORMATION
For more information on the LED status indications, see
chapter Indicator elements (LED).
3
3
The device is restarted.
3
3
After the restart, the device uses the updated
firmware version.
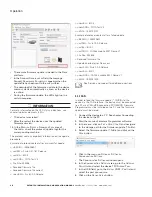
14. In the
s
erviCe
> D
eviCe
> D
ownloaD
f
iles
area of
the
portal
, check the protocol (update log) for the
corresponding machine.
The protocol contains important information on the update
procedure.
Example of protocol content after a successful update:
> <BEGIN>: 1532699807
> <actSW>: Fw 6.0.41.181 Release
> <actBL>: Bl 9.2
> <actDOD>: FOTA Test V4
> File Size: 435908
> Received firmware file
> Received firmware file correct
> <newSW>: Fw 6.1.0.0 Release
> <newBL>: Bl 9.2
> <newDOD>: FOTA Test V4
> <END>: 1532700197
Example of protocol content after a failed update:
> <BEGIN>: 1534330801
> <actSW>: Fw 6.1.0.0 Release
> <actBL>: Bl 9.1
> <actDOD>: CANlink mobile 3337 Demo V1
> File Size: 424836
> Received firmware file
> Update aborted: error file access
> <newSW>: Fw 6.1.0.0 Release
> <newBL>: Bl 9.1
> <newDOD>: CANlink mobile 3337 Demo V1
> <END>: 1534331309
See Service and support for additional questions.
5.9.2 CAN
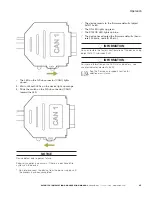
In order to load the firmware update (*.FWBIN) to the
device via the CAN interface, the device must be connected
to a PC via a CAN-USB connection. PROEMION Firmware
Programmer must be installed on the PC and the firmware
update must be stored.
1. Connect the device to a PC. See chapter Connecting
the device to the PC
2. Start the
proemion
Firmware Programmer software.
3. In the menu, click on
f
ile
> o
pen
C
trl
+o
and navigate
to the storage path for the firmware update (*.
f
w
B
in
).
4. Select the firmware update (*.
f
w
B
in
) and click on the
o
pen
button.
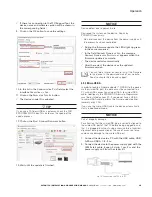
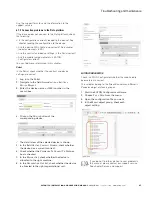
5. Click in the menu on
o
ptions
> s
ettings
>
C
ommuniCation
s
ettings
.
3
3
The
C
ommuniCation
s
ettings
window opens.
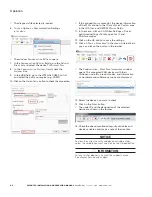
6. In the
C
ommuniCation
g
ateway
area, go to the
g
ateway
D
eviCe
list and select the device
tfx s
upport
t
ool
.
7. In the USB field, go to the
v
irtual
COM -
p
ort
list and
select the port you require.
8. Click on the
o
nline
-C
heCk
button.


