background image

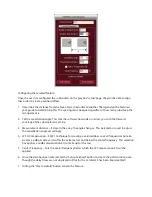
3)  By default, most computers will already have the 

“Obtain an IP address automatically checkbox 

checked. If not – check it. 


The computer is now set to communicate with a 

Network Hub and obtain IP addresses through the 

hub automatically.

Now that the computer is set to receive IP Addresses automatically, we must configure the EAWPilot 

software to do the same

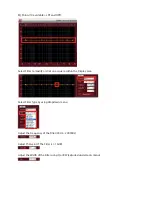
1)  From the EAWPilot homepage, select “Tools” 

and then “Communications”. This opens up the 

“Dialog” menu within Pilot. 

2)  Check the box for “Obtain IP Address By 

Broadcast”. This puts EAWPilot into dynamic IP 

Address mode. Then press “OK” to confirm your 

selection. 


No other changes are necessary. When the 

EAWPilot software is set to poll for connected 

devices, the network hub will automatically 

designate IP Addresses to any connected units.

Summary of Contents for EAWPilot

Page 1: ...EAWPilot...

Page 2: ...e created to aid the users of the UX8800 UX3600 NT products in evaluating building storing and recalling complex DSP configurations This manual has been created to help end users step through the vari...

Page 3: ...Opens browser to load previously saved Pilot files Shortcut Ctrl O Close Closes current Pilot page Save Saves Current Pilot Page Shortcut Ctrl S Save As Allows saving of new file with name assignment...

Page 4: ...enu Toggles Windows Toolbar On Or Off Tools Menu Units Select Between Imperial or Metric measurements PEQ Format Select Between Q or Bandwidth For Equalization Communications Opens Communication Dialo...

Page 5: ...ity zones to be created Window Menu Standard Windows Configuration Options Help Menu EAWPilotHelp Opens The EAWPilot Help Files UX8800Help Opens The UX8800 Help Files About EAWPilot Displays Version N...

Page 6: ...within the EAWPilot software 2 Entering into the Utilities menu on the UX8800 and then IP Address will give you access to the feature 3 There will be four sets of numbers available to modify The first...

Page 7: ...ally have the Obtain an IP Address Automatically checkbox selected We will be setting our own IP Address manually so select the checkbox labeled Use The Following IP Address 4 Now you will be able to...

Page 8: ...the computer will use to communicate to the UX8800 Note Multiple addresses can be entered in this column for recognition from EAWPilot but it is best to remove any unnecessary addresses as EAWPilot wi...

Page 9: ...atically we must configure the EAWPilot software to do the same 1 From the EAWPilot homepage select Tools and then Communications This opens up the Dialog menu within Pilot 2 Check the box for Obtain...

Page 10: ...onnected units This will initiate the polling process as the software searches for connected devices When the polling process is complete connected units will be listed under Found Devices To begin th...

Page 11: ...p the time it takes to program e g House Left and House Right linked The linking process follows a hierarchy Right click on the upper UX8800 to open the options menu Open Opens the Processor Page for...

Page 12: ...cted UX8800 Processor Name of linked processor Channel Channels linked All Linked Control Specific functions that have been linked OK Confirm and escape the link report Unlink Unlink a selected parame...

Page 13: ...sted in the Design column will open its associated Map Page The UX8800 and Pilot communication is duplexing meaning that changes made via computer update the unit immediately while changes made on the...

Page 14: ...are all functional on the map page You can also right click over any of the buttons to copy and paste settings to another channel of the processor This is especially helpful when matching identical pa...

Page 15: ...he UX8800 may be linked if desired or any portions of the input channels Copy Ctrl C Stores all parameters in a temporary memory buffer Paste Ctrl V Pastes these parameters to the destination Paste Li...

Page 16: ...put x 2 EQ in or out Delay Pre delay applied if any Gain Polarity Normal Or Reversed Greybox Selected Shortcut to Greybox page Amplifier Gain Amplifier maximum voltage output Channel name defined on I...

Page 17: ...Any of the 4 input channel tabs can be accessed either by double clicking within their respective Map areas or by selecting the channel via the tabs at the top of the page...

Page 18: ...d a preset into the software and UX8800 starting with one of the processors empty output channels Click on the button marked Select Configure Greybox To browse for a greybox file click on the Open but...

Page 19: ...cused These are labeled as Legacy greyboxes Greybox revision number Any notes associated with the greybox Creator of the greybox The various legs of the greybox will be listed under Leg Label The layo...

Page 20: ...s The user must enter in the load being presented to the amplifier and either the max voltage to be applied at that ohmage or the max watts available at that ohmage for that particular amplifer The fi...

Page 21: ...on the Clear Dialog button If the user wishes to take advantage of the Cardioid feature contained in EAW Pilot simply load one subwoofer greybox and use the plus button to add another and fill in the...

Page 22: ...ent distance if close to the array the angle changes This parameter is used to adjust the cancellation angle accordingly 4 LF EQ Compensation EAW s technique for creating a cardioid does so at all fre...

Page 23: ...tting equalizers The user may elect to manually type in all of the EQ parameters or use the associated spinners to set parameters Alternately you may also use the drag and drop method within the graph...

Page 24: ...o modify or click on a square within the Display area Select Filter Type by using dropdown menu Adjust the Frequency of the Filter 20Hz 20000Hz Adjust The Gain Of The Filter 15dB Adjust the Width of t...

Page 25: ...on this button Drag And Drop Adjustment From any of the greyboxes output tabs left click and drag the slash mark to alter the high pass filter Note Once the HPF has been dragged the software will aut...

Page 26: ...dragging the squares will implement the available 10 parametric EQ s Left click and drag the small yellow dots flanking the EQ and move left or right to adjust the Q of the filter Left click and drag...

Page 27: ...nel If this is your intention click OK or press cancel to go back to the input screen Use the spinner to adjust the gain of the input signal 99 to 15 dB The adjustment is visualized by movement of the...

Page 28: ...put of the UX8800 Note The physical connections to the back of the UX8800 do not necessarily have to follow through to the processor For example you may have a signal coming in on the physical D input...

Page 29: ...Input and Output names can be changed on the I O Page by clicking in their respective title boxes...

Page 30: ...he current temperature and relative humidity of the current environment to calibrate the high frequency compensation feature Select from 5 different predetermined temperature humidity zones The Manage...

Page 31: ...ted file folder from your computer Location of the files on your PC Attributes of the currently selected GreyBox Browse your computers file system for other GreyBoxes to recall Browse your computers f...

Page 32: ...yBox to the UX8800 storage Greyboxes currently stored on the UX8800 if any GreyBox file attributes Select a GreyBox for storage to Your PC Delete GreyBox from the UX8800 File transfer status Exit File...

Page 33: ...n System Processing If processor outputs are not loaded for greybox usage they can be used for generic processing High and low pass filters may be set to create crossover settings for any desired prod...

Page 34: ...Filters may also be set with click and drag Limiters may be custom set by entering absolute numeric values Thresholds can be modified by left click and drag of the threshold bars...

Page 35: ...Notes...

Page 36: ...Notes...

Reviews: