
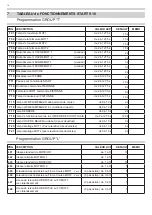
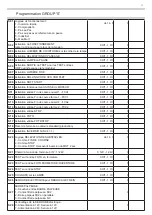
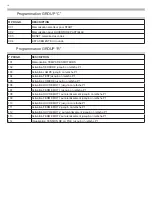


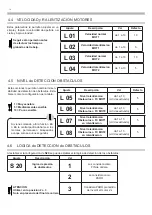
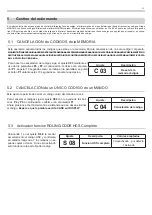

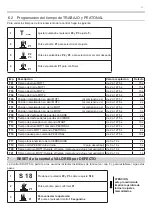
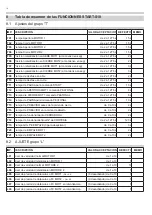


9
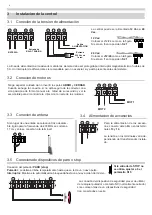
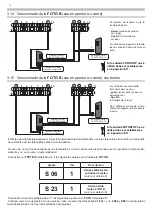
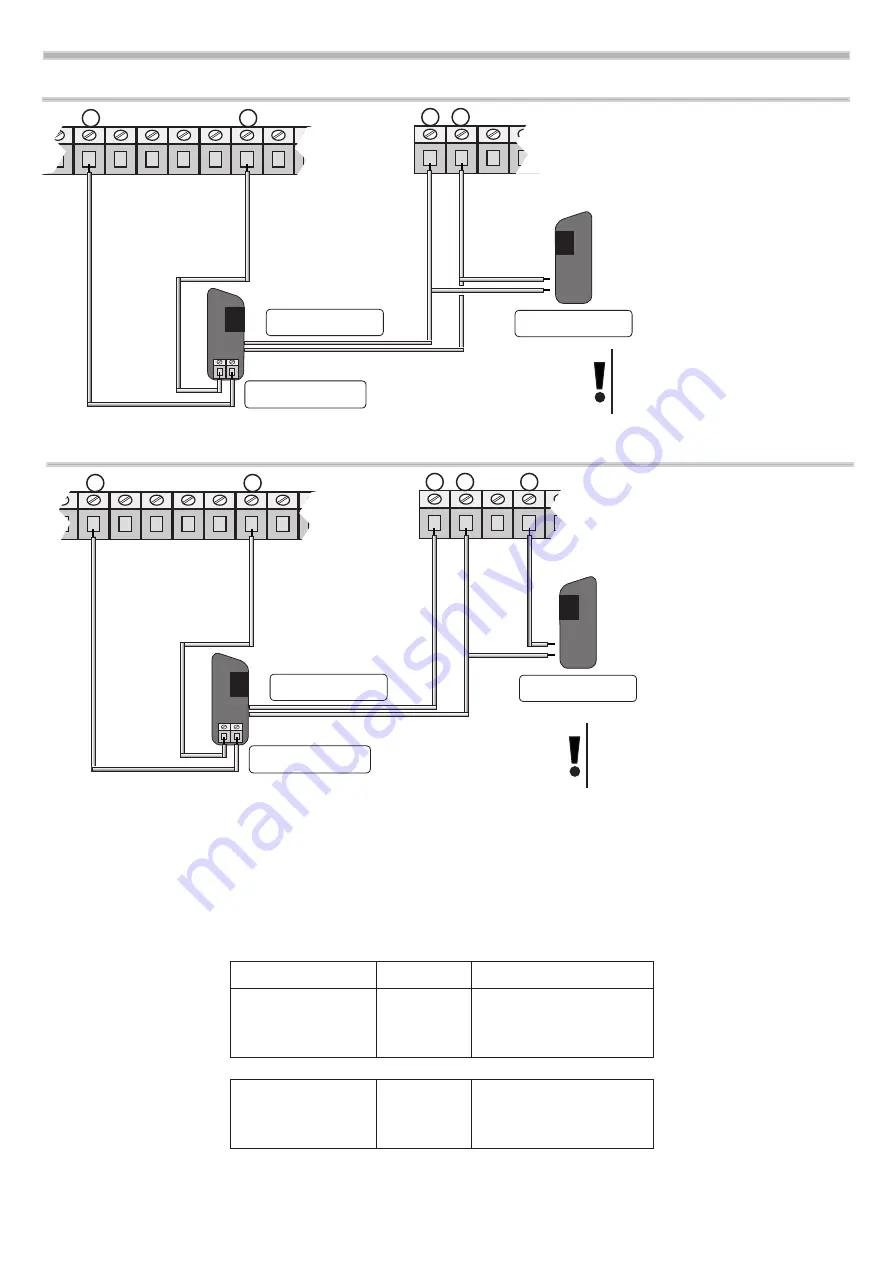
3.12 Conexion de la
fOTOCELuLA fOTO A
(solo en cierre)
2 3 4 5 6 7 8 9 10
ALIMENTACION
TX FOTOCELULA
13 14 15 16
+
-
Receptor fotocelula
Conector contacto NC
ALIMENTACION
RX FOTOCELULA
Si la entrada de ‘fotocelula
no es utilizado, se debe
establecer ajuste de S16 a 0
El contacto del receptor de la fo
-
tocélula debe ser:
-
Limpio
(aislado de tension
sin carga)
-
Tipo NC
(Normalmente
cerrado).
Si utiliza barios juegas de fo
-
tocélulas La conexión debera
hacerse en serie.
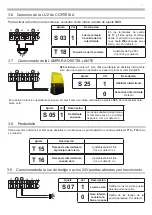
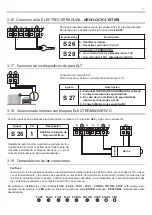
3.13 Conexionado de la
fOTOCELuLA fOTO A
(solo en cierre) con testeo
2 3 4 5 6 7 8 9 10
ALIMENTACION
TX FOTOCELULA
13 14 15 16 17
+
-
Receptor fotocelula
Conector contacto NC
ALIMENTACION
RX FOTOCELULA
El contacto del receptor de la fo
-
tocélula debe ser:
-
Limpio
(aislado de tension
sin carga)
-
Tipo NC
(Normalmente
cerrado).
Si utiliza barios juegas de fotocélu
-
las La conexión debera hacerse en
serie.
-
El Testeo de la fotocelula asegura el correcto funcionamiento del automatismo y de las fotocelulas. El cuadro de maniobras
hara el testeo de las fotocelulas antes de cada apertura.
En caso de un mal funcionamiento de las fotocelulas, el cuadro de maniobras encendera por 5 segundos la lampara de-
stellante y no se movera la automatizacion.
Si la entrada de ‘fotocelula
no es utilizado, se debe
establecer ajuste de S16 a 0
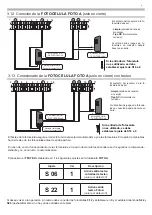
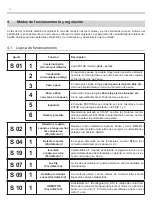
Ajuste
Val
descripción
S 06
1
Activa salida testeo
entradas de testeo
(valor por defecto 0)
S 22
1
Activa salida
testeo foto A
(valor por defecto 0)
Para activar el
TeSTeo
establecido en
1
los siguientes ajustes en la fotocélula
foTo A
:
Si desea volver a la operación sin testeo debe conectar las fotocélulas
3.12
y establecer en
0
y el establecimiento de
S22
y
S06
(deshabilitar sólo si no hay otras entradas en testeo)
+
-
+
-
+
-
+
-
Summary of Contents for START S10
Page 21: ...NOTE 21 ...
Page 22: ...NOTE 22 ...
Page 45: ...NOTE 21 ...
Page 46: ...NOTE 22 ...
Page 67: ...NOTE 19 ...
Page 89: ...NOTE 21 ...
Page 90: ...NOTE 22 ...
Page 113: ...NOTE 21 ...
Page 114: ...NOTE 22 ...


