background image

Operating instructions

K3G450-AZ30-35

Translation of the original operating instructions

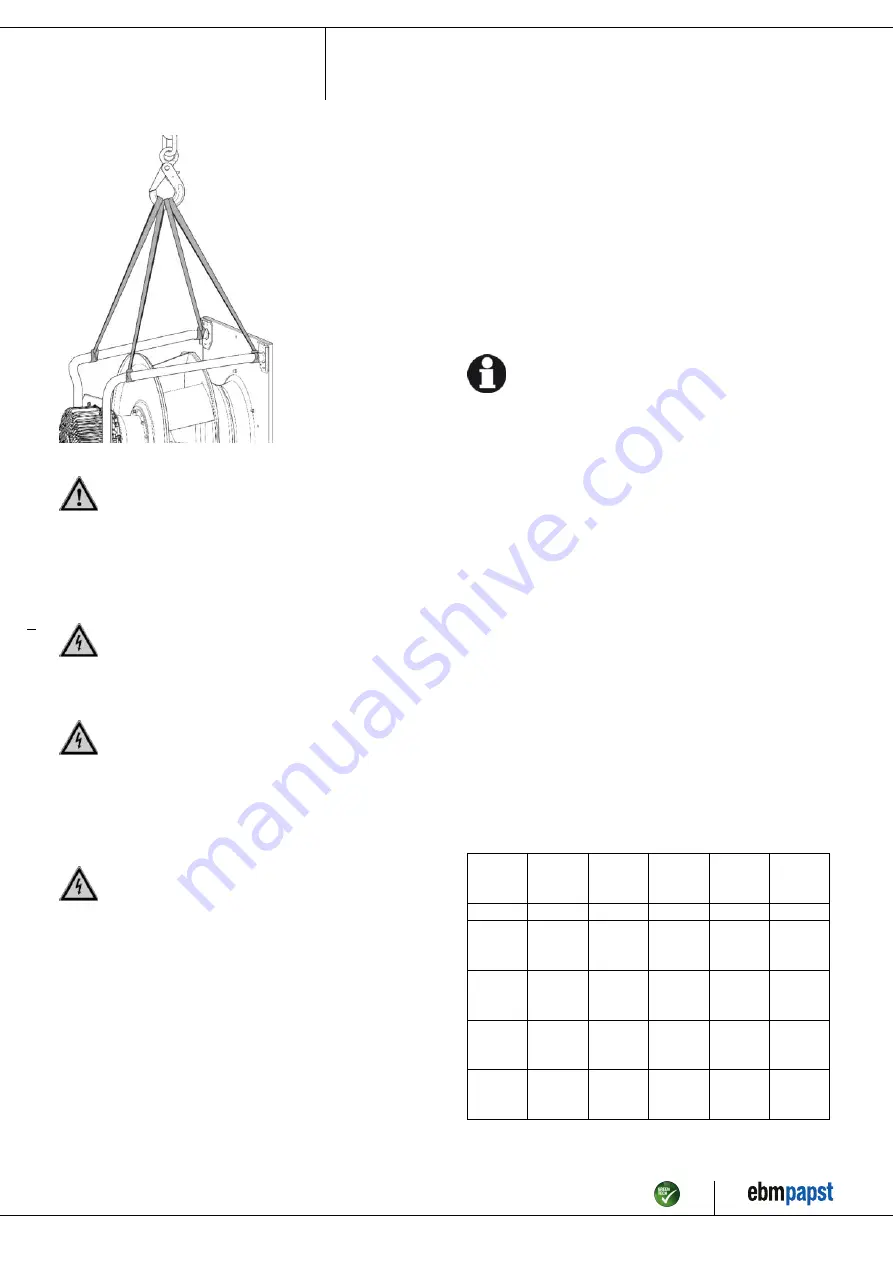
Fig. 1: Hoisting diagram for transportation of RadiPac

CAUTION
Possible damage to the device

If the device slips during installation, serious damage can result.
→ Ensure that the device is securely positioned at its place of

installation until all fastening screws have been tightened.

The fan must not be strained on fastening.

4.2 Electrical connection

DANGER
Voltage on the device

Electric shock
→ Always connect a protective earth first.
→ Check the protective earth.

DANGER
Faulty insulation

Risk of fatal injury from electric shock
→ Use only cables that meet the specified installation

regulations for voltage, current, insulation material, capacity,
etc.

→ Route cables so that they cannot be touched by any

rotating parts.

DANGER
Electrical charge (>50 µC) between phase conductor and
protective earth connection after switching off supply
with multiple devices connected in parallel.

Electric shock, risk of injury
→ Ensure sufficient protection against accidental contact.

Before working on the electrical hookup, short the supply
and PE connections.

CAUTION
Voltage

The fan is a built-in component and has no disconnecting switch.
→ Only connect the fan to circuits that can be switched off with

an all-pole disconnection switch.

→ When working on the fan, secure the system/machine in

which the fan is installed so as to prevent it from being
switched back on.

NOTE
Device malfunctions possible

Route the device's control lines separately from the supply line.
→ Maintain the greatest possible clearance.

Recommendation: clearance > 10 cm (separate cable
routing)

NOTE
Water ingress into wires or cables

Water ingress at the customer end of the cable can damage the
device.
→ Make sure the end of the cable is connected in a dry

environment.

Only connect the device to circuits that can be switched off with
an all-pole disconnection switch.

4.2.1 Requirements

;

Check whether the information on the nameplate matches the
connection data.

;

Before connecting the device, make sure the power supply matches
the device voltage.

;

Only use cables designed for the current level indicated on the
nameplate.
For determining the cross-section, note the sizing criteria according
to EN 61800-5-1. The protective earth must have a cross-section
equal to or greater than that of the phase conductor.
We recommend the use of 105 °C cables. Ensure that the minimum
cable cross-section is at least
AWG 26 / 0.13 mm².

Protective earth contact resistance according to EN 61800-5-1

Compliance with the resistance specifications according to EN 61800-5-
1 for the protective earth connection circuit must be verified in the end
application. Depending on the installation situation, it may be necessary
to connect an additional protective earth conductor by way of the extra
protective earth terminal provided on the device. The protective earth
terminal is located on the housing and provided with a protective earth
symbol and a hole.

4.2.2 Supply connection and fuses

Assignment of supply cable cross-sections and their required fuses (line
protection only, no equipment protection).

Nominal
voltage

Fuse

Automatic
circuit
breaker

Cable
cross-
section

Cable
cross-
section

VDE

UL

VDE

mm²

*AWG

3/PE AC
380-480
VAC

16 A

15 A

C16A

1.5

16

3/PE AC
380-480
VAC

20 A

20 A

C20A

2.5

14

3/PE AC
380-480
VAC

25 A

25 A

C25A

4.0

12

3/PE AC
380-480
VAC

32 A

30 A

C32A

6.0

10

* AWG = American Wire Gauge

Item no. 50747-5-9970 · ENU · Change 209539 · Approved 2021-02-12 · Page 7 / 15

ebm-papst Mulfingen GmbH & Co. KG · Bachmühle 2 · D-74673 Mulfingen · Phone +49 (0) 7938 81-0 · Fax +49 (0) 7938 81-110 · info1@de.ebmpapst.com · www.ebmpapst.com

Summary of Contents for K3G450-AZ30-35

Page 1: ...e permitted to install the device to carry out a test run and to perform work on the electrical installation 1 3 Basic safety rules 1 1 3 Basic safety rules The safety hazards associated with the device must be assessed again following installation in the final product The locally applicable industrial safety regulations are always to be observed when working on the device Keep the workplace clean...

Page 2: ...fore working on the system machine wait until all parts have come to a standstill DANGER Ejected parts Missing protective devices may cause balancing weights or broken fan blades to be ejected and cause injuries Take appropriate safety measures WARNING Rotating device Long hair and dangling items of clothing jewelry and the like can become entangled and be pulled into the device Injuries can resul...

Page 3: ... Chapter 3 2 Nominal data Operating the device with all protective devices Following the operating instructions Improper use In particular operating the device in the following ways is prohibited and could be hazardous Operating the device in an unbalanced state e g due to dirt deposits or ice formation Resonant operation operation with severe vibration This also includes vibration transmitted to ...

Page 4: ...0 mm tightening torque 4 0 6 Nm 2 Cable diameter min 9 mm max 16 mm tightening torque 6 0 9 Nm 3 Inlet ring with pressure tap k factor 240 4 Tightening torque 3 5 0 5 Nm Item no 50747 5 9970 ENU Change 209539 Approved 2021 02 12 Page 4 15 ebm papst Mulfingen GmbH Co KG Bachmühle 2 D 74673 Mulfingen Phone 49 0 7938 81 0 Fax 49 0 7938 81 110 info1 de ebmpapst com www ebmpapst com ...

Page 5: ...ndardized measurement setup 3 4 Technical description Weight 53 6 kg Size 450 mm Motor size 150 Rotor surface Painted black Electronics housing material Die cast aluminum painted black Impeller material Sheet aluminum coated with white plastic RAL 9010 Support plate material Sheet steel galvanized and painted white RAL 9010 Support bracket material Steel galvanized and painted black Inlet nozzle m...

Page 6: ...re if necessary after consultation with the network operator that this device is only connected to a connection point with a Ssc value that is greater than or equal to 120 times the rated output of the arrangement 4 CONNECTION AND STARTUP 4 1 Mechanical connection CAUTION Risk of cutting and crushing when removing device from packaging Carefully remove the device from the packaging by grasping hol...

Page 7: ...able can damage the device Make sure the end of the cable is connected in a dry environment Only connect the device to circuits that can be switched off with an all pole disconnection switch 4 2 1 Requirements Check whether the information on the nameplate matches the connection data Before connecting the device make sure the power supply matches the device voltage Only use cables designed for the...

Page 8: ... multiple of the nominal value 4 2 6 Locked rotor protection Due to the locked rotor protection the starting current LRA is equal to or less than the nominal current FLA 4 3 Connection in terminal box 4 3 1 Preparing cables for connection Only strip the cable as far as necessary ensuring that the cable gland is sealed and there is no strain on the connections For tightening torques see Chapter 3 1...

Page 9: ...le gland for example When routing the cable make sure that the cable glands are located at the bottom The cables must always be routed downward Fig 4 Cable routing for fans installed upright 4 4 Factory settings Factory settings made for the device by ebm papst Mode parameter set 1 PWM control Mode parameter set 2 PWM control Fan device address 01 Max PWM 100 Min PWM 5 Save set value to EEPROM Yes...

Page 10: ...angeover contact common connection contact rating max 250 VAC 2 A AC1 min 10 mA KL 2 3 NC Status relay floating status contact break for failure KL 3 1 RSA Bus connection RS485 RSA MODBUS RTU SELV KL 3 2 RSB Bus connection RS485 RSB MODBUS RTU SELV KL 3 3 10 GND Reference ground for control interface SELV KL 3 4 Ain1 U Analog input 1 set value 0 10 V Ri 100 kΩ adjustable curve only usable as alter...

Page 11: ...ler according to EEPROM setting the direction of action of the integrated controller can be selected as normal inverse via bus or digital input Normal Pin open or applied voltage 5 50 VDC Inverse Bridge to GND or applied voltage 1 VDC SELV KL 3 11 Ain2 U Analog input 2 measured value 0 10 V Ri 100 kΩ adjustable curve only usable as alternative to input Ain2 I SELV KL 3 12 20 V Fixed voltage output...

Page 12: ...ing Either run through the resonant range as quickly as possible with speed control or find another remedy Operation with excessively high vibration levels can lead to premature failure The maximum permissible vibration severity must not exceed 3 5 mm s and should be checked at intervals of 6 months It is to be determined at the motor mount at the motor support plate at least in axial direction an...

Page 13: ...te from supply and remove mechanical blockage Line voltage faulty Check line voltage restore power supply Attention The error message resets automatically Device restarts automatically without warning Faulty connection Isolate from supply correct connection see connection diagram Broken motor winding Replace device Deficient cooling Improve cooling Let the device cool down To reset the error messa...

Page 14: ...maintenance intervals to the actual level of dust exposure 6 3 Safety inspection NOTE High voltage test The integrated EMC filter has Y capacitors The tripping current is exceeded when AC testing voltage is applied Test the device with DC voltage when you perform the legally required high voltage test The voltage to be used corresponds to the peak value of the AC voltage required by the standard W...

Page 15: ...etallic materials are generally considered to be fully recyclable Separate the components for recycling into the following categories Steel and iron Aluminum Non ferrous metal e g motor windings Plastics particularly with brominated flame retardants in accordance with marking Insulating materials Cables and wires Electronic scrap e g circuit boards Only ferrite magnets and not rare earth magnets a...

Reviews: