background image

Pa


Page 5 of 15


ebm-papst A&NZ Pty Ltd


10 Oxford Road · Laverton North VIC 3026 · Phone +61 (03) 9360 6400 · Fax +61 (03) 9360 6464 

ABN 33 115 927 556 

NSW Phone +61 (02) 9827 6400 · NSW Fax +61 (02) 9827 6464 · NZ Phone +64 (09) 525 0245 · NZ Fax +64 (09) 525 0246 


sales@ebmpapst.com.au · www.ebmpapst.com.au 


6


INSTALLATION  


6.1


User Interface and LED Buttons 


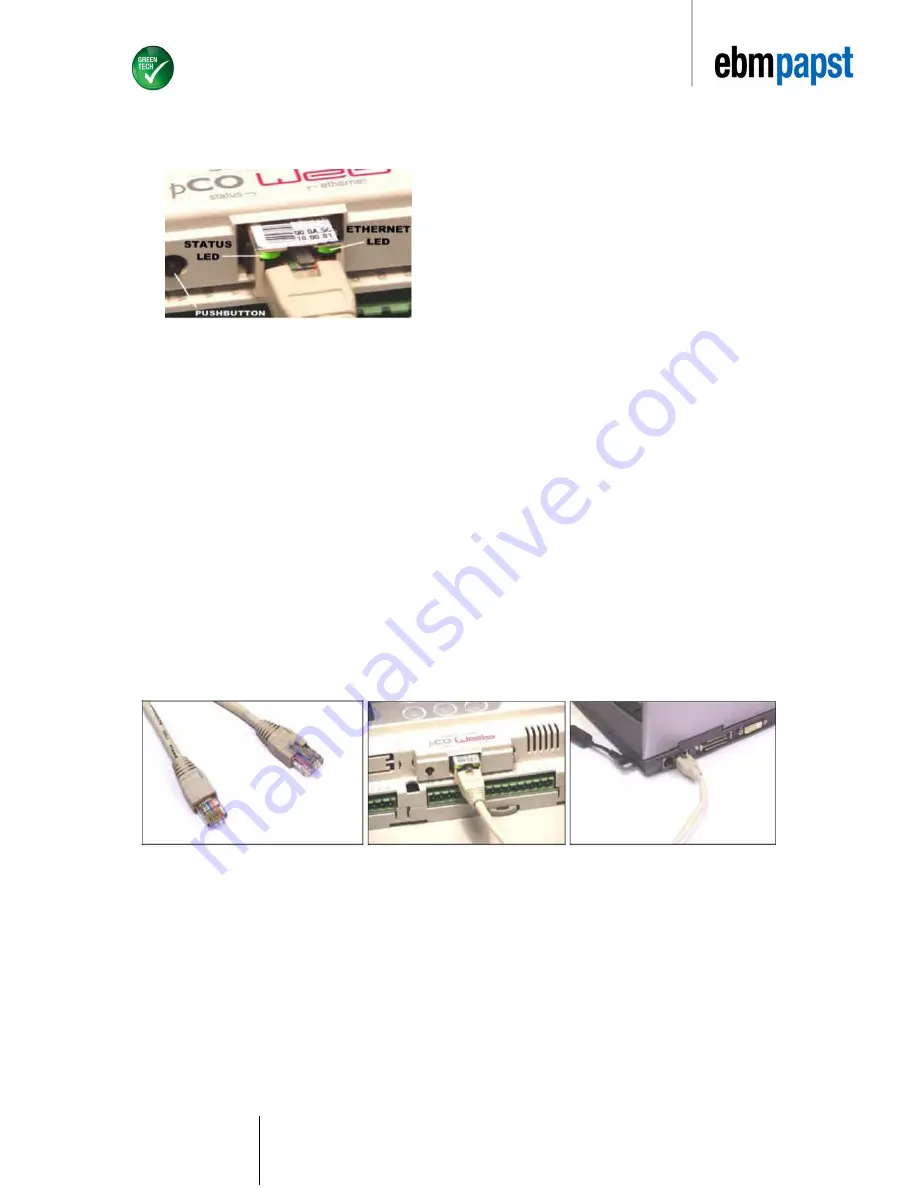
pCOWeb (Figure 4) features a button (PUSHBUTTON) and 
two indicator LEDs (STATUS LED and ETHERNET LED) 


Functions of the button 

When starting up the pCOWeb, the push button is used to select the network communication type - either factory parameters  
or user parameters. In the case of the EC-FAN GATEWAY the parameters have already been pre-programmed for the 
customer. There is no requirement for the customer to select network communication. 


6.2


Push button & LEDs 

 
When the Ethernet LED is in a solid green state, this indicates successful 

connectivity

 between the PC and the EC-FAN 

GATEWAY. When the status LED is green, this indicateds successul 

communication

 between PC (pCOWeb software) and 

the EC-FAN GATEWAY. 
Immediately after reboot, as soon as the Status LED remains on steady GREEN, hold the button; after around 20 seconds 
the Status LED will turn RED and flash slowly 3 times. The button must be released before the end of the 3 flashes. This 
process has to be done only once at the point of programming the device. 
In normal operation, the push button reboots pCOWeb without needing to disconnect the power supply.

 The customer is 

not recommended to reboot the system via the push button as this is done by the pCOWeb webpage that is to be 
set up in Section 7.5. 
 
6.3


Connection 

 
Connect pCOWeb to the Ethernet connector on the PC using a crossover cable (Figure 4). Please note that the crossover 
cable is 

not 

part of the scope of delivery. 


6.4


Adressing fans  


Before the set up of the EC-FAN GATEWAY the number of active ebm-papst fans that are to be connected to the  
ECFAN GATEWAY will have to be pre-programmed via EC-Control. EC-Control is to be used to assign 

addresses

 for the  

respective fans. 


The EC-FAN GATEWAY 

will not

 automatically assign addresses to the fans that are required on its network. 


ebm-papst recommends that the first fan be programmed at address 2 and the following fans thereafter to be programmed  
at “n+1”.This is to avoid any confusion when a new fan unit is to be added to an existing network. Ebmpapst fans are by factory  
default addressed 1. 


Ensure that the fans are 

no

t connected to the EC-FAN GATEWAY before the device has been appropriately 

programmed. Power down the fans. Attach the communication cables to point 2 as per Figure 3 and power up the fans. 


   Figure 4 LED Indicators 

Figure 5 pCOWeb to PC connection


Summary of Contents for EC-FAN

Page 1: ......

Page 2: ......

Page 3: ...SPECIFICATIONS 3 3 1 Scope of delivery 3 3 2 Mechanical specifictions 3 3 3 Plastic Case 3 3 4 Electrical specifications 3 3 5 Electrical connection 3 4 MECHANICAL DIMENSIONS 4 5 CONNECTORS 4 6 INSTAL...

Page 4: ...DC The power supply is connected between G and G0 Cf Figure 1b The voltage supply required is 48 VDC 36V min to 72V max 2 2 3 Fuse The power supply to the EC FAN GATEWAY and terminal or series of EC F...

Page 5: ...ance V0 UL94 and 960 C IEC 695 Ball pressure test 125 C Resistance to creeping current 250 V 3 4 Electrical specifications Isolated power supply DC power supply 48 VDC 36 V minimum to 72 V maximum AC...

Page 6: ...360 6464 ABN 33 115 927 556 NSW Phone 61 02 9827 6400 NSW Fax 61 02 9827 6464 NZ Phone 64 09 525 0245 NZ Fax 64 09 525 0246 sales ebmpapst com au www ebmpapst com au 4 MECHANICAL DIMENSIONS 5 CONNECTO...

Page 7: ...efore the end of the 3 flashes This process has to be done only once at the point of programming the device In normal operation the push button reboots pCOWeb without needing to disconnect the power s...

Page 8: ...C FAN GATEWAY Once the EC FAN GATEWAY device has locaded the following screen will appear 6 5 1 Assigning the number of active devices Select d Service Settings by using arrows Press 6 5 2 Password En...

Page 9: ...and Offline Recall are set a default of 10s and 2s respectively User to choose mode of fan control by scrolling Press once desired option is selected On the same screen scroll down and push for Enable...

Page 10: ...ribed in Selection 6 5 2 and then select b I O Configuration by scrolling via and pressing Here you will assign the appropriate address to the respective Fan The address entered will have match the ad...

Page 11: ...m a power failure the device will revert to the rpm value that is entered in manual value 6 5 6 Viewing real time fan data Return to the main menu by pushing or Pressing or keys will allow the user to...

Page 12: ...16 0 10 and Subnet Mask 255 255 0 0 in the appropriate fields as shown in Figure 17 Figure 17 Internet Protocol Version 4 ECP IPv4 Follow through with the above steps and click OK to establish a loca...

Page 13: ...k tab By default the product has an IP address of 172 16 0 1 Here the user can allocate their desired IP address Please note that if the IP address is changed here the next time the ebm papst web fron...

Page 14: ...n 2 then you will be writing a value at register 43 30 2 1 13 43 Subsequently the Ramp Up time for Fan 3 is assigned to register 73 Take note that if the address is changed digitally via the building...

Page 15: ...xford Road Laverton North VIC 3026 Phone 61 03 9360 6400 Fax 61 03 9360 6464 ABN 33 115 927 556 NSW Phone 61 02 9827 6400 NSW Fax 61 02 9827 6464 NZ Phone 64 09 525 0245 NZ Fax 64 09 525 0246 sales eb...

Reviews: