background image


27-11-2014                                                                    26                                                              ebode IPV4NVR 


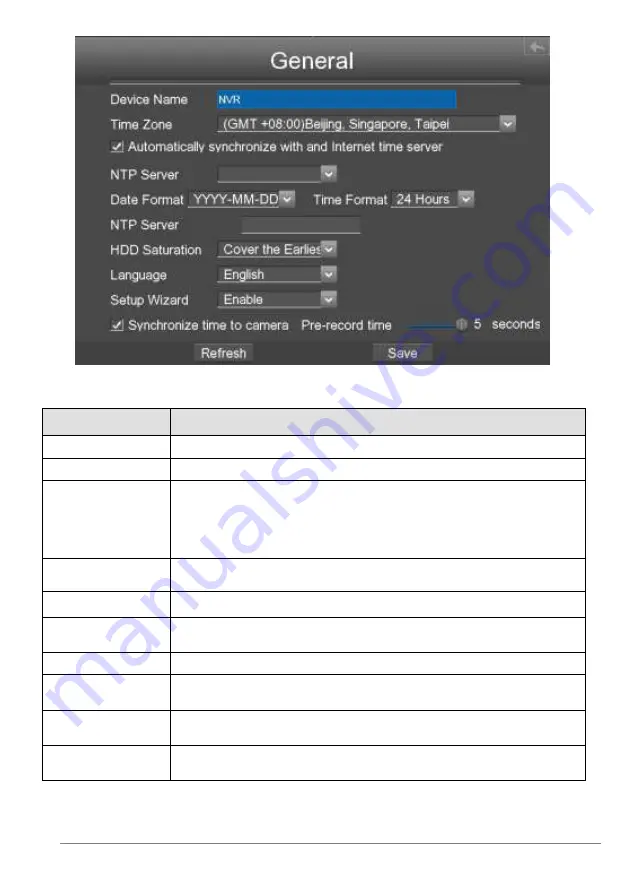
NOTE: Please do not modify the NVR system time when recording. 


Parameter


Description


Device Name 

You can modify your device name to help you identify it.   

Time Zone 

Please select the time zone according to the actual situation.  

Automatically 
synchronize with 
and Internet time 
server 

Whether synchronize your NVR with an Internet time server.   

Check: You need to configure the NTP Server. 

Uncheck: You need to configure the Date and Time. 

Date Format 

You need to configure the date format. 

Time Format 

You need to configure the time format. 

HDD Saturation 

When the HDD is full. You can select the  Cover the Earliest


Recording or Stop Recording.  

Language 

Configure the language of the NVR interface. 

Setup Wizard 

Whether to enable startup wizard when the NVR system starts 
again. 

Synchronize  time 
to camera 

Time set by the NVR system. Whether to synchronize the time to 
the connected IPC device. 

Pre-recorded time 

Pre-recording  time.  When  recording  is  performed,  the  system 
starts recording n seconds before recording is enabled.  


Click Save button to take effect. 


Summary of Contents for IPV4NVR

Page 1: ...ebodeelectronics eu User Manual IPV4NVR 4 Channel 720P 960P HD IP CAM NVR Before using this product please read this document carefully and visit www ebodeelectronics eu for latest manual Software and...

Page 2: ...Technical Specification 4 Channel 720P 960P HD IP Cam Network Video Recorder NVR H 264 Main Profile Video Compression Supports HDMI and VGA Local Display 4 Channel 960P Synchronous Playback Compatibl...

Page 3: ...4 5 Common Operations 7 5 Device 7 5 1 IPV4NVR 7 5 2 USB Mouse Operation 10 6 GUI 10 6 1 Log in 10 6 2 Setup Wizard 11 6 3 Shortcut Menu 15 6 4 Menu 18 7 Web 40 7 1 Instructions Before Login 40 7 2 Lo...

Page 4: ...should only be repaired or serviced by qualified and authorized service personnel Defected pieces must be replaced by original spare parts Batteries keep batteries out of the reach of children Dispose...

Page 5: ...itally by the IP Camera IPC The product can perform live video preview recording playback remote access and backup simultaneously 4 2 Key Features Network Monitoring You can access the NVR system remo...

Page 6: ...can select the cycle cover the earliest recording or stop recording Backup You can query video files stored by the NVR in the HDD and can back up the files through a USB interface and save the files...

Page 7: ...interface then click Shutdown in the System interface Note Please try to avoid shutting down the unit by turning off the power switch on the rear panel especially during recording Reset You can reset...

Page 8: ...uld be 2 4GHZ or 5GHZ It is highly recommended to use the IPC which supports ONVIF protocol 5 1 2 Device Structure Side Panel Icon Name Description HDMI HDMI video output connector VGA VGA video outpu...

Page 9: ...y is properly connected Note Please use the NVR power adapter provided in the package Network Access During the network connection you should provide sufficient bandwidth to ensure the fluency and cla...

Page 10: ...el menu Note The Single Click mentioned in this article is refer to the left mouse click 6 GUI You can visit the local NVR device via the display or monitor and view or manage NVR system NVR device is...

Page 11: ...6 2 Setup Wizard By default the Setup Wizard starts once the NVR has loaded as shown in Figure below The Setup Wizard can walk you through some important settings of the NVR If you don t want to use...

Page 12: ...r region from the drop down menu There are two method about setting time If you select the Automatically synchronize with and Internet time server you need configure the NTP Server information If you...

Page 13: ...rmat the disk for recording Click the Format USB Disk button to format the disk for backup Initialization removes all the data saved in the HDD Step4 Click next button you can add the IPC device for y...

Page 14: ...he Enter button on the input keyboard to save and exit the input keyboard 3 Click OK button to exit the IP Camera Setting window 4 You can find the IP Camera in the IP Camera List 5 Click Finish butto...

Page 15: ...on It is also at the very top of the menu hierarchy thus pressing the ESC many times brings you to the Live View mode After login right click the mouse you will enter the shortcut menu 1 Channel 4 Cha...

Page 16: ...Check the Channel checkbox Click OK button to take effect Right click the mouse to back to the Live view interface In the live view interface there are icon at the right bottom of the screen for the c...

Page 17: ...he IP Camera move the preset position Cruise track The default cruise tracks have two types Vertical and Horizontal Vertical The IP Camera of the channel will rotate from up to down Horizontal The IP...

Page 18: ...e adding of the IP cameras the basic information of the camera lists in the IP Camera List and you can configure the basic setting of the IP cameras Note Before applying Add function please make sure...

Page 19: ...Click Add button and the following interface will be shown 3 Click OK button to finish adding And the camera and its information will be added in the IP Camera list 1 Select the IPC 2 Click Add button...

Page 20: ...nually Add button in the IPC Management interface You can select the Channel and Protocol Input the IP Address Username Password HTTP Port and Media Port Then click OK button to finish adding And the...

Page 21: ...peed can be twice 4 8 16 or 32 times of the normal playing speed The multiple of normal playing speed is displayed in the upper right corner of the playback page For example X2 indicates the current p...

Page 22: ...ck Search button to search the matched recorded files If there are search results then they will be shown in list Backup Record The record information can be exported to USB flash disk for backup 1 Do...

Page 23: ...ching for the recording information you can also select backup page or backup all to achieve bulk backup 6 4 4 About Choose Menu About in the Menu interface The About interface is displayed You can vi...

Page 24: ...s uninitialized select the backup disk then click Format USB disk to format the backup disk if the format is incorrect Format Local Disk If the disk is uninitialized select the record disk then click...

Page 25: ...elect from drop down list 4 Click Backup button and start backup 5 Check backup result The system saves the log to the mobile storage device For example 20140320 134022_01 log indicates that a log is...

Page 26: ...ure the Date and Time Date Format You need to configure the date format Time Format You need to configure the time format HDD Saturation When the HDD is full You can select the Cover the Earliest Reco...

Page 27: ...ncreasing stream which will take up the higher bandwidth Bit Rate Generally speaking the larger the bit rate is the clearer video will become But the bit rate configuration should combine well with th...

Page 28: ...one certain channel The Icon indicate starts schedule recording at the right bottom of the screen for certain channel Disable Schedule Recording 1 Select channel from drop down box list 2 Uncheck the...

Page 29: ...IP address of the NVR system Note The IP of IP cameras PC and NVR should be in the same network segment and in the same LAN Subnet Mask The subnet mask of the NVR system Gateway The gateway of the NVR...

Page 30: ...ake effect Then you can use http Domain name HTTP Port to access the NVR via internet Take hostname a6747 myipcamera org and HTTP Port 88 for example the accessing link of the camera via internet woul...

Page 31: ...heir own port such as 587 or 465 Enable SSH Transport Layer Security usually is None If you use Gmail Transport Layer Security must be set to TLS or STARTTLS and SMTP Port must be set to 465 or 25 or...

Page 32: ...take effect Click FTP Test to see if FTP has been successfully configured If the test success you can see the success information Parameter Description FTP Address If your FTP server is located on th...

Page 33: ...The NVR system supports the display mode in the live view 1 1080P After this item is selected an IPC device is displayed on the NVR preview interface and IPC devices with the resolution of up to 1080P...

Page 34: ...2 Check the checkbox to enable motion detection function Step3 Check the checkbox to select the linkage method You may refer to follow table for details of linkage methods Parameter Description Record...

Page 35: ...n the detection area the NVR will alarm Step5 Set Detection Schedule 1 Click Settings button for the detection schedule Set up arming schedule of the channel for the motion detection You can choose a...

Page 36: ...u Settings Alarm Settings Other Alarm in the Menu interface The Other Alarm interface is displayed You can configure the HDD Hard Disk Drive information Click Save button to take effect Parameter Desc...

Page 37: ...eature is invalid 1 Click Select Shelter Area button and it pop up a window Parameter Description Channel Select the channel from the drop down list Channel Name It displays the IPC device name of the...

Page 38: ...tdown User Account Choose Menu System User Account in the Menu interface The User account management interface is displayed User levels by permission from low to high are visitor operator administrato...

Page 39: ...s It is recommended to backup your configuration before modifying or upgrading firmware Click Config Export and then click OK button in the pop up message box The configuration files of the NVR will b...

Page 40: ...ollowing methods Through operation on the local GUI configure an IP address for the NVR For the specific operation see Appendix II Common operations 2 Configure the IP Parameters Allocate an IP addres...

Page 41: ...found Click me to download it will pop up the message below the page as shown in the following figure 2 Click Run button it will pop up the message below the page as shown in the following figure 3 C...

Page 42: ...ra from Internet here we recommend sub stream Note When the network bandwidth is badly you d better select sub stream and the video will be more fluency Language Select the language type of the NVR cl...

Page 43: ...the monitoring video in the channel Take Snapshot Select channel click this button and take a snapshot of the monitoring video page of a corresponding channel to the local computer Set the storage pat...

Page 44: ...monitoring page to make the monitoring page displayed in full screen Press Esc to exit full screen mode Setting Cruise The default cruise tracks have two types Vertical and Horizontal Vertical The IP...

Page 45: ...down list and click button the IP camera will go to the preset position 7 4 Parameter Configuration Choose Parameter Configuration you can configure the Local Settings Settings Service Configuration...

Page 46: ...Network Time Protocol NTP Server can be configured on your NVR to ensure the accuracy of system date time Choose the one that is closest to your NVR If you uncheck the Automatically Synchronize With I...

Page 47: ...em Note The IP of IP cameras PC and NVR should be in the same network segment and in the same LAN Subnet Mask The subnet mask of the NVR system Gateway The gateway of the NVR system Primary DNS Server...

Page 48: ...or Disable the Email function Authentication Enable or Disable the server authentication feature SMTP Server The SMTP Server IP address or host name SMTP Port The SMTP port is usually set as 25 Some S...

Page 49: ...e FTP parameter Step3 Click Save button to take effect Step4 Click Test to see if FTP has been successfully configured If the test success you can see the success information Parameter Description FTP...

Page 50: ...is feature Click Save button to take effect Then you can use http Domain name HTTP Port to access the NVR via internet Third Party DDNS You can also use third part DDNS such as www no ip com www 3322...

Page 51: ...th Bit Rate Generally speaking the larger the bit rate is the clearer video will become But the bit rate configuration should combine well with the network bandwidth If the bandwidth is very narrow an...

Page 52: ...ment of a LAN with NVR you may add it in one button with IP Camera s user name password and port number Auto Adding IPC Choose Parameter Configuration Device Management IP Camera Setup The IP Camera S...

Page 53: ...ion You can configure the Disk Saturation Pre recorded Time for HDD information Step1 Choose Parameter Configuration Device Management Hard Disk Information The Hard Disk Information page is displayed...

Page 54: ...e Preview page or Playback page the snapshot picture will be saved to the Snap Picture Path in the local computer 7 4 3 Service Configuration Motion Detection Follow the steps to set the motion detect...

Page 55: ...an choose whether to send e mail Note Make sure you have set Email FTP When the Motion detection is triggered you can choose whether to upload detection picture to FTP server Note Make sure you have s...

Page 56: ...3 Click OK button to save and quit When something moving in the detection area the NVR will alarm Step6 Set Detection Schedule Set up arming schedule of the channel for the motion detection You can ch...

Page 57: ...on time in the detection area the NVR will alarm and adopt the corresponding alarm linkage Note You must set the detection area and detection schedule or else there is no alarm anywhere and anytime Re...

Page 58: ...ertain time period for the recording For detailed procedure please refer to Motion Detection Step5 Click Save button to take effect Other Alarm Step1 Choose Parameter Configuration Service Configurati...

Page 59: ...devices 4 960P After this item is selected four IPC devices are displayed on the NVR preview interface and the resolution of up to 960P is supported for IPC devices Note If the Display Mode is changed...

Page 60: ...nd tilt speed of the IP Camera Step1 Choose Parameter Configuration Service Configuration Pan Tilt Speed The Pan Tilt Speed page is displayed Step2 Select channel from drop down box list Step3 Select...

Page 61: ...e track 3 On the lower left of the page you can see all preset points you have added Select one preset point and click Add button you can see the preset point has been added to the cruise track on the...

Page 62: ...4 Click OK button and the cruise track will take effect You can add other cruise track as the same method After add the cruise track back to the surveillance window of IP Camera select Cruise here you...

Page 63: ...it contains the English letter numeric and symbol Choose Parameter Configuration User Management User Account The User Accounts page is displayed Add a User 1 input the Username and Password 2 Select...

Page 64: ...e USB flash disk and click the Import button The loading process takes about 50 seconds After having finished the import of configuration files the NVR device will reboot automatically Note Do not dis...

Page 65: ...e Factory Reset page is displayed Click Factory Reset button then click OK button in the pop up message box and all parameters will return to factory settings The NVR device will reboot automatically...

Page 66: ...peed Fast forward The fast forward speed can be twice 4 8 16 or 32 times of the normal playing speed The multiple of normal playing speed is displayed in the upper right corner of the playback page Fo...

Page 67: ...er of the channels Number of channels where you need to enable recording Time in need hour Time you need to record Spent of HDD Capacity per hour Spent of HDD Capacity per hour M hour sec 3600 8 ond b...

Page 68: ...arty Domain Name Settings User can also use third part DDNS such as www no ip com www 3322 com Here take www no ip com for example Step 1 Go to the website www no ip com to create a free hostname Firs...

Page 69: ...ebsite please click the link to activate your ACCOUNT as indicated in email Secondly Login the link with the registered username and password to create your domain name Please create the domain name s...

Page 70: ...lly the default Domain Name will be invalid The Third Party DDNS and the default Domain Name cannot work at the same time the last time you configured will take effect Do port forwarding within the ro...

Page 71: ...er client through the browser and select DHCP server DHCP service On the DHCP page you can view the start address and end address of the address pool The subnet mask of the NVR must be the same as the...

Page 72: ...k Button one recovery button Alarm in out 4 ch alarm in and 1 ch alarm out Software Features Control Method Mouse Display Switch 1 ch 4 ch display switch Video Storage Schedule Recording Video Playbac...

Page 73: ...Verify the connection cable is good Verify Input mode of the monitor is correct Please check the input mode of the monitor matches with the output mode of the device e g if the output mode of NVR is H...

Page 74: ...80P mode When the NVR server switches to the 1080P mode some functions can take effect only after the server reboots In this case log out of the Web client and log in to it again In similar cases for...

Page 75: ...resses or other information stored in DNS DHCP Dynamic Host Configuration Protocol DHCP is a network application protocol used by devices DHCP clients to obtain configuration information for operation...

Page 76: ...environment This equipment generates uses and can radiate radio frequency energy and if not installed and used in accordance with the installation manual may cause harmful interference to radio commun...

Page 77: ...available and can be obtained from ebode electronics PB 25 NL 4264ZG the Netherlands User Information for Consumer Products Covered by EU Directive 2002 96 EC on Waste Electric and Electronic Equipme...

Page 78: ...conforme aux exigences essentielles et aux autres dispositions pertinentes de la Directive 1999 5 EC Espa ol Spanish Este equipo cumple con los requisitos esenciales asi como con otras disposiciones d...

Page 79: ...udio and video products that are affordable innovative and plug play The products provide you with comfort in your home help you to avoid wires and make sure you can stream your personal audio and vid...

Page 80: ...27 11 2014 80 ebode IPV4NVR www ebodeelectronics eu...

Reviews: