EC-520 User’s Manual
Chapter 2 Installation
2.1 Unpacking
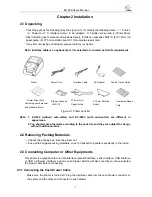
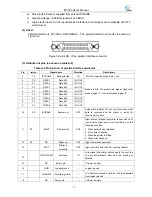
Check the pack list as following (See the Figure 2-1). It contains the following items:
(
1
)
Printer;
(
2
)
Power cord;
(
3
)
Interface cable;
(
4
)
AC adapter;
(
5
)
Facility user's guide;
(6)
Printer Driver
Disk (Including user's manual and windows driver); (7) Ribbon cassette JMR113; (8) 57.5mm roll
paper guide; (9) 57.5mm partition board; (10) Guarantee repair card.
If any item is missing or damaged, please contact your dealer.
Note: Interface cable is an optional part, it is selected or canceled as client’s requirement.
AC Adapter
Power Cord
57.5mm Partition
Board
Interface Cable
Facility User's Guide
Printer
Printer Driver Disk
(Including user's manual
and wind
57.5mm Roll
Ribbon Cassette
JMR113
Guarantee Repair
Card
Paper Guide
ows driver)
Figure 2-1 Printer pack list
Note: 1. EC-520 (without auto-cutter) and EC-520C (with auto-cutter) are different in
appearance.
2. You should check the items according to the pack list, and they are subject to change
without additional notice.
2.2 Removing Packing Materials
①
Unpack the packing box, take the printer out.
②
Keep all the original packing materials, so as to transport the printer expediently in the future.
2.3 Connecting Computer or Other Equipments
This printer is equipped with one data interface (parallel interface, serial interface, USB interface
or USB + Ethernet interface) and one cash drawer interface. Make sure that you have selected
the proper cable before connecting.
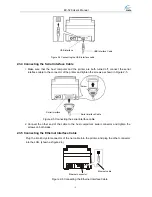
2.3.1 Connecting the Cash Drawer Cable
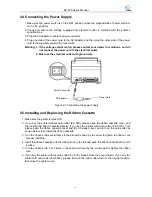
Make sure the printer is turned off. Plug the interface cable into the cash drawer connector of
the printer and the other end connector to cash drawer.
- 3 -

