background image

Page 1 of 9

Installation Instructions

Wireless Camera/Monitor System

Installation, Wiring and Function

CAMERA SYSTEM MODEL EC7008-WK2

OPERATING INSTRUCTIONS:

M

S

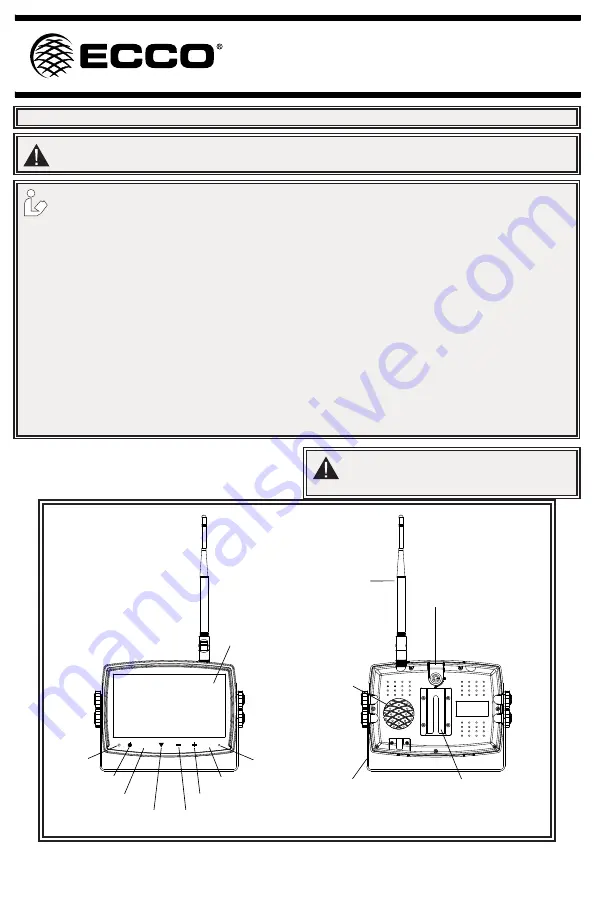
Digital Color LED Screen

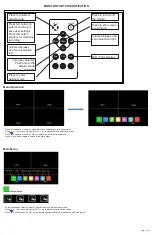
Power

Menu

Record/Select

Volume Decrease/Menu

          Navigation

Volume Increase/Menu Navigation

Camera Channel Select

Dimming Sensor

Loudspeaker

U-Support Bracket

Pedestal Mount Slot

Mini SD Card Slot

Remote

Control

Sensor

Ecante-5

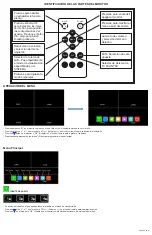
Digital Color LCD Screen

Dimming Sensor

Camera Channel Select

Volume Increase/Menu Navigation

Volume Decrease/

Menu Navigation

Record/Select

Menu

Power

Remote 

Control 

Sensor

Ecante-5

Mini SD Card 

Slot

Loudspeaker

U-Support Bracket

Pedestal Mount Slot

IMPORTANT! Read all instructions before installing and using.  Installer: This manual must be delivered to the end user.

WARNING!

Failure to install or use this product according to manufacturer’s recommendations may result in property damage, serious injury, and/

or death to those you are seeking to protect!

Do not install and/or operate this safety product unless you have read and understood the safety information 

contained in this manual.

1.  Proper installation combined with operator training in the use, care, and maintenance of emergency warning devices are essential to 

ensure the safety of emergency personnel and the public.

2.  Emergency warning devices often require high electrical voltages and/or currents. Exercise caution when working with live electrical 

connections.

3.  This product must be properly grounded. Inadequate grounding and/or shorting of electrical connections can cause high current arcing, 

which can cause personal injury and/or severe vehicle damage, including fire. 

4.  Proper placement and installation is vital to the performance of this warning device. Install this product so that output performance of 

the system is maximized and the controls are placed within convenient reach of the operator so that they can operate the system without 

losing eye contact with the roadway.

5.  Do not install this product or route any wires in the deployment area of an air bag.  Equipment mounted or located in an air bag 

deployment area may reduce the effectiveness of the air bag or become a projectile that could cause serious personal injury or death.  

Refer to the vehicle owner’s manual for the air bag deployment area.  It is the responsibility of the user/operator to determine a suitable 

mounting location ensuring the safety of all passengers inside the vehicle particularly avoiding areas of potential head impact.

6.  It is the responsibility of the vehicle operator to ensure daily that all features of this product work correctly. In use, the vehicle operator 

should ensure the projection of the warning signal is not blocked by vehicle components (i.e., open trunks or compartment doors), 

people, vehicles or other obstructions.

7.  The use of this or any other warning device does not ensure all drivers can or will observe or react to an emergency warning signal. 

Never take the right-of-way for granted. It is the vehicle operator’s responsibility to be sure they can proceed safely before entering an 

intersection, drive against traffic, respond at a high rate of speed, or walk on or around traffic lanes.

8.  This equipment is intended for use by authorized personnel only. The user is responsible for understanding and obeying all laws 

regarding emergency warning devices. Therefore, the user should check all applicable city, state, and federal laws and regulations. The 

manufacturer assumes no liability for any loss resulting from the use of this warning device.

CAUTION!

When drilling into any vehicle surface, make sure that the 

area is free from any electrical wires, fuel lines, vehicle 

upholstery, etc. that could be damaged.

*Trigger wire may or may not be required based on your specific application.

Summary of Contents for EC7008-WM2

Page 1: ...of the system is maximized and the controls are placed within convenient reach of the operator so that they can operate the system without losing eye contact with the roadway 5 Do not install this pr...

Page 2: ...ts preferably directly to the vehicle battery 6 Circuit breakers are very sensitive to high temperatures and will false trip when mounted in hot enviroments or operated close to their capacity The uni...

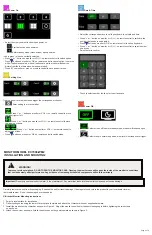
Page 3: ...to enter pairing mode Volume increase and menu selection right Jump key selector Fast jump to the display mode specified by SYSTEM Menu Operation Press M button on monitor or menu button on remote co...

Page 4: ...stop record When camera is not connected press record a grey dot will appear on the top left and nothing will be recorded When camera is connected press record a red dot will appear on the top left an...

Page 5: ...ecord time Record duration of each file Format SD card It is suggested to format all SD card when first time use on the monitor Power on record Start recording upon power on monitor System Dimmer valu...

Page 6: ...ss or button on monitor or VOL on remote control to select number one by one Select enter to confirm Touch to select number touch enter to exit and save Power Off Select screen off to enter standby mo...

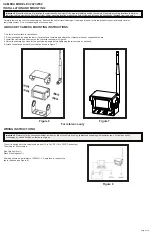
Page 7: ...rs 2 Route wiring using grommets and sealant when passing through compartment walls Minimize the number of splices to reduce voltage drop High ambient temperatures e g under hood will significantly re...

Page 8: ...e and attach the U bracket with user supplied hardware 3 Install the camera and sun visor on the U bracket as shown in Figure 6 4 Adjust the camera s position for the best viewing angle before tighten...

Page 9: ...THER HAZARD IMPROPER INSTALLATION OR OPERATION OR NOT BEING MAINTAINED IN ACCORDANCE WITH THE MAINTENANCE PROCEDURES SET FORTH IN ECCO S INSTALLATION AND OPERATING INSTRUCTIONS VOIDS THIS LIMITED WARR...

Page 10: ...l operador pueda alcanzarlos c modamente y manejar el sistema sin perder en ning n momento el contacto visual con la calzada 5 No instale este producto ni coloque los cables en la zona de despliegue d...

Page 11: ...o por anchos de 5 para que no haya espacios sin cinta Notas 1 Los cables m s largos y las conexiones bien ajustadas ofrecer n una mayor vida til a los componentes Para cables de alta corriente se reco...

Page 12: ...men izquierdo Aumento de volumen y selecci n del men derecho Selector de la tecia de salto Pase r pidamente al modo de visualizaci n especificado po el SISTEMA Presione el bot n OK para ingresar a los...

Page 13: ...c mara no est conectada presione grabar y aparecer un punto gris en la parte superior izquierda y no se grabar nada Cuando la c mara est conectada presione grabar y aparecer un punto rojo en la parte...

Page 14: ...e formatear toda la tarjeta SD cuando se utilice por primera vez en el monitor Grabar al encender Inicia la grabaci n cuando se enciende el monitor SISTEMA El valor de atenuaci n se puede ajustar solo...

Page 15: ...el bot n o en el monitor o VOL Volumen en el control remoto para cambiar la opci n Presione bot n en el monitor u OK en el control remoto para cancelar la opci n el cono cambia a color blanco si la o...

Page 16: ...educir la ca da de tensi n Las temperaturas ambiente altas p ej debajo de la cajuela reducir n significativamente la capacidad de transmisi n de la corriente de cables fusibles e interruptores Todo el...

Page 17: ...brazadera con los accesorios suministrados al usuario 3 Instale la c mara y el visor de sol en la abrazadera en U como se muestra en la Figura 6 4 Ajuste la posici n de la c mara para conseguir el mej...

Page 18: ...tir de la fecha de compra EL DA O A LAS PIEZAS O LOS PRODUCTOS CAUSADO POR LA ALTERACI N ACCIDENTE ABUSO MAL USO NEGLIGENCIA MODIFICACIONES NO AUTORIZADAS FUEGO U OTRO PELIGRO INSTALACI N U OPERACI N...

Page 19: ...un projectile pouvant causer des blessures graves voire mortelles Reportez vous au manuel d utilisation du v hicule pour en savoir davantage sur la zone de d ploiement de l airbag Il incombe l utilisa...

Page 20: ...re conforme la taille minimale et d autres recommandations du fabricant et tre prot g des pi ces en mouvement et des surfaces chaudes Les faisceaux illets attaches de c ble et le mat riel d installati...

Page 21: ...de menu gauche Augmentation du volume et s lection de menu gauche Appuyez pour faire d filer les canaux de la cam ra Appuyez sur OK pour acc der au menu ou sauvegarder les r glages de l utilisateur A...

Page 22: ...strer un point gris s affiche wdans la partie sup rieure gauche de l cran et rien ne sera enregistr Si la cam ra est connect e lorsque vous appuyez pour enregistrer un point rouge s affiche dans la pa...

Page 23: ...er la carte SD Il est conseill de formater toutes les cartes SD lors de la premi re utilisation du moniteur Enregistrement la mise sous tension Lancez l enregistrement d s la mise sous tension du moni...

Page 24: ...ur ou VOL de la t l commande pour passer d une option l autre Appuyez la touche sur le moniteur ou OK de la t l commande pour annuler l option l ic ne passe au blanc si l option est annul e lorsque le...

Page 25: ...llets et de joints d tanch it lors du passage travers les parois du compartiment R duisez le nombre d pissures pour r duire la chute de tension Des temp ratures ambiantes lev es p ex sous capot r duir...

Page 26: ...U comme illustr la Figure 6 4 Ajustez la position de la cam ra pour un meilleur angle de vue avant de serrer les deux vis sur chaque extr mit 5 Fixez l antenne de mani re ce qu elle soit verticale CAM...

Page 27: ...D UN ABUS D UNE N GLIGENCE DE MODIFICA TIONS NON AUTORIS ES D UN INCENDIE OU DE TOUT AUTRE DANGER DE L INSTALLATION OU D UNE UTILISATION INCORRECTE OU D UN D FAUT D ENTRETIEN CONFORME AUX PROC DURES...

Page 28: ...ssen 5 Montieren Sie dieses Produkt nicht im Entfaltungsbereich eines Airbags und verlegen Sie dort auch keine Kabel Ger te die sich im Entfaltungsbereich eines Airbags befinden bzw dort montiert sind...

Page 29: ...ren und werden falsch ausgel st wenn sie in hei en Umgebungen montiert oder nahe ihrer Kapazit tsgrenze betrieben werden Das Ger t ist f r elektrische Systeme von 12 bis 24 VDC Extreme 10 bis 30 VDC a...

Page 30: ...s Men s Dr cken Sie die Taste M auf dem Monitor oder die Taste Menu auf der Fernbedienung um das Men anzuzeigen Dr cken Sie die Taste oder auf dem Monitor oder VOL auf der Fernbedienung um das Unterme...

Page 31: ...h mit zunehmender Anzahl der Aufnahmedateien Ein Ordner kann maximal 997 Videodateien enthalten Ist ein Ordner voll wird automatisch ein neuer Ordner erstellt Eine Datei ist umso neuer je h her ihre D...

Page 32: ...auf dem Monitor zu formatieren Power on record Aufnahmestart beim Einschalten Die Aufnahme wird gestartet wenn der Monitor eingeschaltet wird System Der Dimmer Wert kann nur eingestellt werden wenn Au...

Page 33: ...lenden Dr cken Sie die Taste oder auf dem Monitor oder VOL auf der Fernbedienung um die Nummern einzeln auszuw hlen Dr cken Sie zur Best tigung Enter Eingabe Ber hren Sie die Nummer um sie auszuw hlen...

Page 34: ...Steckverbinder des Typs 3M Scotchlok 2 Verwenden Sie T llen und Dichtungsmittel um Kabel durch Trennw nde zu verlegen Minimieren Sie die Anzahl der Splei e um den Spannungsabfall zu verringern Hohe Um...

Page 35: ...Bohren Sie die Befestigungsl cher mit der unteren U Halterung als Schablone und befestigen Sie die U Halterung mit eigenen Befestigungsmaterialien 3 Bringen Sie die Kamera und die Sonnenblende wie in...

Page 36: ...END AUF ANSPR CHEN AUFGRUND VON VERTRAGSVERLETZUNG FEHLER HAFTER INSTALLATION FAHRL SSIGKEIT ODER ANDEREN ANSPR CHEN SELBST WENN ECCO ODER EIN VERTRETER VON ECCO AUF DIE M GLICHKEIT SOLCHER SCH DEN HI...

Reviews: