background image


21 


[Electrostatic spray gun] 


  For part names, see pages 30 and 31.


Symptom 

Cause 

Countermeasure


Red lamp on 
controller lights but 
electrostatic spray 
effect is not 
sufficient.


Electric resistance of paint is not 
appropriate.


Adjust the electric resistance of paint to 
between 10 and 100M

Ω-cm at AC500V.


Gun tip is contaminated and 
high-voltage current is leaked, 
resulting in a gun tip voltage drop.


Wipe off paint with a cloth soaked with 
paint thinner.


Many splashes of 
paint


Paint is sprayed toward a too long 
distance.


Spray at an appropriate distance (200mm 
to 300mm).


Paint pressure or air pressure is too 
high.


Reduce the pressure.


The product being coated is not 
grounded.


Class D or better grounding is required 

(see the Research Committee

’s Report 

issued by the Japan Industrial Safety & 
Health Association).


Sparks sometimes 
come out of nozzle 
during spraying 
operation.


Damaged cascade


※ 

Replace cascade with a new one.


Warning buzzer on 
the control unit 
sounds.


A high-voltage current leaks through 
moisture contained in the 
compressed air.


Supply dry compressed air using an air 
drier or the like.


Electric resistance of paint is too low.


Adjust the electric resistance of paint to 
between 10 and 100M

Ω-cm at AC500V.


Contaminants on gun


Clean the gun.


Nozzle is heavily 
clogged.


Material filter mesh size is too large.


Select a filter mesh suitable for the nozzle 
to be used.


Poorly cleaned gun


Especially when using two-component 
paint, thoroughly clean with exclusive 
paint thinner.


Paint leaks through 
the root of gun 
extension.


Worn U-packing at needle shaft


Remove trigger and seat set and replace 
needle set with a new one.


Paint leaks from air 
outlet in nozzle or 
its periphery.


Worn or damaged seat at gun tip


Replace seat set with a new one.


Nozzle is not a high pressure type.


Use type ENH nozzle, which has a black 
resin part and a protrusion on seat.


Paint comes out of 
the tip of nozzle 
when gun is not 
triggered.


Worn needle


Remove trigger and replace needle set 
with a new one.


Seat is clogged with foreign matter.


Remove seat set and clean needle seat.


Troubleshooting 

Summary of Contents for Xtatic HP6000

Page 1: ... manual contains important information on warnings and cautions Read the manual thoroughly before starting to operate this equipment and follow the instructions Always keep the manual handy until such time as the equipment is no longer being used If your manual is lost or worn badly do not hesitate to contact our agency which is closest to you or the ECCO Finishing AB directly and ask us to send y...

Page 2: ...erate Use of the equipment should therefore be limited to those who have acquired operation and application skills through an authorized training course Should you have any questions about the manual please get in touch with us at the addresses phone and fax numbers as shown on the back of this manual In order for us to give you an answer that s relevant to your particular needs don t forget to gi...

Page 3: ... So shown below and in the pages that follow are the basic minimum safety precautions in connection with use of our product Safety precautions are classified into three categories based on the severity of hazards involved WARNING Alerts a hazardous situation which may result in personal injury along with hazard avoidance measures CAUTION Alerts a hazardous situation which may result in equipment d...

Page 4: ... a large amount of toxic substances intrudes into your body If you fail to immediately receive adequate treatment the toxic substances destroy your nerve system possibly resulting in a serious situation e g lifetime functional disorders or amputation of the injured part of your body Even a splash of the paint may lead to serious injuries if it enters your eyes or sticks to your skin Necessity of t...

Page 5: ...lease the pressure with the following procedure Pressure releasing procedure To reduce the possibility of injury from the paint spray or splashes into your eyes or skin always release the paint pressure with the following procedure before inspecting the pump or gun mounting removing cleaning or replacing the nozzle or stopping the spraying operation Lock the trigger of the air wrap airless electro...

Page 6: ...t from service and immediately contact the distributor or us for replacement of the defective part When stopping or finishing the spraying operation turn the controller off Some substances contained in the paint or solvent do harm if inhaled or contacted to your skin Observe the instructions in the Material Safety Data Sheets provided by the paint and solvent manufacturers Install an adequate vent...

Page 7: ... any of those problems is found immediately withdraw the hose from service and replace with a new one Never hold the leaking point with your hand nor temporarily close it with an item such as a tape as doing so may rather increase the possibility of danger Do not repair the leaking point with a repair joint If a paint leakage is found always replace the hose with a new one Use a standard hose that...

Page 8: ...of ignition Never smoke in the area where a spraying operation is performed If you feel electric shock even slightly when handling the coating machine immediately stop the spraying operation and check the grounded condition of each part Do not restart the spraying operation until the cause is located and countermeasure is completed If the power cable or connecting cable is damaged it may generate ...

Page 9: ...loor or table is used for grounding connect an exclusive grounding wire to the paint container to completely ground it The container shall be kept closed with the lid during a spraying operation For detail follow the instructions from the fire station with jurisdiction over your region Grounding of cans of solvent used for cleaning Dripping or spouting cleaning solvent generates static electricity...

Page 10: ...7100 Shown above are typical examples and there are of course other kinds of halogenated hydrocarbon solvents in the marketplace Please check with your paint vendors or manufactures for further details The paint mist or sprayed atmosphere may cause dyspnea or organic solvent poisoning Do not use the product in a room tunnel tank or other poorly ventilated place Take enough care of not only yoursel...

Page 11: ...imensions L208 W55 H219 mm Weight 560g Connecting cable length 10m extendable up to 30m in increments of 10m Standard Machinery Directive 2006 42 EC Low Voltage Directive 2006 95 EC EMC Directive 2004 108 EC ATEX Directive 94 9 EC EN 50050 2001 Certification Sira 10ATEX5053X Sira Test Certification Ltd Rake Lane Eccleston Chester CH4 9JN England The cable length can be extended up to 30m by combin...

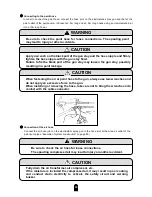
Page 12: ...e grounded together with the product to be coated by connecting to a class A grounded booth or steel pillar using M6 screws and accessory screws The paint pump shall be completely grounded by means of the accessory grounding wire in the same manner Firmly connect a grounding wire to the controller This operation requires a cross ended screwdriver The control unit grounding wire shall be 3 5mm2 or ...

Page 13: ...connecting cable so as not to apply a load to the connector where it is connected When bundling the cable and air and paint hoses with a tape or the like leave a slight slack in the cable so as not to apply a tensile force to the cable Using the cable as tensed may cut wires in the cable For detail see 6 Caution in bundling and handling the connecting cable Connect the other end of the connecting ...

Page 14: ...leakage When fastening the air or paint hose to the gun always use two wrenches and do not apply an excessive force to the gun When installing or removing the hose take care not to bring the wrenches into contact with the cable connector Connection of the air hose Connect the air hose joint on the electrostatic spray gun to the hose joint at the wrap air outlet of the paint pump see Example of sys...

Page 15: ...un or bundle the connecting cable and hoses in such a manner that bends at an acute angle or excessively tenses the connecting cable and air and paint hoses Doing so reduces their strength and may cut them 3 Take enough care not to step on the connecting cable Stepping on it over a metallic drain board may cut wires in it by the board 4 Do not continuously wind a plastic tape or the like around th...

Page 16: ...ing in damage or paint leak If the nozzle is engaged without aligning the notch on it with the pin on the air cap the paint may spout out from the nozzle when the gun is triggered If the gun is used with the pin on the air cap broken or collapsed the nozzle may get out of position and disturb the spray pattern possibly resulting in poor coating If the locating pin on the air cap is broken or colla...

Page 17: ...y must be provided at the area where a spraying operation is performed The paint thinner brought into the coating workshop must be the minimum and stored in a metallic container closed with a lid There is a possibility of electric shock or injury The operators must wear cotton socks and conductive shoes and must not wear gloves If you need to wear gloves make a hole at the palm of each glove so th...

Page 18: ...harm if inhaled or contacted to your skin Follow the instructions in the Material Safety Data Sheets provided by the paint and solvent manufacturers Work in a well ventilated place so as to prevent accumulation of hazardous substances Operating procedures For the paint pump and controller thoroughly read the operation and maintenance manuals for them 1 Before starting operation check that the pain...

Page 19: ... the slider inside the trigger downward and trigger the gun If the red lamp on the controller lights this means that a high voltage has been applied to the tip of the gun The output voltage can be adjusted 9 Start coating operation Discharges from the air wrap airless electrostatic spray gun may cause electric shock or fire In steps 3 to 9 always hold the gun grip with the one hand and operate the...

Page 20: ...posited to the gun and nozzle seats 9 Raise the wrap air pressure and slightly trigger the gun to release the wrap air only and remove the solvent that has intruded into the air circuit 10 Reduce the wrap air pressure to 0MPa again 11 Lock the trigger to terminate operation There is a possibility of injury When suspending or finishing operation be sure to raise the slider at the trigger to lock th...

Page 21: ...osited paint if any If the corona pin is bent straighten it 3 After cleaning dry the nozzle The air cap and nozzle are made of a solvent resistant resin but may be degraded in performance if immersed into a certain solvent for a long time After cleaning them with a solvent thoroughly dry them with blown air Paint hose and connecting cable 1 Keep them clean and free from deposited paint and other c...

Page 22: ...ighten it to the gun barrel with a retaining nut If the nozzle is engaged without aligning the notch on it with the pin on the air cap the paint may spout out from the nozzle when the gun is triggered Always use a high pressure type nozzle with a protrusion on the seat face at the backside of the nozzle tip Use of other nozzles may lead to a paint leak from the nozzle seat Types of air wrap airles...

Page 23: ...e control unit sounds A high voltage current leaks through moisture contained in the compressed air Supply dry compressed air using an air drier or the like Electric resistance of paint is too low Adjust the electric resistance of paint to between 10 and 100MΩ cm at AC500V Contaminants on gun Clean the gun Nozzle is heavily clogged Material filter mesh size is too large Select a filter mesh suitab...

Page 24: ... leaks even after trigger is released Air valve seat is clogged with debris or dust Clean air seat and air valve Worn O ring Replace O ring with a new one Shaft does not return due to deposited paint Remove paint deposited to shaft Air leaks from pattern control knob Broken O ring Remove valve set and replace O ring with a new one Paint is not sprayed Nozzle tip is clogged Remove nozzle immerse it...

Page 25: ...charge accumulated static electricity Wear conductive shoes Low electrostatic effect Paint pressure is too high Adjust paint pump to raise paint pressure Coating workshop is not adequately ventilated Adjust exhaust air flow through booth between 0 3 and 0 6m sec The product being coated is poorly grounded Ground completely Remove deposited paint from conveyor and hangers Nozzle bore diameter and p...

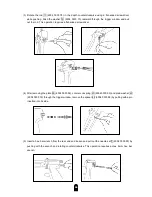
Page 26: ...3 6004 0335 43 at the end of the barrel using a box screwdriver They shall be installed and removed with the gun triggered This operation requires a Hex 10 box screwdriver If the front seat has been damaged replace it with a new one Replacement of paint filter 1 Remove the paint hose and loosen the nut 10 6004 0335 77 that is securing the stay 8 6004 0335 76 Then remove the retainer 38 6004 0335 8...

Page 27: ...e out of position possibly resulting in a paint leakage Replacement of paint needle paint packing air tappet and air packing 1 Remove the hex socket bolt 56 6004 0330 29 and sleeve 31 6004 0330 88 and remove the trigger 23 6004 0335 85 This operation requires a Hex 25mm hexagonal bar wrench 2 Remove the cap 22 6004 0335 84 and remove three springs 19 6004 0330 72 20 6004 0330 73 and 21 6004 0335 7...

Page 28: ...ed screwdriver 4 After removing the plate 39 6004 0330 92 conical coil spring 40 6004 0330 93 and plain washer 63 6004 0330 35 through the trigger window remove the spacer 42 6004 0335 88 by pulling with a pin inserted into its side 5 Insert a hex bar wrench from the rear end and loosen and pull out the needle set 7 6004 0335 90 by pushing with the wrench and rotating counterclockwise This operati...

Page 29: ...f the gun and tighten while pushing the rod with a flat ended screwdriver Tighten until the conical coil spring is collapsed to a length about 1mm as viewed through the trigger window 8 After installing the paint seats insert three springs from the rear end and tighten the adapter Install the trigger and assemble the seat set while pulling the trigger Replacement of O ring for pattern air adjuster...

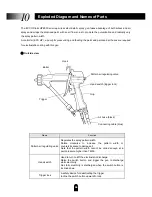
Page 30: ...ray pattern width Rotate clockwise to increase the pattern width or counterclockwise to decrease it Note that the pattern width cannot be varied enough at a paint pressure higher than 7MPa Hand switch Used to turn on off the electrostatic discharge Raise the switch button and trigger the gun to discharge static electricity No static electricity is discharged when the switch button is inclined down...

Page 31: ...n The air supplied to the gun must be filtrated using an air filter etc to remove moisture and particles Earth Product to be coated Earth Compressed air supply Air filter Air hose Paint hose Connecting cable Power supply AC100V High pressure pump Control unit EXC HP ...

Page 32: ...30 ECCO Xtatic HP6000 Exploded Diagram ...

Page 33: ...0 82 Packing 1 50 0663 9303 10 O ring 1 18 6004 0330 83 Air seat 1 51 0663 9304 00 O ring 2 19 6004 0330 72 Spring 1 52 0663 9305 00 O ring 2 20 6004 0330 73 Spring 1 53 0663 9306 00 O ring 2 21 6004 0335 79 Spring 1 54 0663 9306 10 O ring 2 22 6004 0335 84 Cap 1 55 0663 9307 00 O ring 1 23 6004 0335 85 Trigger 1 56 6004 0330 29 Hex socket bolt 1 24 6004 0335 86 Slider 1 set 57 6004 0330 28 Hex so...

Page 34: ... ECCO Finishing AB In house ECCO Finishing AB In house ECCO Finishing AB In house ECCO Finishing AB In house ECCO Finishing AB In house ECCO Finishing AB In house ECCO Finishing AB In house ECCO Finishing AB In house ECCO Finishing AB In house ECCO Finishing AB In house ECCO Finishing AB In house ECCO Finishing AB In house ECCO Finishing AB In house ECCO Finishing AB In house ECCO Finishing AB In ...

Page 35: ...tside Japan In these circumstances any costs that may be incurred on repair or freight shall be the responsibility of the Purchaser In the event also of failure caused by use in conjunction with a hose or a gun etc of a maker not approved by the Company the warranty does not apply In these circumstances the Company will submit a quotation for the costs of whatever corrective measures are necessary...

Page 36: ...ECCO FINISHING AB Box 93 S 532 22 SKARA Sweden Tel 46 0 511 134 45 Fax 46 0 511 180 13 E mail info eccofinishing com www eccofinishing com ...

Reviews: