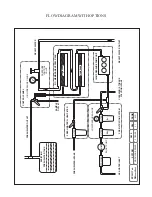
Run one of the high-pressure hoses from the output of the HP pump (O ring sealed fitting) to the O ring
sealed fitting at the end of the membrane that is marked IN.
A minimum hose length of 3 feet/1M is required for pulsation dampening. The hose can be coiled
where needed.
Run the second high-pressure hose from the outlet of the RO membrane housing to the pressure control
valve in the control panel. Do not over tighten the high pressure fittings. They are O-ring sealed and
need little torque to lock only.
PRODUCT WATER TUBING
Connect the product water tubing from the center fitting(s) of the membrane housing(s) to the bottom
inlet of the flow meter, in the control panel. Connect the tubing from each output port of the 3-way
valve to your water tank and to the taste/test station of your choice.
CAUTION: UNDER NO CIRCUMSTANCES SHOULD THE PRODUCT WATER LINE BE
ALLOWED TO BECOME BLOCKED WHILE THE SYSTEM IS RUNNING.
DO NOT INSTALL SHUT-OFF VALVES ANYWHERE IN THIS LINE.
CAUTION: DO NOT ALLOW CHLORINATED WATER FROM YOUR STORAGE TANK TO
FLOW BACK INTO THE R.O. MEMBRANE.
You may directly “T” your product water line into the tank vent (Refer to the Flow Diagram). This
avoids chlorinated
water to back flow from your water tanks into the R.O. membrane and does not
require a new fitting in your tank.
When using a spigot as the taste/test station, be sure you have no shut-off valves in the product water
line. A hand pump style spigot, with a check valve
only
, is acceptable. If using this type of spigot for
two sources, install a low-pressure check-valve in the product line and “T” it into the existing hand
pump spigot line.
REJECT WATER TUBING/HOSE
Connect the outlet of the pressure control valve on the control panel with a reject thru-hull of your
choice (preferably above the water line).
HARDENER / pH NEUTRALIZER KIT
Install the hardener / pH neutralizer housing at a serviceable location in line with the product water
tubing from the diverter valve on the control panel to the freshwater storage tank. Observe the flow
direction indicated on the housing.
THRU-HULL (not supplied)
The boat’s designated intake thru hull should be located in an area that will always be in the water with
the boat is used under normal running conditions.
A speed boat scoop could be helpful. Installed with the opening facing the bow, it typically generates a
small amount of pressure while moving through the water. It is important not to place the scoop thru-
hull directly forward of a speedometer pickup. It is also wise not to place the intake thru-hull slightly
aft or outboard of a holding tank, head or galley sink overboard discharge.
Summary of Contents for Watermakers 1200-BML-3
Page 17: ......


