background image

10

ASSEMBL

Y

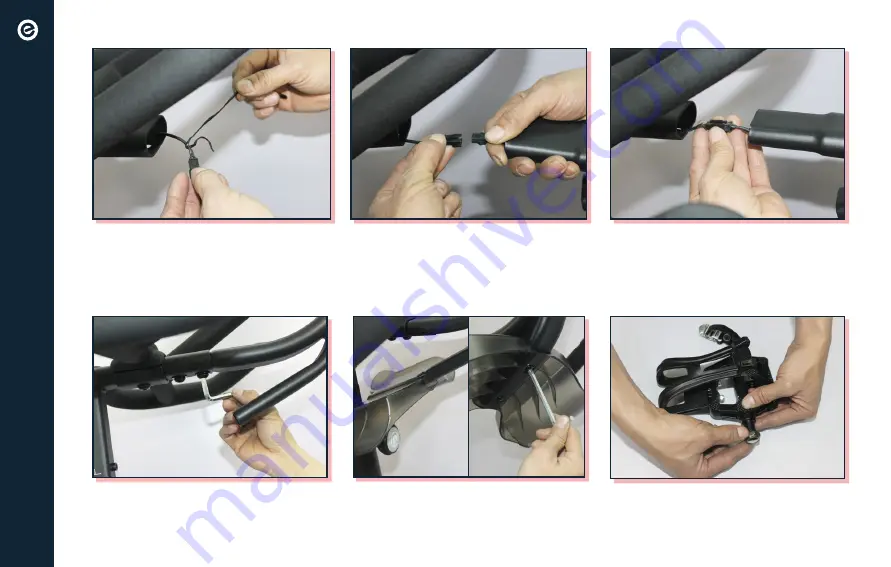
Place flat washers to table mount 

bolts, place table mount bolts with 

washers, finger tighten, then secure 

bolts with washers with hex key.

Untie the twist tie from handlebar 

post, do not allow the wire to fall 

inside the handlebar post.

After connecting wires, feed excess 

wire into handlebar post and slide 

tablet mount into handlebar post.

Remove nut from the right pedal by 

turning counterclockwise.

Connect the wire from the handlebar 

post to the wire at the bottom of the 

tablet mount.

Slide water bottle holder onto post, 

secure both sides with screws and 

hex key. 

10

Summary of Contents for GT

Page 1: ...INSTRUCTION MANUAL ECHELON GT...

Page 2: ......

Page 3: ...our fitness goals With thousands of live and on demand classes no matter your schedule or experience there is always a new and exciting class for you to join We embrace your decision to join our Echel...

Page 4: ...riding 7 Front bracket 8 Rear bracket 9 Wheel chock not visible 10 Handlebars 11 Tablet mount arm 12 Front foot 13 Rear foot 14 Handlebar post 15 Seat 16 Water bottle holder 17 Pedals 18 Seat post 19...

Page 5: ...e location 3 Choose your plan Monthly 1 Year 2 Year Select purchase location and follow the on screen instructions 4 Set up payment method 5 ENTER PERSONAL ACCOUNT INFO Once assembly is complete you w...

Page 6: ...Ensure latest version of the Echelon Fit App is installed from the Google Play Store or the App Store OPERATIONAL INSTRUCTIONS Connect to the Echelon FitTM App to access tutorials and operation instr...

Page 7: ...foot under the rear bracket Place the front foot under the front bracket Using your wrench or fingers pull wheel chock out and set aside Insert foot bolts into rear foot and tighten down with hex key...

Page 8: ...ever and post is secure Loosen the Resistance Knob by turning counterclockwise Place seat onto seat post and secure with included wrench on both sides Untie the twist tie at the handlebar adjustment k...

Page 9: ...the handlebar post Pull out the connect wire and untwist the twist tie from tablet mount Connect the wire from frame and handlebar post together Unscrew handlebar post adjustment knob but do not remo...

Page 10: ...do not allow the wire to fall inside the handlebar post After connecting wires feed excess wire into handlebar post and slide tablet mount into handlebar post Remove nut from the right pedal by turnin...

Page 11: ...d wrench and use single sided wrench to tighten nut counterclockwise Plug power adapter into port located on the rear foot bracket Ensure pedal and crank arm are both marked with the R Label Screw rig...

Page 12: ...e adjustment knob counterclockwise to loosen and move seat along track to desired location Turn seat height adjustment knob counterclockwise until you are able to pull out the knob halway raise or low...

Page 13: ...ow system apps Select Bluetooth Share then Storage and then either Clear Data or Clear Cache depending which button is highlighted Restart the Echelon Fit App and attempt connection again If you have...

Page 14: ...4 OPERATION To adjust the resistance while using the Echelon GT turn the resistance adjustment knob to the left or right To stop the bike press down on the resistance adjustment knob 14...

Page 15: ...ITS ARE DESIGNED TO PROVIDE REASONABLE PROTECTION AGAINST HARMFUL INTERFERENCE IN A RESIDENTIAL INSTALLATION THIS EQUIPMENT GENERATES USES AND CAN RADIATE RADIO FREQUENCY ENERGY AND IF NOT INSTALLED A...

Page 16: ...ICES 003 CET APPAREIL NUM RIQUE DE CLASSE B EST CONFORME LA NORME NMB 003 CANADIAN NOTICE THIS DEVICE COMPLIES WITH ISED LICENSE EXEMPT RSS STANDARD S OPERATION IS SUBJECT TO THE FOLLOWING TWO CONDITI...

Page 17: ...E STATIONARY EXERCISE BIKE BEFORE MOUNTING OR DISMOUNTING MOVE THE PEDAL ON THE MOUNTING OR DISMOUNTING SIDE TO ITS LOWEST POSITION AND BRING THE MACHINE TO A COMPLETE STOP THE MANUFACTURER RECOMMENDS...

Page 18: ...ing the machine to a complete stop Keep the top surface of the pedal clean and dry Model ECH GT Made In China Max user weight 136KGS Class H Input 9V 0 5A FCC ID FOR CONSUMER USE ONLY CAN ICES 3 B NMB...

Page 19: ...ed into water Return the appliance to a service center for examination and repair 6 Do not carry this appliance by supply cord or use cord as a handle 7 Keep the cord away from heated surfaces 8 Never...

Page 20: ...instructions This ensures your safety WARNINGS ALWAYS use the Echelon GT on solid level ground and in a well lit and ventilated area ALWAYS check that the seat and handlebars are securely fastened bef...

Page 21: ...Echelon GT again NEVER use the Echelon GT in a standing position at high revolutions per minute RPM see OPERATION section Fig 2 ALWAYS keep your pelvis positioned over the center line of the Echelon...

Page 22: ...If you have any questions about anything in this manual please get in touch with our customer service department at cs echelonfit uk or at 44 0 203 3763 5892 If you are looking for an immediate answe...

Page 23: ...2 23 NOTES...

Page 24: ...is necessary to return the unit This warranty is void if damage or malfunction is due to abuse or failure to operate product in accordance with instructions and on recommended electrical current This...

Reviews: