background image

28

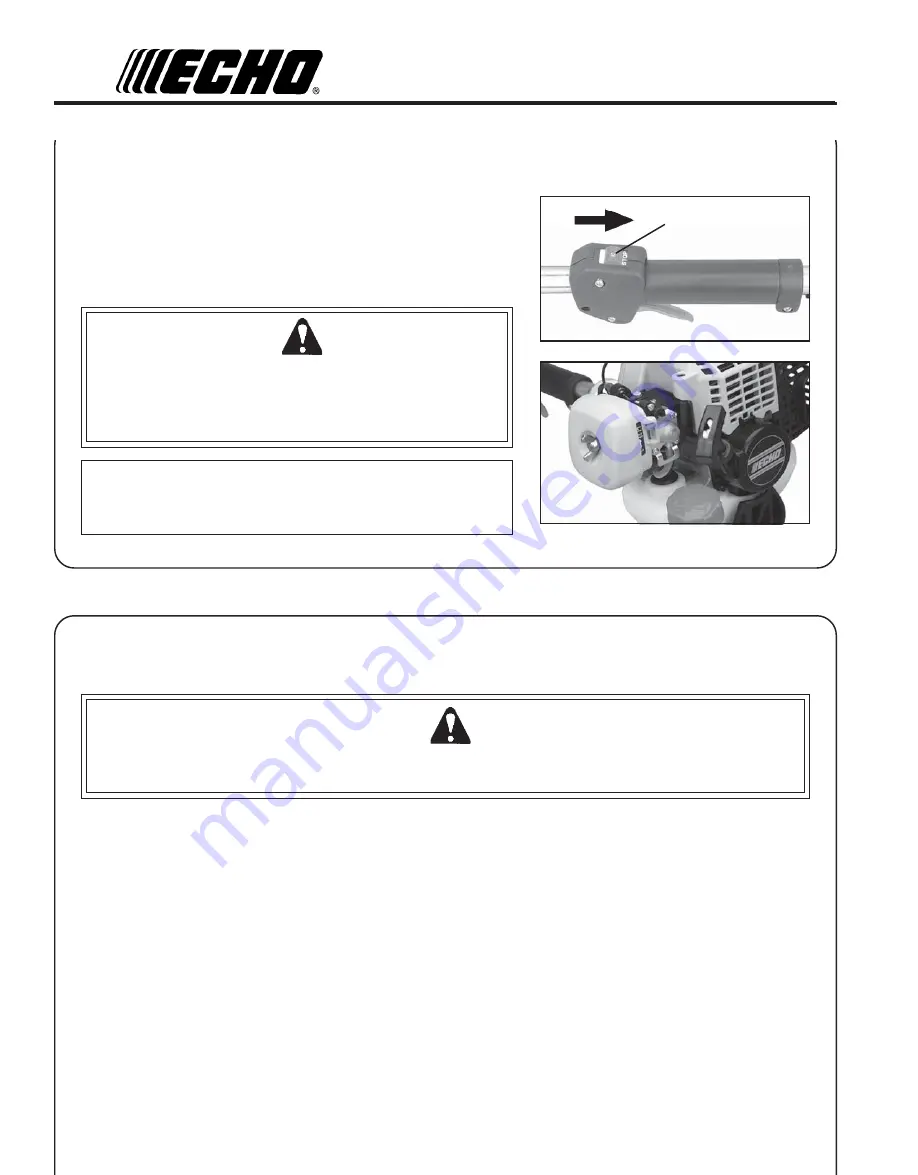
STOPPING


ENGINE

1.

Release Throttle.  Allow engine to idle for a minute.

2.

Stop Switch - Stop.  Move stop switch button (A) backward to
STOP position.

WARNING  

  DANGER

If engine does not stop when stop switch is moved to STOP
position, close choke - COLD START position - to stall engine.
Have your ECHO dealer repair stop switch before using trimmer
again.

NOTE
Refer to Grass Trimmer/Brush Cutter Safety Manual for proper and
safe techniques.

A

M

AINTENANCE

WARNING  

  DANGER

Catalytic mufflers operate at extremely high temperatures. Muffler area must be kept clean. Do not perform mainte-
nance on engine or muffler until engine and muffler are completely cool, otherwise serious personal injury may occur.

Your ECHO trimmer is designed to provide many hours of trouble free service. Regular scheduled maintenance will help
your trimmer achieve that goal. If you are unsure or are not equipped with the necessary tools, you may want to take your
unit to an ECHO Service Dealer for maintenance.  To help you decide whether you want to DO-IT-YOURSELF or have the
ECHO Dealer do it, each maintenance task has been graded. If the task is not listed, see your ECHO Dealer for repairs.

SKILL


LEVELS

Level 1 =

Easy to do. Most required tools come with unit.

Level 2 =

Moderate difficulty. Some specialized tools may be required.

Level 3 =

Experience required. Specialized tools are required. ECHO recommends that
the unit be returned to your ECHO dealer for servicing.

ECHO offers REPOWER

TM

 Maintenance Kits and Parts to make your maintenance job easier. Below each task heading

are listed the various part numbers required for that task. See your ECHO dealer for these parts.

Summary of Contents for 02999999

Page 1: ...DEL SRM 231 SRM 231U Serial Number 02001001 02999999 WARNING DANGER Readrulesforsafeoperationandinstructionscarefully ECHOprovidesanOperator s ManualandaSafetyManual Bothmustbereadandunderstoodforproperandsafe operation X7502094200 X750001150 03 01 ...

Page 2: ...ons 9 Description 10 Contents 10 Emission Control 11 Blade Terms and Definitions 11 Specifications 14 Assembly 15 Drive Shaft Power Head 15 Throttle Linkage and Ignition Leads 15 Plastic Shield Installation 16 Nylon Head Installation 16 Front Handle Installation 16 Accessory Installation 17 Harness Clamp Installation 17 Install Metal Shield 18 U Handle Installation 19 Pre Operation 21 Operation wi...

Page 3: ...hese safety decals on your unit The complete unit illustration found in the DESCRIPTION section will help you locate them Make sure the decals are legible and that you understand and follow the instructions on them If a decal cannot be read a new one can be orderedfromyourECHOdealer SeePARTSORDERINGinstructions forspecificinformation 89017740630 Shaft Decal Spanish Decal English Translation DEBRIS...

Page 4: ... and feet clear of blade cutting attachment unless engine is shut off and cutting attachment is not moving INSPECT BLADES BEFORE USE DO NOT USE DAMAGED CRACKED BENT DULL OR IMPROP ERLY SHARPENED BLADES Do not remove shields modify the unit or install attachments or parts not approved by ECHO Approved attachment information and replacement Operator s and Safety Manuals are available from your ECHO ...

Page 5: ...pect shield for damage and ensure that the cut off knife issecurely in place Replace if either is damaged or missing Check that the cutting attachment is firmly attached and in safe operating condition Check that front loop handle and or optional shoulder waist harness are adjusted for safe comfortable operation See Assembly for proper adjustment Have repairs done only by an authorized ECHO Dealer...

Page 6: ...t or operate unit until leakage is repaired IMPORTANT Spilled fuel is a leading cause of hydrocarbon emissions Some states may require the use of automatic fuel shut off containers to reduce fuel spillage Contact your ECHO dealer for ordering information After Refueling Wipe any spilled fuel from the unit Move at least 3 m 10 ft from refueling location before starting After Use DO NOT store a unit...

Page 7: ... your grip on the Trimmer Brush Cutter handles Gloves also reduce the transmission of machine vibration to your hands Hearing Protection ECHO recommends wearing hearing protection whenever unit is used Proper Clothing Wear snug fitting durable clothing Pants should have long legs shirts with long sleeves DONOTWEARSHORTS DONOTWEARTIES SCARVES JEWELRY Wear sturdy work shoes with non skid soles DONOT...

Page 8: ...ng WARNING DANGER Do not operate this product indoors or in inadequately ventilated areas Engine exhaust contains poisonous emissions and can cause serious injury or death AvoidHotSurfaces During operation the exhaust area drive shaft and the bearing housing may become very hot Avoid contact during and immediately after operation Always keep the exhaust area clear of flammable debris Allow the eng...

Page 9: ...tion Repetitive Stress Injuries It is believed that overusing the muscles and tendons of the fingers hands arms and shoulders may cause soreness swelling numbness weakness and extreme pain in those areas Certain repetitive hand activities may put you at a high risk for developing a Repetitive Stress Injury RSI AnextremeRSIconditionisCarpalTunnelSyndrome CTS which could occur when your wrist swells...

Page 10: ...g 1 4mm Hexagon Wrench 1 8mm x 55mm bolt 1 flat washer 2 cable clips 1 Plastic Bag 3 5mm x 15mm screws shield mount 2 5mm x 8mm screws bracket to shield 4 5mm nuts 4 5mm lockwashers 1 metal shield 1 bracket 1 Shoulder Harness w hip pad DESCRIPTION The ECHO product you purchased has been factory pre assembled for your convenience Due to packaging restrictions shield installation and other assembly ...

Page 11: ...nacted by the California Air Resources Board PRODUCTEMISSIONDURABILITY The 300 hour emission durability period is the time span selected by the manufacturer certifying the engine emissions output meets applicable California emissions regulations provided that approved maintenance procedures are followed as listed in the Maintenance Section of this manual BLADE TERMS AND DEFINITIONS BladeConvertibl...

Page 12: ...12 1 2 3 4 5 6 7 8 9 10 11 17 19 20 21 22 23 24 25 18 26 3 5 7 12 13 14 16 15 SRM 231U SRM 231 ...

Page 13: ...esstriggergradually for best operating technique 12 BLADE Circular blade for grass weed or brush cutting applications Harness metal shield U handles required for blade operation 13 METAL BLADE SHIELD Required when unit is equipped with blades Do not operate unit without shield 14 U HANDLE Requiredformetalbladeoperation 15 HIP PAD Used to protect hip leg and clothing when using U handle equipped un...

Page 14: ...n e d e l o o c r i a e k o r t s o w t e c n a m r o f r e P h g i H O H C E 1 0 5 y t i c a p a C k n a T l e u F z o l f S U 6 9 1 t i l 8 5 0 m e t s y S r e t r a t S r e t r a t S d n i w e R c i t a m o t u A h c t u l C e p y T l a g u f i r t n e C m e t s y S d e t a l o s I n o i t a r b i V e l d n a h t n o r f n o p i r g r e b b u R y t u d y v a e h t n u o m e n i g n e n o n o i ...

Page 15: ...justment procedure 3 Bundle and secure ignition leads against engine housing with clip F PLASTIC SHIELD INSTALLATION For Nylon Line Operation Tools Required Screwdriver Parts Required PlasticShield ShieldPlate three 3 5mmx15mm screws NOTE The plastic shield is for use with the Nylon Line Head only Install Metal Shield when using plastic or metal blades 1A SRM 231 RemovevinylprotectorfromPTOshaft 1...

Page 16: ...TALLATION SRM 231 Tools Required Screwdriver Parts Required Front Handle Assembly 1 Position front handle for comfortable operation and secure screws NOTE For SRM 231U Handle Assembly refer to U Handle Installation page19 instructions10 12 14 16 17 B ACCESSORY INSTALLATION BladeConversionKitP N99944200415 U Handle BladeConversionKitP N99944200521 NOTE Refer to Operation with Blades page 21 for cor...

Page 17: ...Remove locating screw B found at the top of the gear housing Pull shield and gear housing assembly from the drive shaft assembly IMPORTANT Prevent steel drive shaft from sliding from drive shaft housing If shaft does slide free clean dirt from shaft and re assemble 2 Remove front handle a Remove four 4 screws and nuts and handle support from handle b Removehandle 3 Installclamp 4 Install front han...

Page 18: ...tall Blade Tools Required Locking Tool scrench Parts Required 1 20mm Upper Fixing Plate Grass Blade 69600120330 BrushBlade 69500120330 orTri CutBladew GlideCup 99944200030 1 LowerFixingPlate 1 10mmL H Nut 1 2x22mm SplitPin 3 Install upper plate D on splined shaft Blade installation requires use of upper Plate D with 20mm pilot Upper plate with 37mm pilot should be retained for use with nylon line ...

Page 19: ...e 5 Loosen two 2 rear handle screws G and pull rear handle H from the drive shaft assembly 6 Loosen four 4 screws I and remove front handle 7 Install harness hook J 8 PositionlowerU Handlebracket K 400mm 15 3 4in from engine end of drive shaft Secure with three 3 5mm x 30mm bolts 9 Position harness hook 220mm 8 5 8 in from engine end of drive shaft assembly DO NOT tighten at this time 10 Install u...

Page 20: ...djusted properly The throttle linkage must be adjusted by moving the adjustment fixture E Consult with your Echo Dealer for correct adjustment procedure 14 Connect ignition leads A and B 15 SRM 231 Remove left side clutch case bolt M Install metal bracket clamp N with curved end up 16 All Models Install throttle linkage into bracket clamp and pinch tight with pliers Bend bracket up and flush again...

Page 21: ...ment approximately 2 3 from ground d Tighten harness hook screw PRE OPERATION OPERATION WITH BLADES Preparing the Trimmer Brush Cutter for Blade Use WARNING DANGER Blade use DEMANDS specific Brush Cutter configuration Operation without specified shield and harness can result in serious personal injury PlasticandNylonBladesRequire BladeConversionKit P N99944200415 Metal Shield A and Shoulder Harnes...

Page 22: ...n Blades may be used where ever the nylon line head is used DO NOT use this blade for heavy weeds or brush Blade ConversionKitP N99944200521isrequiredforusewithNylonBlades 8ToothWeed GrassBlade P N69600120331 isdesignedforgrass garden debris and thick weeds DO NOT use this blade for brush or heavy woody growth 3 4 in 19 mm diameter or larger U Handle BladeConversionKitP N99944200521isrequiredforus...

Page 23: ...ood alcohol is NOT approved TwoStrokeOil Atwo strokeengineoilmeetingISO L EGD ISO CD 13738 and J A S O FC Standards must be used Echo brand Premium 50 1 oil meets these standards Engine problems due to inadequate lubrication caused by failure to use an ISO L EGD and J A S O FC certifiedoil suchasEchoPremium50 1Two strokeOil willvoidthe two stroke engine warranty Emission related parts only are cov...

Page 24: ...ff containers to reduce fuel spillage Contact your ECHO dealer for ordering information After refueling Wipe any spilled fuel from the unit Move at least 3 m 10 ft from refueling location before starting the engine After use DO NOT store a unit with fuel in its tank Leaks can occur Return unused fuel to an approved fuel storage container Storage Fuel storage laws vary by locality Contact your loca...

Page 25: ... comfortable operation See Assembly Section for proper adjustment Have repairs done only by an authorized ECHO Dealer Do not use any attachment accessory or replacement part unless it is recommended in this Operator s Manua DETERMINE OPERATION AREA WARNING DANGER Inspect starting area for hazards such as rocks glass debris etc which could be contacted by the cutting attachment when starting Keep h...

Page 26: ...r to completely cool before performing any maintenance activity STARTING COLD ENGINE WARNING DANGER The cutting attachment should not rotate at idle If attachment rotates readjust carburetor according to Carburetor Adjustment instructions in this manual or see your ECHO Dealer otherwise serious personal injury may result 1 Stop Switch Start Run Move stop switch button A forward away from the STOP ...

Page 27: ...t except DO NOT close the choke NOTE If engine does not start after 5 pulls use Cold Start Procedure WARNING DANGER When engine starts the cutting attachment may rotate even with the throttle trigger in idle released position 1 Stop Switch Start Run Move stop switch button A away from the STOP position 2 Primer Pump Bulb Pump primer bulb C until fuel is visible and flows freely in the clear fuel t...

Page 28: ...designed to provide many hours of trouble free service Regular scheduled maintenance will help your trimmer achieve that goal If you are unsure or are not equipped with the necessary tools you may want to take your unit to an ECHO Service Dealer for maintenance To help you decide whether you want to DO IT YOURSELF or have the ECHO Dealer do it each maintenance task has been graded If the task is n...

Page 29: ...t s e r r A k r a p S r e l f f u M e c a l p e R t c e p s n I 2 R I x e l F t f a h S e v i r D s l e d o M e l b a C e s a e r G 2 1 I g n i s u o H r a e G e s a e r G 2 2 I e p o R r e t r a t S l i o c e R n a e l C t c e p s n I 1 C I g u l P k r a p S n a e l C t c e p s n I 2 C I R s t l o B s t u N s w e r c S e c a l p e R n e t h g i T t c e p s n I 1 R I S E D O C R E T T E L E R U D ...

Page 30: ...ce 3 If element can be cleaned and reused be certain it still fits the cavity in the air cleaner cover is installed with the original side out FUEL FILTER Level1 Tools required Fuellinehook 203 254mm 8 10in lengthofwire with one end bent into a hook Clean rag funnel and an approved fuel container Partsrequired 90008REPOWERTM AIR FUELFILTERKIT WARNING DANGER FuelisVERYflammable Useextremecarewhenmi...

Page 31: ...ls required Cross Head Screwdriver 4 mm Hex Wrench Cleaning Brush 25 or 50 mm 1 or 2 in medium bristle paint brush Parts Required None if you are careful IMPORTANT To maintain proper engine operating temperatures cooling air must pass freely through the cylinder fin area This flow of air carries combustion heat away from the engine Overheating and engine seizure can occur when Air intakes are bloc...

Page 32: ...se a metal scraper to remove dirt from the cylinder fins 5 Use brush to remove dirt from the cylinder fins 6 Remove grass and leaves from the grid between the recoil starter and fuel tank EXHAUST SYSTEM Spark Arrestor Screen Level2 Tools Required Cross Head Screwdriver Soft Metal Brush 4 mm Hex Wrench Parts Required SparkArrestorScreenP N14586251030 A B C ...

Page 33: ...inder exhaust port must be inspected and cleaned of excess carbon every 3 months or 90 hours of operation in order to maintain this engine within the emissions durability period ECHO strongly recommends that you return your unit to your ECHO dealer for this important maintenance service CARBURETOR ADJUSTMENT Engine Break In New engines must be operated a minimum duration of two tanks of fuel break...

Page 34: ...the specifications found on page 14 Specifications of this manual Turn idle screw A clockwise to increase idle speed counter clockwise to decrease idle speed WARNING DANGER When carburetor adjustment is completed the cutting attachment should not turn at idle otherwise serious personal injury may result LUBRICATION Level1 Tools Required 8 mm Open End Wrench Screwdriver Clean Rag Parts Required Ech...

Page 35: ...CEMENT Level1 Tools Required Head locking tool if head is to be removed PartsRequired ECHO0 095 NylonTrimmerLine12m 40feet long 1 Hold drum A and turn spool B CW clockwise until it stops Pull spool from drum DO NOT push in on spool when turning 2 Use one piece of new nylon line C 12m 40 feet long and thread through the molded loop D on the spool Pull line tight and adjust so one end is 15 cm 6 in ...

Page 36: ...s H on drive with notches in spool and push spool into drum 6 Pull on both lines until they come free from notches E in spool 7 Hold drum A firmly and turn spool B CCW counterclockwise until it stops DO NOT push in on spool when turning 8 Pull both lines out and trim to cut off knife length ...

Page 37: ...dling due to vibration and can result in blade failure 8 tooth Blade Tool required Flat file preferred Electric grinder if special care is used Round rat tail file for gullet radius 1 File each tooth at a 30 degree angle a specific number of times eg 4 strokes per tooth Work your way around the blade until all teeth are sharp 2 DO NOT file the gullet radius of the tooth with the flat file The radi...

Page 38: ... r u o y e e S r e l a e d O H C E r u o y e e S g u l p t a k r a p S k r a p s o N g u l p t a t c e r r o c n i p a g k r a p S n o b r a c h t i w d e r e v o C l e u f h t i w d e l u o F e v i t c e f e d g u l p k r a p S n i 6 2 0 0 m m 5 6 0 t s u j d A e c a l p e r r o n a e l C e c a l p e r r o n a e l C g u l p e c a l p e R e n i g n E t o n s e o d k n a r c m e l b o r p e n i g n...

Page 39: ... serious personal injury may result 2 Place the stop switch A in the OFF position 3 Remove accumulation of grease oil dirt and debris from exterior of unit 4 Perform all periodic lubrication and services that are required 5 Tighten all the screws and nuts 6 Drain the fuel tank completely and pull the recoil starter handle several times to remove fuel from the carburetor 7 Remove the spark plug and...

Page 40: ...m to 5 00 pm Central Standard Time Monday through Friday Before calling please know the model and serial number of your unit to help your Consumer Product Support Representative WARRANTY REGISTRATION You may register your Echo equipment using the warranty registration card or register on line at www echo usa com Registering provides a direct link between you and ECHO if we find it necessary to con...

Reviews: