background image

11

2”

45°

2”

CAUTION

A falling tree can seriously damage anything it may hit - a
car, a house, a fence, a power line, or another tree. There
are ways to make a tree fall where you want it, so first
decide where that is!

Before cutting, clear the area around the tree. You will need
good footing while working and you should be able to work
the saw without hitting any obstacles. Next, select a path
of retreat. When the tree begins to fall you should retreat
away from the direction of fall at a 45 degree angle to avoid
the trunk kicking back over the stump.

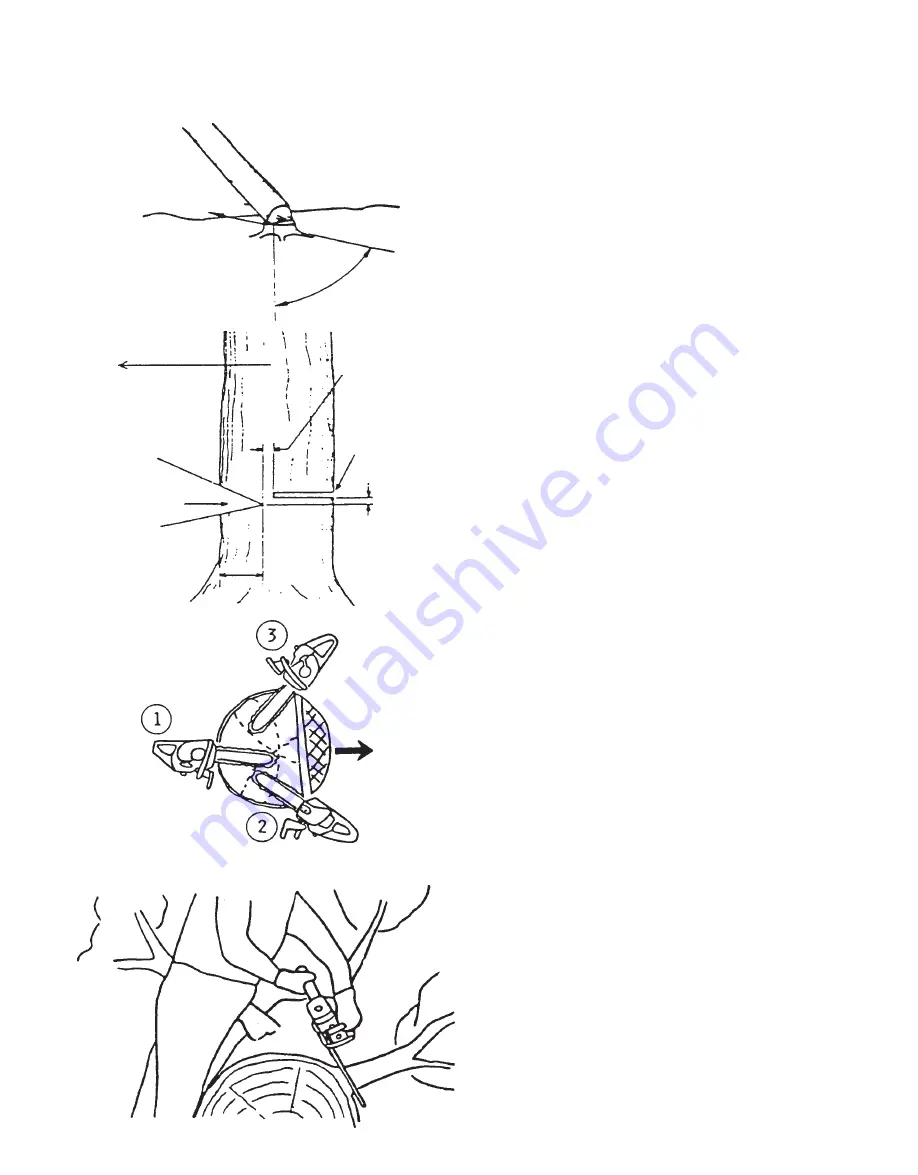
Begin the cut on the side to which the tree is to fall. Cut a
notch about 1/3 of the way into the tree as shown. The
position of this notch is important since the tree will try to
fall “into” the notch. The felling out is made on the side
opposite the notch and at a level about 2” above the bottom
of the notch. Do not try to cut through to the notch with the
felling cut. The remaining wood between the notch cut and
felling cut (about 2”) will act as a hinge when the tree falls,
guiding it in the desired direction. When the tree starts to
fall, kill the engine, place the saw on the ground and make
your retreat quickly.

To fell  big trees with a diameter exceeding twice the bar
length, start the notching cuts from one side and draw the
saw through to the other side of the notch. Start the back
cut on one side of the tree, pivoting the saw through to form
the desired hinge on that side.

Then remove the saw for the second cut. Insert the saw in
the first cut, very carefully so as not to cause kickback.
The final cut is made by drawing the saw forward in the cut
to reach the hinge.

Limbing a fallen tree is much the same as bucking. Never
limb on the tree that you are standing. When limbing, cau-
tion is the word. Be careful of the tip touching other limbs.
Always use both hands.

FELLING A TREE

DIRECTION

OF FALL

Direction of fall

Hinge

Felling cut

First cut

Notch

Second cut

One-third tree

diameter

LIMBING

Summary of Contents for CS-3400TYPE 1E

Page 1: ...CS 3400 TYPE 1E Serial Number 3942 Up CS 3450 TYPE 1E Serial Number 5120 Up WARNING DANGER Readrulesforsafeoperationandinstructionscarefully ECHOprovidesanInstruction ManualandaSafetyManual Bothmustbe...

Page 2: ...ll help you reduce kickback and main tain control of the saw Don t let go 3 Make sure that the area in which you are cut ting is free from obstructions Do not let the nose of the guide bar contact a l...

Page 3: ...l ventilated areas 16 Do not operate a chain saw in a tree unless you have been specifically trained to do so 17 Allchainsawservice otherthantheitemslisted in the Instruction Manual maintenance instru...

Page 4: ...H C E h t i w o i t a r 1 0 5 l o h o c l a l y h t e m g n i n i a t n o c l e u f e s u t o n o D d e d a e l n u e n a t c o 9 8 E B T M 5 1 r o l o h o c l a l y h t e 0 1 n a h t e r o m y t i c...

Page 5: ...Chain brake actuating lever 2 Throttle control lockout 3 Throttle control trigger 4 Sprocket guard 5 Chain catcher 6 Air cleaner cover 7 Purge bulb 8 Guide bar 9 Saw chain 10 Front handle 11 On Off sw...

Page 6: ...in fully released position to install sprocket guard to saw Install sprocket guard C and tighten guide bar nuts finger tight Adjust saw chain tension as instructed in Adjust ment Chain Tension ADJUSTM...

Page 7: ...ne 3 Close container and shake to mix oil with gasoline 4 Add remaining gasoline and remix 5 Install fuel container cap and wipe any spilled fuel from containerandsurroundingarea IMPORTANT Stored fuel...

Page 8: ...IS HARD TO START Press throttle control lockout down while holding throttle trigger and push in throttle control latch Pull starter handle When engine starts immediately squeeze throttle trigger to r...

Page 9: ...lever fully rearward to release chain brake Squeeze throttle trigger with throttle control lockout gradually to increase engine speed Saw chain starts rmoving when the engine reaches approximately 42...

Page 10: ...tart the engine see that it is running properly Squeeze the trigger to open the throttle wide open and start the cut If the chain is properly sharpened the cutting should be relatively effortless It i...

Page 11: ...through to the notch with the felling cut The remaining wood between the notch cut and felling cut about 2 will act as a hinge when the tree falls guiding it in the desired direction When the tree sta...

Page 12: ...n dig into the earth it is harmful for the saw and you stand a good chance of being struck by flying debris To cut the trunk use the bucking and two cut sequence shown The first cut should be no deepe...

Page 13: ...radius same pitch and having the same number of teeth A hard nose guide bar having the same length and nose radius as a sprocket nose bar Low Kick Guard Link Type Saw Chain The low kick guard link cha...

Page 14: ...it FUEL STRAINER Checkperiodically Do not allow dust to enter fuel tank Cloggedstrainerwillcausedifficultyinstartingengineor abnormalitiesinengineperformance Pick up the fuel strainer F through fuel...

Page 15: ...stle cleaning brush do not use a metal brush to remove dirt from cylinder fins in muffler and ignition coil areas CARBURETOR ADJUSTMENT ENGINEBREAK IN New engines must be operated a minimum duration o...

Page 16: ...t screw B CW until the saw chain begins to move then turn the screw CCW until saw chain stops moving Turn screw CCW an additional 1 4 turn 5 Accelerate to full throttle for 2 3 seconds to clear excess...

Page 17: ...older Round file and flat file are available from your Echo Dealer File cutters as below Type 91VG HOLDFILEHOLDER LEVEL Depth gauge ONEFIFTHOFFILEDIAMETER REMAINSABOVECUTTEREDGE To sharpen other types...

Page 18: ...upply sufficient oil to it rotate the chain slowly to wash away the filings before using again If the chain saw is operated with filings clogged in the groove the saw chain and the guide bar will be d...

Page 19: ...st Disas semble and clean Fuel leaking from fixing surfaces Retighten all screws of carburetor Air valve fuel tank cap does not worknormally Replace or Clean Fuel pump does not operate Check impulse d...

Page 20: ...ary Cylinder chromium plating peeled Replace cylinder or worn out Exhaust port clogged with carbon Clean as necessary Throttle is not fully open Readjust Chain tension incorrect Adjust Chain wrongly s...

Page 21: ...rformance is maintained in compliance with the Standard B175 1 2000 INSTALLATION Echo recommends that the chain brake should be serviced by an authorized Echo servicing dealer OPERATION Set the lever...

Page 22: ...22 NOTES...

Page 23: ...23 NOTES...

Page 24: ...Representative WARRANTY CARD This card is our means of registering all original owners of ECHO equipment The card plus proof of purchase provides you the assur ance that authorized warranty work will...

Reviews: