background image

5

5

102514

Guide Bar Nose  

Tip or end of guide bar.

Kickback

  Quick backward and upward motion of guide bar.

Kickback may occur when tip of guide bar touches an object while
chain is moving. The guide bar will kick up and back towards
operator.

Kick Guard  

Covers the nose area of the bar and chain where

kickback reaction is generated. No chain contact in this area. No
rotational kickback.

Limbing  

Process of cutting limb(s) from a felled tree.

Low-Kickback Chain

  Chain that reduces chance of kickback

as required by ANSI B175.1.

Normal Cutting Position

  Stance used while making bucking

and felling cuts.

Notching Cut

  Notch cut in tree that directs fall of tree.

Oiler Control

  System for oiling guide bar and chain.

Power Head

    Chain saw without chain and guide bar. Also

known as saw body.

Pushback (Kickback, Pinch)

  Rapid pushback of chain saw.

Pushback may occur if chain along top of guide bar is pinched,
caught, or contacts a foreign object.

Rear Handle

  Handle located at rear of saw body.

Reduced Kickback Guide Bar

  Guide bar that reduces chance

of kickback.

Replacement Chain

  Chain that complies with ANSI B175.1

when used with a specific saw. It may not meet ANSI require-
ments when used with other saws.

Saw Chain (Chain)

  Loop of chain having cutting teeth for

cutting wood. The motor drives chain. The guide bar supports
chain.

Spiked Bumper (Spike)

  Pointed teeth at front of saw body

beside guide bar. Keep spiked bumper in contact with wood when
felling or bucking. It helps maintain position of saw while cutting.

Sprocket

  Toothed wheel that drives chain.

Switch

  Device that completes or interrupts electrical circuit

to motor of saw.

Switch Linkage

    This device connects switch to trigger. It

moves switch when you squeeze trigger.

Switch Lockout

  Device that reduces accidental starting of saw.

Trigger  

Device that turns saw on and off. Squeezing trigger

turns saw on. Releasing trigger turns saw off.

Trimming (Pruning)  

Process of cutting limb(s) from a living

tree.

Undercut  

An upward cut from underside of log or limb. This is

done while in normal cutting position and cutting with top of
guide bar.

CHAIN SAW NAMES AND TERMS

Bucking

  Process of cutting a felled tree or log into lengths.

Felling

  Process of cutting down a tree.

Felling Cut

    Final cut when felling a tree. Make this cut on

opposite side of tree from notching cut.

Front Hand Guard

  Shield between front handle and guide bar.

Protects left hand while using saw. When kickback occurs, the
front hand guard is moved forward by the back of operator’s left
hand. This stops the saw chain quickly, reducing the chance of
serious injury.

Front Handle

  Located at front of saw body.

Guide Bar

  Metal bar that extends from saw body. The guide bar

supports and guides chain.

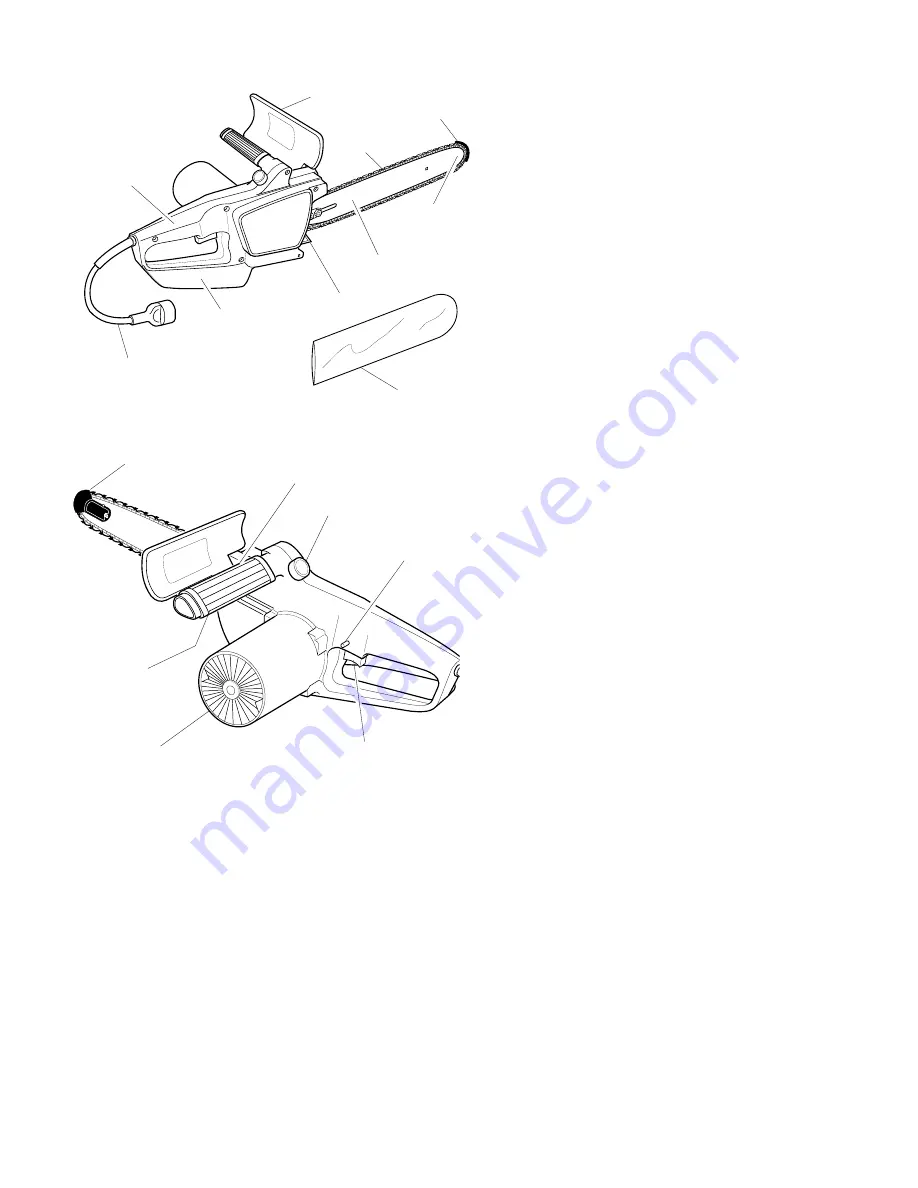
PRODUCT IDENTIFICATION

Guide Bar

Power Cord

Rear
Handle

Rear Hand
Guard

Spike

Front Hand
Guard

Saw
Chain

Switch
Lockout

Oil Level Sight Hole
(located on saw body,
hidden by front handle)

Front
Handle

Motor
Housing

Trigger

Oil Cap

Guide Bar
Nose

Scabbard

Figure 2 - Electric Chain Saw

Kick Guard

Kick Guard

Summary of Contents for ECS-2000

Page 1: ...enance and Storage of Chain Saw 4 Product Identification 5 Chain Saw Names and Terms 5 Unpacking 6 Assembly 6 Saw Chain Tension Adjustment 7 Filling Oil Tank 7 TABLE OF CONTENTS ECS 3000 16 GUIDE BAR SERIAL NUMBER 200 UP SERIAL NUMBER 300 UP Operating Chain Saw 7 Extension Cords 8 Oiling Chain 8 Cutting with the Chain Saw 8 Chain Brake 8 Trimming a Tree 9 Felling a Tree 9 Limbing a Tree 10 Bucking...

Page 2: ... Eye Protection Must Be Worn Safety Information Warnings Appears Throughout This Manual Pay close attention to them Below are definitions for the safety information listed throughout this manual WARNING indicates a hazard which can cause severe personal injury death or substantial property damage if you ignore warning CAUTION indicates a hazard which will or can cause minor personal injury or prop...

Page 3: ...ches that may fall on you 11 To reduce the risk of electric shock this saw has a polarized plug one blade is wider than the other This plug will fit in a polarized outlet only one way If the plug does not fit fully in the outlet of your extension cord reverse the plug If it still does not fit a polarized extension cord will be necessary Do not change the plug in any way KICKBACK WARNING ICON G 001...

Page 4: ...Keep finger off trigger until ready to make cut WARNING Avoid pushback and pull in These hazards can cause you to lose control of chain saw Pushback or pull in can cause severe injury SAFETY WARNINGS Continued 10 Before starting chain saw make sure chain is not touching anything 11 Avoid body contact with grounded objects such as pipes wire fences and metal posts 12 Keepallpartsofbodyawayfromchain...

Page 5: ...dbumperincontactwithwoodwhen fellingorbucking Ithelpsmaintainpositionofsawwhilecutting Sprocket Toothed wheel that drives chain Switch Device that completes or interrupts electrical circuit to motor of saw Switch Linkage This device connects switch to trigger It moves switch when you squeeze trigger SwitchLockout Devicethatreducesaccidentalstartingofsaw Trigger Device that turns saw on and off Squ...

Page 6: ...o saw body Place rear of guide bar between adjusting plate and sprocket support IMPORTANT Make sure to insert adjusting block into oval adjusting hole on guide bar 5 Attach guide bar nuts to guide bar bolts IMPORTANT Tighten guide bar nuts finger tight only Make sure adjusting block is in oval adjusting hole on guide bar 6 Place chain around drive sprocket then along top groove of guide bar and ar...

Page 7: ...d sprocket to wear rapidly FILLING OIL TANK 1 Remove oil cap 2 Fill oil tank with Echo bar and chain oil 3 Replace oil cap at once Tighten oil cap firmly for good seal This will avoid oil seepage from tank 4 Wipe off excess oil Note It is normal for oil to seep when saw is not in use Empty oil tank after each use to prevent seepage Guide Bar Incorrect Tension Figure 6 Saw Chain Adjustment Guide Ba...

Page 8: ... movement of saw 7 Guide saw using light pressure Do not force saw The motor will overload and can burn out 8 Remove saw from a cut with saw running at full speed Stop saw by releasing trigger Do not use the chain brake Make sure chain has stopped before setting saw down 9 Practice until you can maintain a steady even cutting rate OILING CHAIN Always check oil level before using saw To oil chain p...

Page 9: ...ee Make sure there are no dead limbs or branches that may fall on you Study natural lean of tree location of larger branches and wind direction This will help you judge which way tree will fall 2 Clear work area around tree 3 Plan and clear a retreat path before felling Make retreat path opposite to planned direction of fall of tree and at 45 angle see Figure 12 4 Remove dirt stones loose bark nai...

Page 10: ...by notching cuts Felling Cut 1 Make felling cut five centimeters higher than lower notch cut and on opposite side of tree see Figure 13 Keep felling cut parallel to lower notch cut 2 Cut towards notch 4 When tree begins to fall quickly remove saw from felling cut release trigger to turn saw off put saw down exit area using retreat path WARNING ICON G 001 WARNING Be alert for falling overhead limbs...

Page 11: ...sible raise log or section off ground Do this by using limbs logs chocks etc When cutting through log maintain control by reducing cutting pressure near end of cut Do not relax your grip on chain saw handles Do not let moving chain touch ground Ground will dull moving chain After cutting through log release trigger to turn saw off before moving saw Follow directions below to buck a log Entire Leng...

Page 12: ...l Guide Bar Maintenance 1 Remove guide bar from chain saw 2 Remove sawdust from guide bar groove periodically Use putty knife or wire 3 Clean oil slots after each day of use 4 Remove burrs from sides of guide bar Use flat file to make side edges square Replace guide bar when bar is bent or cracked inside groove of bar is badly worn Note When replacing guide bar see Replacement Parts page 14 for pr...

Page 13: ...30 Guide Mark File Guide 4 mm Round File Note This illustration shows file guide place ment and filing direction for sharpening cutters on left side of chain Filing Direction Figure 20 File and File Guide Placement On Chain Top Plate left side of chain Groove Depth Gauge left side of chain Depth Gauge right side of chain Left Side of Chain Right Side of Chain Figure 21 Chain Part Locations Flat Fi...

Page 14: ... filled with oil This will prevent rust 5 Wipe a thin coating of oil over surface of guide bar 6 Wipe off outside of saw body Do this with soft cloth dampened with a mild soap and water mixture 7 Store chain saw in a high or locked place out of children s reach in a dry place in a carrying case part 999888 00207 or with scabbard over guide bar REPLACEMENT PARTS WARNING ICON G 001 WARNING Use only ...

Page 15: ...loose Guide bar and chain not assembled right Saw damaged Do not use saw Oil cap is not secure Brake failure REMEDY See Assembly page 6 See Sharpening Your Saw Chain page 12 Extension cord wire size too small See Extension Cords page 8 Press in switch lockout before squeez ing trigger Release trigger and move front hand guard back towards rear of saw Check cord connections Check line fuse or circu...

Page 16: ...proof of purchase provides you the assurance that authorized warranty work will be done It also provides a direct link between you and ECHO if we find it necessary to contact you ADDITIONAL OR REPLACEMENT MANUALS Safety Manuals are available free of charge from your ECHO dealer or by contacting Echo Incorporated 400 Oakwood Road Lake Zurich IL 60047 Operators and Parts Manuals are available for pu...

Reviews: