background image

22

CarbureTor


adJusTmenT

Engine Break-In

New engines must be operated a minimum duration of two tanks of fuel 

break-in before carburetor adjustments can be made. During the break-

in period your engine performance will increase and exhaust emissions 

will stabilize. Idle speed can be adjusted as required.

High Altitude Operation

This engine has been factory adjusted to maintain satisfactory starting, 

emission, and durability performance up to 1,100 feet mean sea level 

(MSL) (96.0 kPa and below). To maintain proper engine operation and 

emission compliance above 1,100 feet MSL the carburetor may need to 

be adjusted by an authorized ECHO service dealer.

IMPORTANT 

If the engine is adjusted for operation 

above

 1,100 feet MSL, the 

carburetor must be re-adjusted when operating the engine 

below


1,100 feet MSL, otherwise severe engine damage can result.

Level 2.

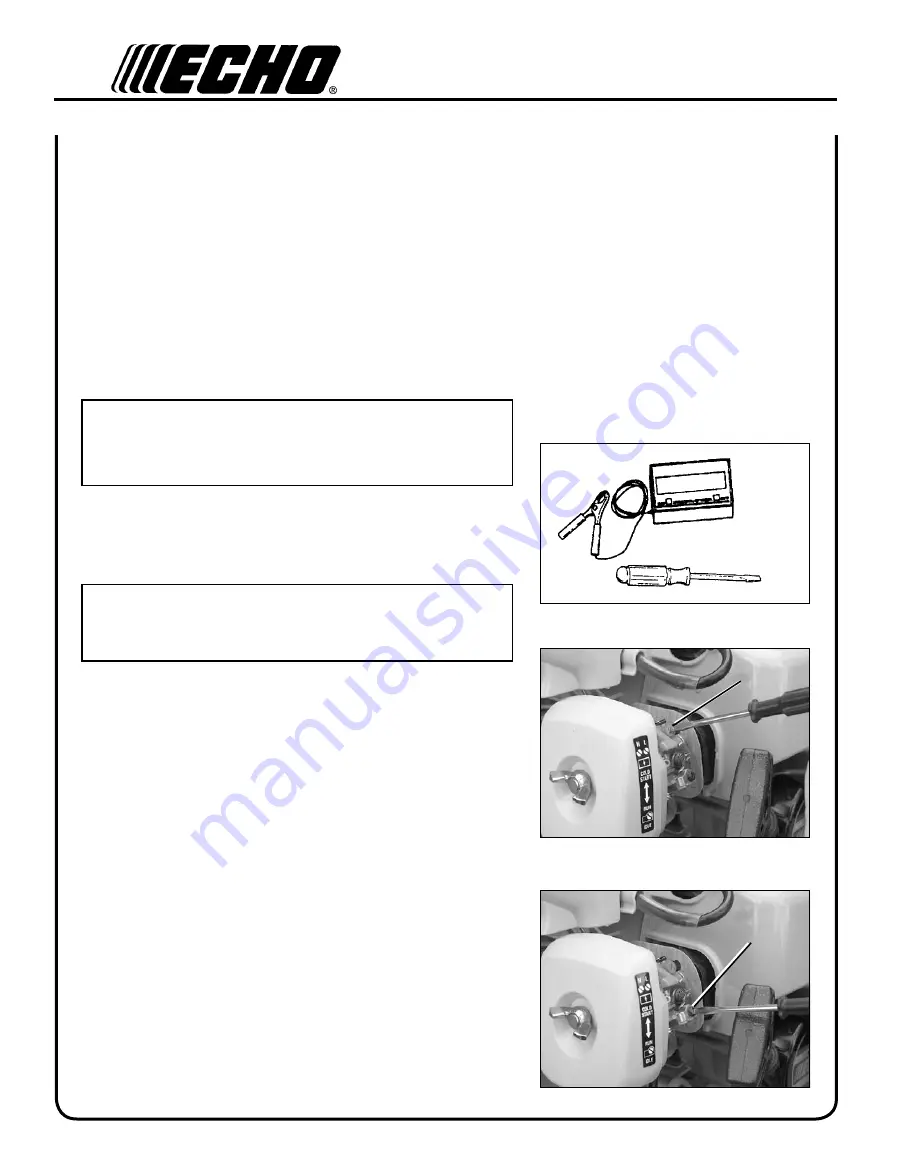
Tools required:

     Screwdriver, tachometer (Echo P/N 99051130017)

Parts required:

    None.

NOTE


Every unit is run at the factory and the carburetor is set in com-

pliance with emission regulations. This carburetor does not have 

acceleration adjustment needle. 

  1.  Before adjusting the carburetor, clean or replace the air filter and 

spark arrestor screen and install blower pipes.

  2.  Start engine and run for several minutes to reach operating tem-

perature.

  3.  Stop engine. Turn red HI speed needle (A) CCW (counter clock-

wise) to stop. 

  4.  Idle Speed Adjustment with tachometer. 

    •Start engine and turn “idle” speed adjustment screw  (B) to idle 

RPM found on page 24 “Specifications” section of this manual.

  5.  Accelerate to full throttle for 2-3 seconds to clear excess fuel from 

engine then return to idle.  Accelerate to full throttle to check for 

smooth transition from idle to full throttle.  If engine stops or 

stalls after full warm up, return the unit to your authorized ECHO 

dealer for repair.

  6.  Check HI speed RPM at W.O.T. (Wide Open Throttle). HI speed 

RPM should be set to specifications found on page 24 “Specifica

-

tions” of this manual.

  7.  Check idle speed and reset if necessary. 

A

b

Summary of Contents for ES-210 - 12-08

Page 1: ... s Manual MODEL es 210 X753002972 12 08 X7531135902 WARNING Read rules for safe operation and all instructions carefully ECHO provides this Operator s Manual which must be read and understood for proper and safe operation ...

Page 2: ...al Number 28 Service 28 Echo Consumer Product Support 28 Warranty Registration 28 Additional or Replacement Manuals 28 Specifications descriptions and illustrative material in this literature are as accurate as known at the time of publication but are subject to change without notice Illustrations may include optional equipment and ac cessories and may not include all standard equipment Introducti...

Page 3: ... gear must be worn when operating SHRED N VAC Safety manual safety symbols and important information Throughout this manual and on the product itself you will find safety alerts and helpful informational messages preceded by symbols or key words The following is an explanation of those symbols and key words and what they mean to you WARNING The safety alert symbol accompanied by the word WARNING c...

Page 4: ... with cap or net Hot Humid Weather Heavy protective clothing can increase operator fatigue which may lead to heat stroke Schedule heavy work for early morning or late afternoon hours when temperatures are cooler Vibration and Cold It is believed that a condition called Raynaud s Phenomenon which affects the fingers of certain individuals may be brought about by exposure to vibration and cold Expos...

Page 5: ...njuries It is believed that overusing the muscles and tendons of the fingers hands arms and shoulders may cause soreness swelling numbness weakness and extreme pain in those areas Certain repetitive hand activities may put you at a high risk for developing a Repetitive Stress Injury RSI An extreme RSI condition is Carpal Tunnel Syndrome CTS which could occur when your wrist swells and squeezes a v...

Page 6: ...or loose missing nuts bolts and screws Tighten and or replace as needed Do not use blower if any part is missing or damaged Have repairs done only by an authorized ECHO Service dealer Do not use any attachment accessory or replacement part unless it is recommended in this Operator s Manual IMPORTANT ENGINE INFORMATION ENGINE FAMILY 8EHXS 0214EG DISPLACEMENT 21 2 cc EMISSION COMPLIANCE PERIOD 300 H...

Page 7: ... a new one can be ordered from your ECHO dealer See PARTS ORDERING instructions for specific information Description Hot Decal near muffler P N X505002310 1 2 3 5 6 7 8 9 10 4 P N 89016003360 71 Category III dB A Measured at 50 ft 15m per ANSI B175 2 P N 89016009461 P N X508000140 General Warning Decal located on top of blower housing Sound Label located on blower housing 15 16 11 12 14 13 ...

Page 8: ...fety interlock switch when closed Engine will not run if safety switch is not activated 10 THROTTLE POSITION LEVER Pull back to increase engine speed Friction washers maintain throttle lever setting 11 SHOULDER STRAP Secures debris bag to shoulder 12 VACUUM PIPE Sucks in materials to be shredded 13 DEBRIS BAG Collects shredded material 14 BLOWER PIPES Twist lock design 15 PURGE BULB Pumping purge ...

Page 9: ...ozzle onto straight pipe 4 Turn fan head nozzle clockwise to lock into place vacuum shredding application Install Vacuum Tube and Bag Assembly 1 Turn knob A counter clockwise until hinged housing cover is free to open for vacuum tube installation 2 Loosen screw B Do not remove clamp from blower housing 3 While holding housing cover open align arrow on vacuum tube with interlock switch D and instal...

Page 10: ...oved for use in ECHO 2 stroke gasoline engines Use of alternative fuels may cause performance prob lems loss of power overheating fuel vapor lock and unintended machine operation including but not limited to improper clutch engagement Alternative fuels may also cause premature deterioration of fuel lines gaskets carbu retors and other engine components WARNING Moving parts can amputate fingers or ...

Page 11: ...OT store a unit with fuel in its tank Leaks can occur Return unused fuel to an approved fuel storage container Storage Fuel storage laws vary by locality Contact your local government for the laws affecting your area As a precaution store fuel in an approved airtight container Store in a well ventilated unoccupied building away from sparks and flames IMPORTANT Stored fuel ages Do not mix more fuel...

Page 12: ...lways hold the unit firmly 5 Recoil Starter Place the unit on a flat clear area Firmly grasp throttle grip with left hand and rapidly pull recoil starter handle rope E until en gine fires 5 pulls maximum 6 Choke After engine fires or 5 pulls move choke lever C to Run position then pull starter handle rope until engine starts and runs Allow unit to warm up at idle for several minutes 7 After engine...

Page 13: ... pull recoil starter handle rope E until en gine fires IMPORTANT Recoil starter Use short pulls only 45 60 cm 18 24 in of rope for starting Do not allow the rope to snap back in Always hold the unit firmly NOTE If engine does not start after 5 pulls use Cold Start Procedure stopping engine 1 Throttle Trigger Throttle Position Lever Release throttle trigger F Move throttle position lever B forward ...

Page 14: ...evving do not block blower pipe 1 Use only during appropriate hours 2 Allow the engine to warm up at a fast idle for a few minutes 3 Control engine speed with throttle trigger F or for continu ous use set engine speed with throttle position lever B Rotate throttle position lever forward for lower speed back for higher speed 4 Use lower speed to blow debris from hard surfaces 5 Additional speed may...

Page 15: ... Use attachment to vacuum pile shred n vac troubleshooting Problem Cause Remedy Unit runs but doesn t vacuum or has poor suction Elbow or debris bag clogged Check elbow and debris bag and clear as needed Make sure bag is not folded over at intake during use Obstructions in vacuum tube Check vacuum tube and remove obstructions Avoid wet leaves Unit stopped suddenly during vacu uming and now starter...

Page 16: ...tructions clearing debris or servicing unit Allow unit to cool before performing service Wear gloves to protect hands from sharp edges and hot surfaces Maintenance COMPONENT SYSTEM MAINTENANCE PROCEDURE REQ D SKILL LEVEL DAILY OR BEFORE USE EVERY REFUEL 3 MONTHS OR 90 HOURS YEARLY 600 HOURS Air Filter Inspect Clean 1 I C R Choke Shutter Inspect Clean 1 I C Fuel Filter Inspect Replace 1 I I R Fuel ...

Page 17: ... the line and install the new filter air filter Level 1 Tools required 25 50 mm 1 2 in cleaning brush Parts required REPOWERTM Air and Filter Kit NOTE Clean daily 1 Close choke Cold Start Position This prevents dirt from entering the carburetor throat when the air filter is removed Brush accumulated dirt from air cleaner area 2 Remove air filter cover Brush dirt from inside cover 3 Remove air filt...

Page 18: ... prevents the heat from leaving Removal of cooling passage blockages or cleaning of cooling fins is considered Normal Maintenance Any failure attributed to lack of maintenance is not warranted Cleaning Grill 1 Remove accumulated debris from crankcase intake grill above the fuel tank spark plug Level 2 Tools required T Wrench Feeler gauge Parts Required REPOWERTM Tune Up Kit IMPORTANT Use only NGK ...

Page 19: ...gged with carbon deposits NOTE When cleaning carbon deposit be careful not to damage the cata lytic element inside muffler 5 Install spark arrestor screen gasket and covers 6 Loosely reassemble engine cover with five cross head and two hex head screws 7 Tighten all screws securely 8 Install spark plug and spark plug lead A B C D Cleaning Cylinder Fins 1 Remove spark plug lead and spark plug 2 Remo...

Page 20: ... clean deposits from cylin der exhaust port IMPORTANT Never use a metal tool to scrape carbon from the exhaust port Do not scratch the cylinder or piston when cleaning the exhaust port Do not allow carbon particles to enter the cylinder 6 Inspect heat shield and replace if damaged 7 Install heat shield and muffler 8 Tighten muffler mounting bolts or nuts to 80 95 in lbf 90 110 kgf cm 9 Remove spar...

Page 21: ... clamp and pull vacuum tube from unit 2 Remove accumulated debris from blade and inspect for damage IMPORTANT Do not operate SHRED N VAC if shredder blade is damaged or broken Return unit to Echo Dealer for service 3 Install vacuum tube Refer to Installing Vacuum Tube page 9 in assembly section for correct assembly procedures debris bag Level 1 Parts Required None Shake dust from bag and inspect f...

Page 22: ... 99051130017 Parts required None NOTE Every unit is run at the factory and the carburetor is set in com pliance with emission regulations This carburetor does not have acceleration adjustment needle 1 Before adjusting the carburetor clean or replace the air filter and spark arrestor screen and install blower pipes 2 Start engine and run for several minutes to reach operating tem perature 3 Stop en...

Page 23: ...r a c h t i w d e r e v o C l e u f h t i w d e l u o F e v i t c e f e d g u l P n i 6 2 0 0 m m 5 6 o t t s u j d A e c a l p e r r o n a e l C e c a l p e r r o n a e l C g u l p e c a l p e R s n u r e n i g n E r o s e i d t u b t o n s e o d e t a r e l e c c a y l r e p o r p r e t l i f r i A y t r i d r e t l i f r i A r a e w l a m r o N e c a l p e r r o n a e l C r e t l i f l e u F y ...

Page 24: ...in the STOP position 3 Remove accumulation of grease oil dirt and debris from exterior of unit 4 Perform all periodic lubrication and services that are required 5 Tighten all screws and nuts 6 Drain the fuel tank completely and pull the recoil starter handle several times to remove fuel from the carburetor 7 Remove the spark plug and pour 7cc 1 4 oz of fresh clean ECHO 2 stroke engine oil into the...

Page 25: ...stor catalytic muffler muffler Fuel Mixed Gasoline and Two stroke Oil Fuel Oil Ratio 50 1 Power Blend X TM ISO L EGD ISO CD 13738 and J A S O M345 FC FD two stroke air cooled engine oil Gasoline Use 89 Octane unleaded Do not use fuel containing methyl alcohol more than 10 ethyl alcohol or 15 MTBE Do not use alternative fuels such as E 20 or E 85 Oil Power Blend X TM Premium Universal 2 Stroke Oil ...

Page 26: ...26 notes ...

Page 27: ...27 Shred N Vac Operator s Manual notes ...

Page 28: ...vided below Model No _____________ Type _________SN ______________ service Service of this product during the warranty period must be performed by an Authorized ECHO Service Dealer For the name and address of the Authorized ECHO Service Dealer nearest you ask your retailer or call 1 800 432 ECHO 3246 Dealer information is also available on our Web Site When presenting your unit for Warranty servic...

Reviews: