background image

PAS-225SB

MAINTENANCE

© 10/2013 ECHO Inc.

X7722277600

21

MAINTENANCE

Moving parts can amputate fingers or cause severe injuries. Keep hands, clothing and loose objects 
away from all openings. Always stop engine, disconnect spark plug, and make sure all moving parts 
have come to a complete stop before removing obstructions, clearing debris, or servicing unit. 
Allow unit to cool before performing service. Wear gloves to protect hands from sharp edges and 
hot surfaces.

Your ECHO unit is designed to provide many hours of trouble free service. Regular scheduled maintenance 
will help your unit achieve that goal. If you are unsure or are not equipped with the necessary tools, you may 
want to take your unit to an ECHO Service Dealer for maintenance. To help you decide whether you want to 
DO-IT-YOURSELF or have the ECHO Dealer do it, each maintenance task has been graded. If the task is 
not listed, see your ECHO Dealer for repairs.

Skill Levels

Level 1

 = Easy to do. Common tools may be required.

Level 2

 = Moderate difficulty. Some specialized tools may be required.

ECHO offers 

REPOWER

TM

 Maintenance Kits and Parts to make your maintenance job easier.

Maintenance Intervals

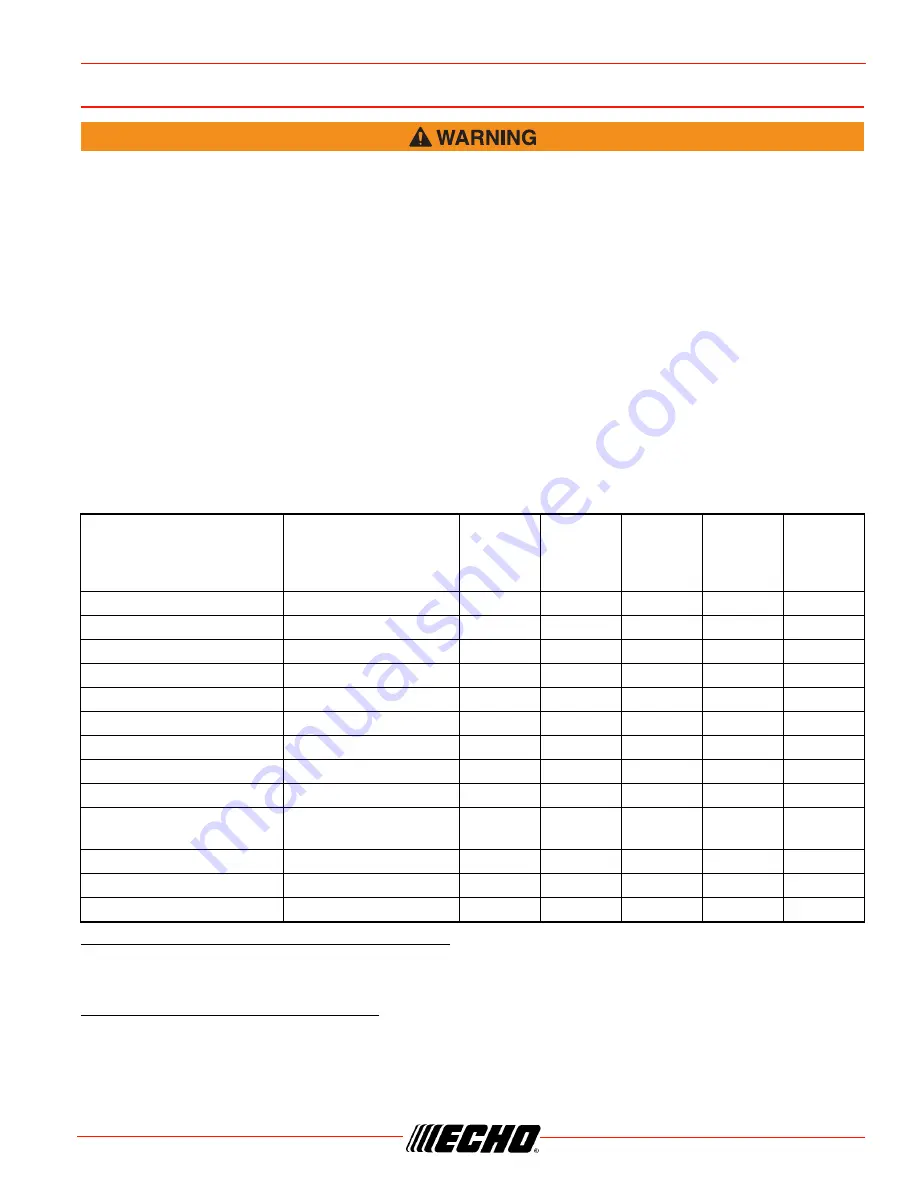
MAINTENANCE PROCEDURE LETTER CODES: I = INSPECT, R = REPLACE, C = CLEAN
IMPORTANT NOTE

 - Time intervals shown are maximum. Actual use and your experience will determine 

the frequency of required maintenance.

MAINTENANCE PROCEDURE NOTES:

(1) Apply POWER BLENDX

TM

 grease every 25 hours of use.

(2) Apply POWER BLENDX

TM

 grease every 50 hours of use.

(3) Low evaporative fuel tanks DO NOT require regular maintenance to maintain emission integrity.

* Replacement is recommended based on the finding of damage or wear during inspection.

COMPONENT/SYSTEM

MAINTENANCE 

PROCEDURE

REQ’D 

SKILL 

LEVEL

DAILY 

OR 

BEFORE 

USE

EVERY 

REFUEL

MONTHS 

YEARLY 

Air Filter 

Inspect/Clean 

1

I  /  C  *


R * 

Choke Shutter 

Inspect/Clean 

1

I / C


Fuel Filter 

Inspect/Replace 

1

I  *


I / R * 

Fuel Cap Gasket 

Inspect/Replace 

1

I  *


R * 

Fuel System 

Inspect/Replace 

1

I (3) *


I (3) *


Spark Plug 

Inspect/Clean 

1

I / C / R *


Cooling System 

Inspect/Clean 

2

I / C


Muffler Spark Arrestor 

Inspect/Clean/Replace 

2

I / C / R *


Cylinder Exhaust Port 

Inspect/Clean/Decarbon 

2

I  /  C


Drive Shaft 
(Flex Cable Models) 

Grease 

2

I  (1)


Gear Housing 

Grease 

2

I  (2)


Recoil Starter Rope Inspect/Clean 

1

I  /  C  *


Screws/Nuts/Bolts Inspect/Tighten/Replace 

1

I  * 

Summary of Contents for PAS-225SB Pro Attachment Series

Page 1: ...catalytic muffler and surrounding cover may become extremely hot Always keep clear of exhaust and muffler area otherwise serious personal injury may occur The engine exhaust from this product contains...

Page 2: ...ower Head Shaft Lower Shaft Assembly 13 Plastic Shield Installation 13 Nylon Line Head Installation 14 To Advance Trimmer Line 14 Remove Nylon Line Head 14 Support Handle Installation 15 Operation 15...

Page 3: ...ure reference write them in the space provided below Model No _________________ SN ___________________ Service Service of this product during the warranty period must be performed by an Authorized ECH...

Page 4: ...ls and key words and what they mean to you The safety alert symbol accompanied by the word DANGER calls attention to an act or condition which WILL lead to serious personal injury or death if not avoi...

Page 5: ...nt Low speed mixture Choke Control Run Position Choke Open Choke Control Cold Start Position Choke Closed Safety Alert Emergency Stop Keep feet away from blade RotatingCutting Attachment Hot Surface F...

Page 6: ...on the handles Gloves also reduce the transmission of machine vibration to your hands Breathing Protection Wear a facemask to protect against dust Hearing Protection ECHO recommends wearing hearing p...

Page 7: ...ed If you experience discomfort redness and swelling of the fingers followed by whitening and loss of feeling consult your physician before further exposing yourself to cold and vibration Repetitive S...

Page 8: ...n footing and balance at all times Do not stand on slippery uneven or unstable surfaces Do not work in odd positions or on ladders Do not over reach Avoid Hot Surfaces During operation the drive shaft...

Page 9: ...n authorized servicing dealer before using EMISSION CONTROL EXHAUST EVAPORATIVE EPA 2010 and Later and or C A R B TIER III The emission control system for the engine is EM engine modification and if t...

Page 10: ...Make sure the decal s is legible and that you understand and follow the instructions on it If a decal cannot be read a new one can be ordered from your ECHO dealer See PARTS ORDERING instructions for...

Page 11: ...S SHIELD ASSEMBLY Included in plastic bag co pack MUST be installed on unit before use see Assembly Instructions Shield assembly includes the Cut Off Knife and Safety Decal Mounts on the Gear Housing...

Page 12: ...r ECHO Dealer of damaged or missing parts Use the contents list to check for missing parts ____ 1 Power Head w Upper Drive Shaft Assembly ____ 1 Lower Drive Shaft Assembly ____ 1 Operator s Manual ___...

Page 13: ...fully engaged by twisting lower drive shaft Locator pin should snap flush in coupler Full engagement will prevent further shaft rotation 7 Secure lower shaft assembly to coupler by tightening clampin...

Page 14: ...is shield with cut off knife Using nylon line heads with metal debris shield can result in trimmer damage caused by operation with excessive line length Note Your nylon line head may appear different...

Page 15: ...also create sparks if the cutter strikes rocks metal or other hard objects Contact local fire authorities for laws or regulations regarding fire prevention requirements Fuel Alternative fuels such as...

Page 16: ...Always loosen fuel caps slowly allowing pressure to equalize NEVER refuel a unit when the engine is HOT or RUNNING DO NOT fill fuel tanks indoors ALWAYS fill fuel tanks outdoors over bare ground DO NO...

Page 17: ...tion instructions DO NOT INSTALL BLADES ON GT CURVED SHAFT MODEL TRIMMERS Arbor Diameter of Upper Blade Plate must match arbor diameter of blades New cotter pin required each time blade is installed B...

Page 18: ...ush or heavy woody growth 80 Tooth Brush Blade is designed for cutting brush and woody growth up to 13 mm 1 2 in diameter 22 Tooth Clearing Blade is designed for dense thickets and saplings up to 64 m...

Page 19: ...of all obstacles Firmly grasp throttle handle and throttle trigger lockout with left hand and fully depress throttle trigger to wide open position Rapidly pull recoil starter handle rope D until engin...

Page 20: ...ble in the Clear fuel return line Pump bulb an additional 4 or 5 times 3 Recoil Starter Lay the unit on a flat area and keep movable attachment parts clear of all obstacles Firmly grip throttle handle...

Page 21: ...required ECHO offers REPOWERTM Maintenance Kits and Parts to make your maintenance job easier Maintenance Intervals MAINTENANCE PROCEDURE LETTER CODES I INSPECT R REPLACE C CLEAN IMPORTANT NOTE Time...

Page 22: ...l 1 Fuel is VERY flammable Use extreme care when mixing storing or handling or serious personal injury may result 1 Use a clean rag to remove loose dirt from around fuel cap and empty fuel tank 2 Use...

Page 23: ...in proper engine operating temperatures cooling air must pass freely through the cylinder fin area This flow of air carries combustion heat away from the engine Overheating and engine seizure can occu...

Page 24: ...nents in reverse order Exhaust System Spark Arrestor Screen Level 2 1 Remove engine cover B 2 Place piston at Top Dead Center TDC to prevent carbon dirt from entering cylinder 3 Remove spark arrestor...

Page 25: ...e and re tighten mounting bolts or nuts to specifications Carburetor Adjustment Level 2 Engine Break In New engines must be operated a minimum duration of two tanks of fuel break in before carburetor...

Page 26: ...the cutting attachment should not move at idle otherwise serious personal injury may result Lubrication Level 1 Gear Housing 1 Clean all loose debris from gear box 2 Remove plug A and check level of g...

Page 27: ...Make sure that the flex cable fully engages into the clutch square drive socket 7 Slide coupler on upper drive shaft until fully seated and align set screw hole in coupling with hole in upper drive sh...

Page 28: ...in eyelets 3 Insert one end of trimmer line into an eyelet and push line equal distance through trimmer head 4 Hold trimmer head while turning knob clockwise to wind line onto spool until about 5 13...

Page 29: ...to maintain balance A blade that is not balanced will cause unsafe handling due to vibration and can result in blade failure 1 File each tooth at a 30 degree angle a specific number of times eg 4 stro...

Page 30: ...rk at end of plug wire No spark Stop switch off Electrical problem Interlock switch Turn switch to ON See your Echo dealer See your Echo dealer Spark at plug No spark Spark gap incorrect Covered with...

Page 31: ...uel fumes may accumulate or reach an open flame or spark 2 Place the stop switch in the OFF position 3 Remove accumulation of grease oil dirt and debris from exterior of unit 4 Perform all periodic lu...

Page 32: ...Oil Fuel Oil Ratio 50 1 Power Blend XTM ISO L EGD ISO CD 13738 and J A S O M345 FD two stroke air cooled engine oil Gasoline Use 89 Octane unleaded Do not use fuel containing methyl alcohol more than...

Page 33: ...by ECHO for use with these units RECOMMENDED OPTIONAL ATTACHMENTS Articulating Hedge Trimmer 99944200590 Articulating Hedge Trimmer 99944200595 Brush Cutter 99944200600 Power Edger 99944200470 Hedge...

Page 34: ...warranty period and arrange for pick up or return of your unit after the repairs have been made For your nearest authorized ECHO servicing dealer call ECHO s Dealer Referral Center at 1 800 432 ECHO o...

Page 35: ...A or California Emission Defect Warranty Explanation X G Only use gasoline which contains G Gasohol which contains a 6 7 J 9 is also approved The prescribed mixing ratio of gasoline to oil is listed o...

Page 36: ...O INCORPORATED 400 Oakwood Road Lake Zurich IL 60047 www echo usa com 36 S06400141920 S06400999999 S59511001001 S59511999999 S59612001001 S59612999999 T44811001001 T44811999999 T44912001001 T449129999...

Reviews: