background image

18

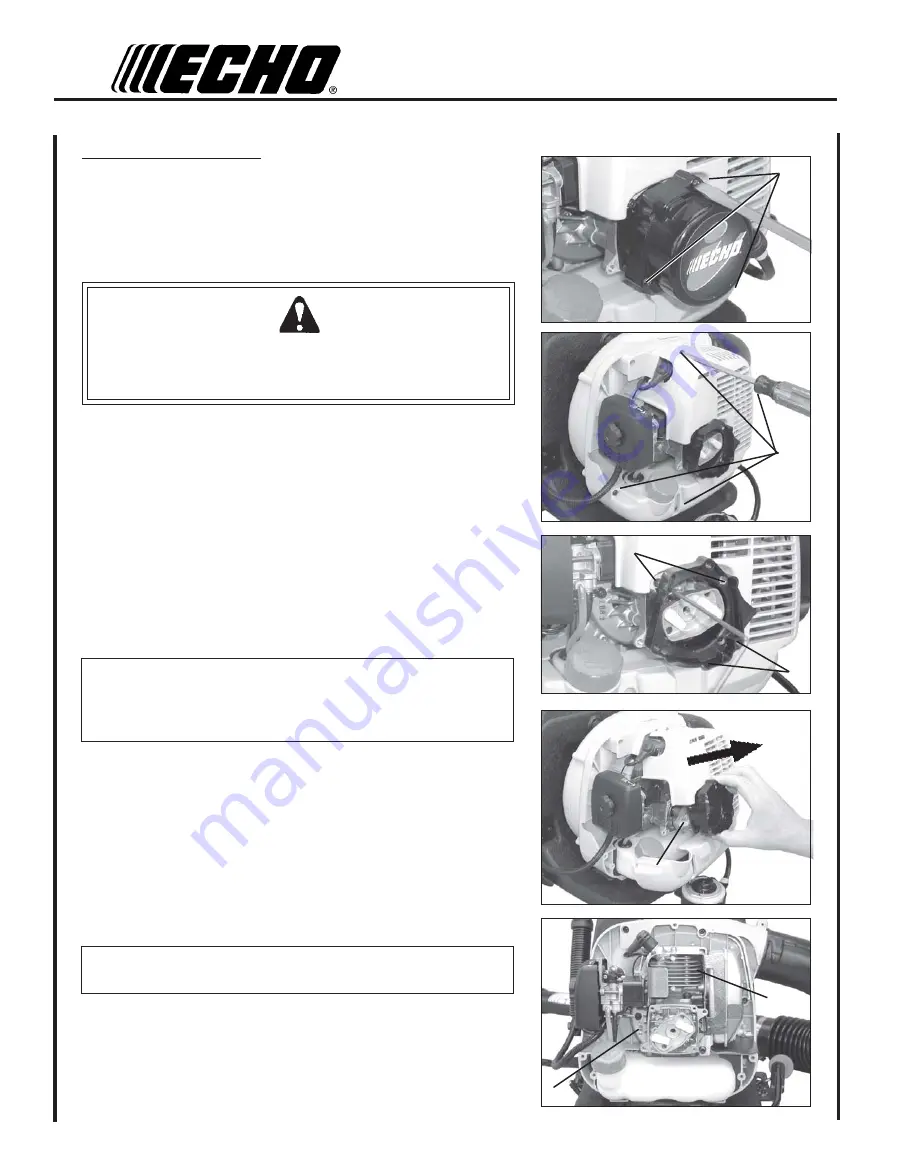
Cleaning Cylinder Fins

1. Disconnect spark plug lead from spark plug and remove spark

plug.

2. Remove 3 screws (A) from starter assembly and remove starter.

WARNING  

  DANGER

The starter assembly contains a powerful spring that may have
stored energy. DO NOT disassemble starter.  Disassembly of starter
may result in serious personal injury.

3. Remove (4) engine cover screws (B).

4. Remove (4) starter base screws (C).

5. Remove engine cover and starter base.

NOTE

Upper lip of starter base fits behind engine cover screw holes. Guide
starter base opening over starter pawl assembly (D),  and remove
base and cover together.

6. Install spark plug to prevent dirt and debris from entering engine.

7. Cover starter pawl assembly (D) and starter assembly with a clean

rag to protect from dirt and debris during cleaning.

8. Clean cylinder fins (E) to allow cooling air to pass freely.

IMPORTANT

DO NOT use a metal scraper to remove dirt from the cylinder fins.

9. Clean air intake grid area (F).

A

B

C

C

D

E

F

Summary of Contents for PB-260

Page 1: ...perator s Manual MODEL PB 260 WARNING DANGER Readrulesforsafeoperationandallinstructionscarefully ECHOprovidesthisOperator s Manualwhichmustbereadandunderstoodforproperandsafeoperation X753001110 06 0...

Page 2: ...ratingBlower 14 Maintenance 14 SkillLevels 14 Maintenance Intervals 15 AirFilter 16 FuelFilter 16 SparkPlug 17 CoolingSystem 17 ExhaustSystem 19 Carburetor Adjustment 20 Troubleshooting 21 Storage 22...

Page 3: ...eans whatever is shown within the circle is prohibited INTERNATIONAL SYMBOLS PERSONAL CONDITION AND SAFETY EQUIPMENT WARNING DANGER SHRED N VAC users risk injury to themselves and others if the SHRED...

Page 4: ...or net Hot Humid Weather Heavy protective clothing can increase operator fatigue which may lead to heat stroke Schedule heavy work for early morning or late afternoon hours when temperatures are coole...

Page 5: ...arm muscles Immediately stop using all power equipment and consult a doctor if you feel tingling numbness or pain in the fingers hands wrists or arms The sooner RSI CTS is diagnosed the more likely pe...

Page 6: ...Label is located on the engine This is an EXAMPLE ONLY information on label varies by engine FAMILY EQUIPMENT CHECK WARNING DANGER Use only ECHO approved attachments Serious injury may result from the...

Page 7: ...e safety decals on your unit Make sure the decals are legible and that you understand and follow the instructions on them If a decal cannot be read a new one can be ordered from your ECHO dealer See P...

Page 8: ...aceableairfilterelement 8 CHOKE Move lever to Cold Start position for starting and emergency stopping Move lever to Run position to run engine 9 HANDLE Rotates downward for throttle control access Spr...

Page 9: ...bowPipe __ 1 FlexPipe __ 1 SwivelPipe __ 1 StraightPipe __ 1 StraightPipe __ 1 Operator s Manual __ 1 Warranty Registration Card __ 1 ECHO Emissions and Warranty Statement __ 2 Clampsw screws __ 1 Sti...

Page 10: ...lamps B onto both ends of flexible pipe C 6 Assemble straight pipe with swivel D into flexible pipe C and tightenclamp B 7 Assemble flexible pipe C to elbow E on blower and tighten clamp B NOTE A ligh...

Page 11: ...ccur Return unused fuel to an approved fuel storage container Storage Fuel storage laws vary by locality Contact your local government for the laws affecting your area As a precaution store fuel in an...

Page 12: ...ntil fuel is visible and flows freely in the clear fuel tank return line Pump bulb an additional 4 or 5 times NOTE Energy is stored in the starter spring each time the handle rope is pulled Generally...

Page 13: ...ter Gently pull recoil starter handle rope D until engine fires NOTE If engine does not start after 5 engine engagements use cold start procedures STOPPING ENGINE 1 Throttle Lever Move throttle lever...

Page 14: ...Minimize dust by using blower at lower speeds and by dampening material with water mist when necessary Keep debris on your property Be Smart be a good neighbor MAINTENANCE Your ECHO blower is designed...

Page 15: ...l p e R t c e p s n I 1 I R s k a e L m e t s y S l e u F e c a l p e R t c e p s n I 1 I R I m e t s y S g n i l o o C n a e l C t c e p s n I 2 C I r o t s e r r A k r a p S r e l f f u M e c a l p...

Page 16: ...3 If element can be cleaned and reused be certain it still fits the cavity in the air cleaner cover is installed with the original side out FUEL FILTER Level1 Tools required 200 250mm 8 10in lengthofw...

Page 17: ...rush 3mmHexWrench Cross Head Screwdriver Parts Required None if you are careful IMPORTANT To maintain proper engine operating temperatures cooling air must pass freely through the cylinder fin area Th...

Page 18: ...rter base screws C 5 Remove engine cover and starter base NOTE Upper lip of starter base fits behind engine cover screw holes Guide starter base opening over starter pawl assembly D and remove base an...

Page 19: ...rk arrestor covers A and B gasket C and spark arrestor screen D from muffler Replace screen if it has holes burned through or is plugged with carbon deposits 3 Install spark arrestor screen gasket and...

Page 20: ...set in compliance with emission regulations Carburetor adjustments other than idle speed must be performed by an authorized ECHO dealer BeforeAdjustment Check that Air filter is clean and properly ins...

Page 21: ...i g n E r o s e i d t u b t o n s e o d e t a r e l e c c a y l r e p o r p r e t l i f r i A y t r i d r e t l i f r i A r a e w l a m r o N e c a l p e r r o n a e l C r e t l i f l e u F y t r i d...

Page 22: ...n of grease oil dirt and debris fromexteriorofunit 4 Perform all periodic lubrication and services that are required 5 Tighten all screws and nuts 6 Drain the fuel tank completely and pull the recoil...

Page 23: ...65mm 0 026in ExhaustSystem Spark ArrestorMuffler Fuel Mixed GasolineandTwo strokeOil Fuel OilRatio 50 1 two stroke air cooled engine oil Gasoline 89 Octane unleaded DO NOT use fuel containing methyl a...

Page 24: ...8 30am to 4 30 pm Central Standard Time Monday through Friday Before calling please know the model and serial number of your unit to help your Consumer Product Support Representative WARRANTY REGISTRA...

Reviews: