background image

15

S

hred

 'N' V

ac

®


o

peraTor

'

s

 m

anual

shred

 ‘

n

’ 

vaC

® 

operaTIon


  WARNING 

Flying debris hazard.  Never operate unit as a vacuum unless 

discharge elbow is installed and debris bag is securely cinched to 

elbow.  Failure to follow instructions can result in serious injuries.


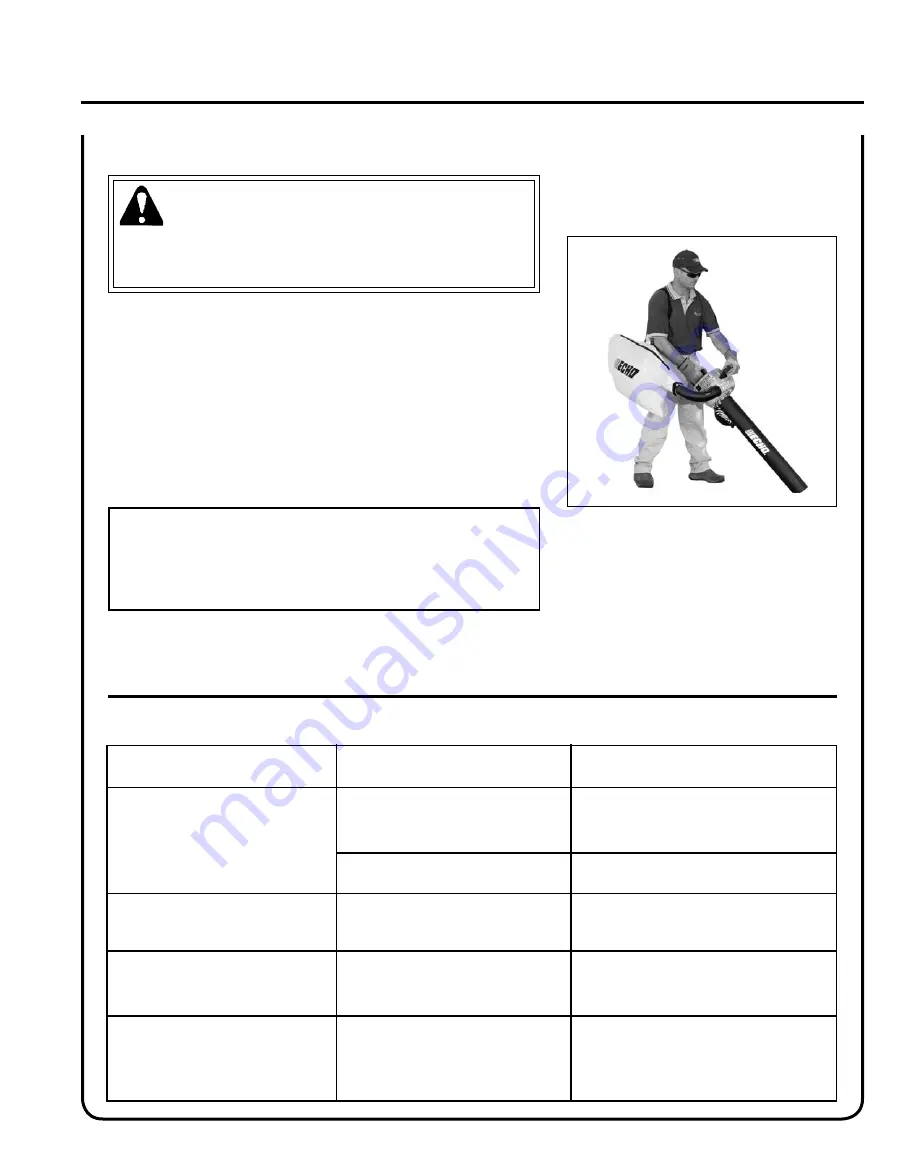
  1.  Adjust debris bag strap to support bag on operator’s shoulder. 

Bag must not be folded at intake area, or intake will clog. Further 

adjustment may be necessary as the debris bag fills and becomes 

heavier.

  2.  Grip throttle handle with left hand, and support handle with right 

hand. Keep unit to your right side so hot exhaust will be directed 

away from you.


  3.  Operate unit with beveled end of tube facing downward. Keep 

tube opening close to material being vacuumed for best results. 


NOTE  

Vacuum action works best at higher engine speeds. Avoid using 

vacuum in areas where rocks or other large, hard debris may be 

vacuumed into unit. Clear these areas with blower first, blowing 

light debris into a pile. Use attachment to vacuum pile.       

shred

 '

n

vaC

®


TroubleshooTIng

Problem 

Cause 

Remedy

  Unit runs, but doesn’t vacuum or 

has poor suction 

  Elbow or debris bag clogged 

  Check elbow and debris bag, and clear as 

needed.  Make sure bag is not folded over 

at intake during use.

  Obstructions in vacuum tube 

Check vacuum tube, and remove 

obstructions. Avoid wet leaves.

  Unit stopped suddenly during vacu

-

uming, and now starter won’t work 

Object stuck in fan housing area 

  Unit jams repeatedly during use   

Material being vacuumed too big or 

too hard for blades to shred 

  Use vacuum for leaves and small 

twigs, maximum 1/4” diameter x 3” 

long.

  Vacuum tube difficult to install or 

remove from unit 

  Tube/housing fit tight. 

Remove vacuum tube and check fan 

area.  Remove object.

  4.  Empty bag when debris level reaches intake opening. To empty bag, move stop switch to “Stop” position, and wait 

for blower to stop running. Loosen Velcro strap at elbow and slide bag off elbow. Open other end of bag, and empty 

contents. Close bag, and reattach to blower. Secure bag with Velcro strap. 

  Apply small amount of soapy water to 

end of tube to ease assembly or re-

moval.  Turns tube 1/4 turn to loosen for 

removal.

Summary of Contents for Pro Attachment ES-210

Page 1: ...s Manual MODEL es 210 X753002973 11 09 X7531135903 WARNING Read rules for safe operation and all instructions carefully ECHO provides this Operator s Manual which must be read and understood for prope...

Page 2: ...nformation 32 Parts Serial Number 32 Service 32 Echo Consumer Product Support 32 Warranty Registration 32 Additional or Replacement Manuals 32 Specifications descriptions and illustrative material in...

Page 3: ...gear must be worn when operating SHRED N VAC Safety manual safety symbols and important information Throughout this manual and on the product itself you will find safety alerts and helpful information...

Page 4: ...with cap or net Hot Humid Weather Heavy protective clothing can increase operator fatigue which may lead to heat stroke Schedule heavy work for early morning or late afternoon hours when temperatures...

Page 5: ...juries It is believed that overusing the muscles and tendons of the fingers hands arms and shoulders may cause soreness swelling numbness weakness and extreme pain in those areas Certain repetitive ha...

Page 6: ...sories which have not been tested and approved by ECHO Read and comply with all safety instructions listed in this manual and safety manual Check unit for loose missing nuts bolts and screws Tighten a...

Page 7: ...a new one can be ordered from your ECHO dealer See PARTS ORDERING instructions for specific information Description Hot Decal near muffler P N X505002310 1 2 3 5 6 7 8 9 10 4 P N 89016003360 71 Catego...

Page 8: ...nt 9 HOUSING COVER Covers blade area and activates safety interlock switch when closed Engine will not run if safety switch is not activated 10 THROTTLE POSITION LEVER Pull back to increase engine spe...

Page 9: ...zzle onto straight pipe 4 Turn fan head nozzle clockwise to lock into place vacuum shredding application Install Vacuum Tube and Bag Assembly 1 Turn knob A counter clockwise until hinged housing cover...

Page 10: ...fingers or cause severe injuries Keep hands clothing and loose objects away from all openings Always stop engine disconnect spark plug and make sure all moving parts have come to a complete stop befor...

Page 11: ...fuel in an approved airtight container Store in a well ventilated unoccupied building away from sparks and flames IMPORTANT Stored fuel ages Do not mix more fuel than you expect to use in thirty 30 da...

Page 12: ...ways hold the unit firmly 5 Recoil Starter Place the unit on a flat clear area Firmly grasp throttle grip with left hand and rapidly pull recoil starter handle rope E until en gine fires 5 pulls maxim...

Page 13: ...pull recoil starter handle rope E until en gine fires IMPORTANT Recoil starter Use short pulls only 45 60 cm 18 24 in of rope for starting Do not allow the rope to snap back in Always hold the unit fi...

Page 14: ...Be Smart be a good neighbor B A operating blower WARNING Engine exhaust IS HOT and contains Carbon Monoxide CO a poison gas Breathing CO can cause unconsciousness serious in jury or death Exhaust can...

Page 15: ...Use attachment to vacuum pile shred n vac troubleshooting Problem Cause Remedy Unit runs but doesn t vacuum or has poor suction Elbow or debris bag clogged Check elbow and debris bag and clear as need...

Page 16: ...uctions clearing debris or servicing unit Allow unit to cool before performing service Wear gloves to protect hands from sharp edges and hot surfaces Maintenance COMPONENT SYSTEM MAINTENANCE PROCEDURE...

Page 17: ...the line and install the new filter air filter Level 1 Tools required 25 50 mm 1 2 in cleaning brush Parts required REPOWERTM Air and Filter Kit NOTE Clean daily 1 Close choke Cold Start Position This...

Page 18: ...prevents the heat from leaving Removal of cooling passage blockages or cleaning of cooling fins is considered Normal Maintenance Any failure attributed to lack of maintenance is not warranted Cleaning...

Page 19: ...ged with carbon deposits NOTE When cleaning carbon deposit be careful not to damage the cata lytic element inside muffler 5 Install spark arrestor screen gasket and covers 6 Loosely reassemble engine...

Page 20: ...ylin der exhaust port IMPORTANT Never use a metal tool to scrape carbon from the exhaust port Do not scratch the cylinder or piston when cleaning the exhaust port Do not allow carbon particles to ente...

Page 21: ...clamp and pull vacuum tube from unit 2 Remove accumulated debris from blade and inspect for damage IMPORTANT Do not operate SHRED N VAC if shredder blade is damaged or broken Return unit to Echo Deale...

Page 22: ...quired None NOTE Every unit is run at the factory and the carburetor is set in compli ance with emission regulations Carburetor adjustments other than idle speed must be performed by an authorized ECH...

Page 23: ...a c h t i w d e r e v o C l e u f h t i w d e l u o F e v i t c e f e d g u l P n i 6 2 0 0 m m 5 6 o t t s u j d A e c a l p e r r o n a e l C e c a l p e r r o n a e l C g u l p e c a l p e R s n u...

Page 24: ...n the STOP position 3 Remove accumulation of grease oil dirt and debris from exterior of unit 4 Perform all periodic lubrication and services that are required 5 Tighten all screws and nuts 6 Drain th...

Page 25: ...or spark arrestor muffler with catalyst Fuel Mixed Gasoline and Two stroke Oil Fuel Oil Ratio 50 1 Power Blend X TM ISO L EGD ISO CD 13738 and J A S O M345 FC FD two stroke air cooled engine oil Gaso...

Page 26: ...come producing use will be covered by this limited warranty for five 5 years from date of purchase EXCEPTIONS For two stroke engine powered products the electronic ignition module flexible drive cable...

Page 27: ...ncorrect storage procedures stale fuel including failure to provide or perform required maintenance services as prescribed in the operator s manual Preventative maintenance as outlined in the operator...

Page 28: ...ned built and equipped to conform with applicable EPA and C A R B emissions standards and that your equipment SORE is free from defects in material and workmanship that would cause it to fail to confo...

Page 29: ...29 Shred N Vac Operator s Manual notes...

Page 30: ...30 notes...

Page 31: ...31 Shred N Vac Operator s Manual notes...

Page 32: ...presenting your unit for Warranty service repairs proof of purchase is required echo consumer product support If you require assistance or have questions concerning the applica tion operation or maint...

Reviews: