background image

Echoflex Installation Guide

Dual Tech Ceiling-mount Vacancy Sensor

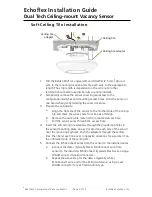
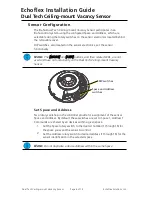
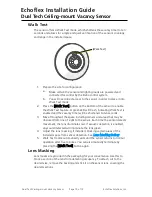
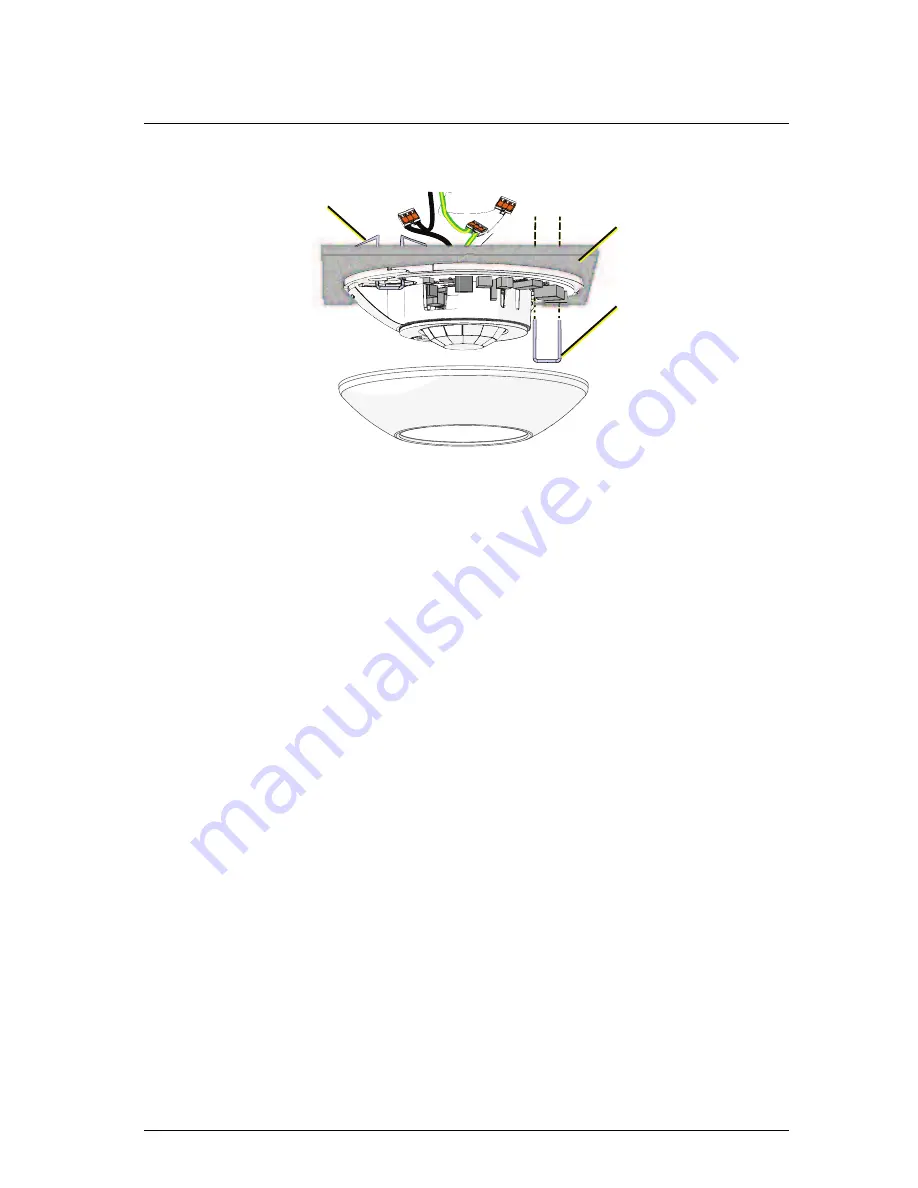
Soft Ceiling Tile Installation

Ceiling tile

adapter

Ceiling tile

Ceiling tile adapter

1.

Pull the Belden 8471 (or equivalent) and 14 AWG (2.5 mm

2

) ground

wire to the mounting location and strip each wire to the appropriate
length. The strip length is dependant on the wire nut or other
termination connector used (wire nuts are not provided).

2.

Temporarily remove the sensor cover to gain access to the
configuration switches and mounting access holes. Hold the sensor in
one hand while gently twisting the cover clockwise.

3.

Prepare the ceiling tile.

a.

Align the flat side of the sensor to the finished side of the ceiling
tile and mark the access hole for wire pass-through.

b.

Remove the ceiling tile material from marked access hole.

c.

Pull the sensor wires through the access hole.

4.

Insert the soft ceiling tile adapters through the provided pinholes in
the sensor mounting plate, one set located on each side of the sensor
near the mounting keyholes. Push the adapters through the ceiling
tiles, then bend each tine over in opposite directions for a secure fit on
the unfinished side of the ceiling tile.

5.

Connect the EchoConnect wires from the sensor to the installed wires.

a.

Connect the data - (typically black) EchoConnect wire from
sensor to the incoming EchoConnect (typically black) wire using a
WAGO wire termination connector.

b.

Repeat the above step for the data + (typically white)
EchoConnect wire and for the ESD ground wire, using a new
WAGO connector for each termination type.

Dual Tech Ceiling-mount Vacancy Sensor

Page 5 of 12

Echoflex Solutions, Inc.

Summary of Contents for Elaho Dual Tech Ceiling-mount Occupancy Sensor

Page 1: ...ctionality upon detection of vacancy The ceiling mount sensor offers 360 degree coverage with optimized lens options to accommodate small and large spaces The sensor is available in a white or black finish Small Room Lens coverage 452 ft 2 at 8 ft 42 m 2 at 2 4 m 804 ft 2 at 10 ft 74 3 m2 at 3 m Large Room Lens coverage 1 809 ft 2 at 8 ft 168 m 2 at 2 4 m 3 019 ft 2 at 10 ft 280 m 2 at 3 m Field i...

Page 2: ...ial attention to the installation environment When operating in PIR only modes the sensor must have an unobstructed view of the room Do not mount behind or near tall cabinets shelves hanging light fixtures etc Do not install the sensor within eight feet from an HVAC airflow duct vent Install the sensor where it cannot easily sense movement in areas outside of the intended space such as hallways gl...

Page 3: ... devices be grounded for ESD protection Pull an additional 14 AWG 2 5 mm2 wire for grounding when control wires are not installed in grounded metal conduit Note When using Category 5 or equivalent cable on the EchoConnect communication bus please note the following Cat5 wiring must be terminated using EchoConnect Cat5 Termination Kit and must be installed using a bus topology Refer to the installa...

Page 4: ... location junction box or finished surface and strip each wire 3 8 9 10 mm 2 Temporarily remove the sensor cover to gain access to the configuration switches and mounting access holes Hold the sensor in one hand while gently twisting the cover clockwise 3 Connect the EchoConnect wires from the sensor to the installed wires a Connect the data typically black EchoConnect wire from sensor to the inco...

Page 5: ... hole for wire pass through b Remove the ceiling tile material from marked access hole c Pull the sensor wires through the access hole 4 Insert the soft ceiling tile adapters through the provided pinholes in the sensor mounting plate one set located on each side of the sensor near the mounting keyholes Push the adapters through the ceiling tiles then bend each tine over in opposite directions for ...

Page 6: ...unctionality on the Dual Tech Ceiling mount Vacancy Sensor DIP switches Space and Address switches Set Space and Address Two rotary switches on the controller provide for assignment of the sensor Space and Address By default these switches are set to Space 1 Address 1 Commands are shared by all devices within a given space 1 Set the Space rotary switch to the desired number 1 through 16 for the sp...

Page 7: ...re ignored Instead the settings made by the EchoAccess Mobile App are used 3 and 4 Vacancy Timeout 5 min Switches 3 and 4 are Off 15 min Switch 3 is Off and Switch 4 is On default 30 min Switch 3 is On and Switch 4 is Off Auto Both switches are On 5 Detection LEDs When set to On default the occupancy detection LEDs illuminate when movement is detected When set to Off the occupancy detection LEDs a...

Page 8: ...meout When the vacancy timeout in the space has only been reset by acoustic detection for 60 minutes acoustic detection is disabled until the next PIR detection event PIR only Detection When acoustic detection is disabled DIP switch 6 set to On the following logic is used When the space is vacant only manual control can switch the state to occupied When the space is occupied PIR detection and manu...

Page 9: ...ns If the sensor does not detect occupancy again during the vacancy timeout period the lights turn off and a 30 second grace period begins Grace Period The sensor features a 30 second grace period after a vacancy timeout occurs During this grace period if the sensor detects occupancy it will turn on or restore the previous lighting condition Auto Vacancy Timeout The Auto vacancy timeout setting va...

Page 10: ...n seconds 3 Move throughout the space including corners and areas that may be obscured from line of sight to the sensor Each time the sensor detects movement the lens illuminates red If acoustic detection is enabled any sound detected will illuminate the lens green 4 Adjust the lens masking if installed blocking certain areas of the installed space from sensor detection See Lens Masking below 5 Wa...

Page 11: ...m 10 ft 3 0 m 10 ft 4 6 m 15 ft 4 6 m 15 ft 6 1 m 20 ft 6 1 m 20 ft 8 ft 2 4 m 10 ft 3 0 m 12 ft 3 7 m Large Room Lens Side View 0 8 ft 2 4 m 10 ft 3 0 m 12 ft 3 7 m 0 3 0 m 10 ft 3 0 m 10 ft 6 1 m 20 ft 6 1 m 20 ft 9 1 m 30 ft 9 1 m 30 ft 12 2 m 40 ft 12 2 m 40 ft Dual Tech Ceiling mount Vacancy Sensor Page 11 of 12 Echoflex Solutions Inc ...

Page 12: ...Echoflex Installation Guide Dual Tech Ceiling mount Vacancy Sensor Dual Tech Ceiling mount Vacancy Sensor Page 12 of 12 Echoflex Solutions Inc ...

Reviews: