

Echoflex Installation Guide
Dual Tech Ceiling-mount Vacancy Sensor
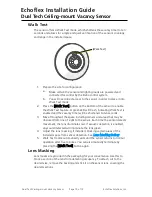
Power Up and Test
Power Up
All EchoConnect terminations in the system must be made before applying
power to the system and sensor. When the sensor is powered up, the PIR and
acoustic detection LEDs illuminate for one minute for calibration and warm-
up, then return to normal operation according to the configuration.
Both the PIR and acoustic detection features of the sensor will automatically
adjust sensitivity threshold to eliminate nuisance tripping. During this time,
sensor configuration is not allowed and no events are triggered.
Dual Technology
When both PIR and acoustic detection are used, the following logic is used:
•
When the space is vacant, only manual control can switch the state to
occupied.
•
When the space is occupied, PIR, acoustic detection, and manual
control can reset the vacancy timeout.
•
When the vacancy timeout in the space has only been reset by acoustic
detection for 60 minutes, acoustic detection is disabled until the next
PIR detection event.
PIR (only) Detection
When acoustic detection is disabled (DIP switch 6 set to On), the following
logic is used:
•
When the space is vacant, only manual control can switch the state to
occupied.
•
When the space is occupied, PIR detection and manual control can
reset the vacancy timeout.
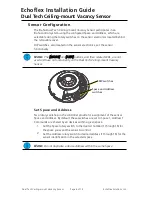
Basic Configuration
When the sensor is in Basic configuration mode (DIP switch 2 set to Off), the
sensor will activate a Space Off command when vacancy is detected.
Custom Configuration Mode
When functionality other than Space Off is required, place the sensor in
Custom configuration mode (DIP switch 2 set to On). Customization of the
sensor and all actions are configured using the ElahoAccess Mobile App.
For more detailed information about custom configuration options available
using ElahoAccess, see the ElahoAccess Mobile App integrated help system.
Dual Tech Ceiling-mount Vacancy Sensor
Page 8 of 12
Echoflex Solutions, Inc.


