


12
FLS 2D Instruction Manual
Some Guidance on Use
The Digital Depth Display
This ADDITIONAL information (in the bottom left-hand corner) is the calculated
depth from the angle data that is received and processed by the FLS. Unlike older
FLS models, the depth can now be calculated regardless of the selected range and
therefore can be useful for the user in selecting the correct range. The depth relies on
a good quality sonar signal and care should be taken in poor sonar conditions (e.g.
turbulence from passing boats or another sounder running at the same frequency
causing excessive noise). Care has been taken to prevent false depth readings in noisy
sonar conditions but cannot be guaranteed in all conditions.
Practice
When learning to interpret the screen practise with clear targets, e.g. a quay wall. Try
moving around an obstruction very gently to see what the maximum range is that
different targets become visible.
!!!!! WARNING !!!!!
If approaching a target select a range longer than you think you need. Most people
(including us!) seriously underestimate distances to quays, buoys, walls etc.
Note that going astern can push turbulence past the transducer reducing sensitivity or
sometimes obliterating all the picture so take care! Manoeuvre with the minimum
use of astern (reverse) power, especially with the propeller (on twin screw vessels) on
the side of the transducer.
Turbulence from other vessels, especially in shallow water can also adversely affect
performance. Algae (normally in spring), Plankton and pollution can all show up as
‘noise’ on the LCD screen.
Operating the FLS 2D at Speed
Ultrasonic signals travel well through solids and liquids but are greatly attenuated in
air. It follows that a stream of turbulence and air bubbles will limit the performance
of the FLS system, or any depth system for that matter. However, if a place can be
found on the hull where there is a clear flow of water, then good results can be
obtained even at speed.
13
FLS 2D Instruction Manual
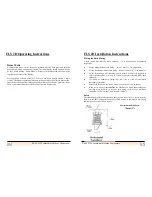
Transducer Installation
The choice of transducer position will have a major effect on final performance so
please consider carefully all factors and if in any doubt, telephone the factory.
Motor Boats
On a small planing hull fit the transducer as far aft as reasonably possible. On a stern
drive boat (inboard or outboard) typically fit just in front of the engine(s). On a shaft
driven boat (not V drive) forward of the shaft log or stern gland, but behind the
gearbox. On larger vessels fit further forward to increase effective range.
Keep inboard of the lower spray rail if possible.
Do not fit downstream of any other through hull fittings (for example intakes, log,
toilet sea cocks etc) and choose a location with good access for withdrawing the
transducer for cleaning.
The transducer should ideally be vertical in the fore and aft plane at running trim. If it
leans forward the seabed will appear to slope up, and if it rakes aft then a degree of
surface clutter may show. Some heel to port or starboard is acceptable, to a maximum
of 5 degrees.
Avoid the temptation to fit the transducer too far forward as it may then be out of
solid water when at speed or pitching. Also remember the transducer looks down as
well as ahead, so when manoeuvring in shallow waters you may wish to see there is
water for the propellers and rudders.
Sonar cannot see around corners so before installing stand under the boat with your
head near the proposed position and check that you can see from your toes up to
above the horizontal ahead. If the boat has a full or deep forefoot and is shallow aft a
forward mounted transducer maybe necessary.
FLS 2D Installation Instructions