background image

Issue: D2600-B-1A

© 2001 EchoStar International Corporation - The Netherlands

We encourage you to express your thoughts on this user manual.

Please send your comments to:

EchoStar International Corporation

Technical Publications Department

Schuilenburglaan 5a

7604 BJ Almelo

The Netherlands

Summary of Contents for D-2600 IP Viaccess

Page 1: ...USER MANUAL D 2600 IP Viaccess Digital Satellite Receiver Printed on recycled paper ...

Page 2: ...nal Corporation The Netherlands We encourage you to express your thoughts on this user manual Please send your comments to EchoStar International Corporation Technical Publications Department Schuilenburglaan 5a 7604 BJ Almelo The Netherlands ...

Page 3: ...E MODULES AND SMART CARDS For pay services please only use Common Interface CI modules and the related smart cards which are approved by the service provider of the encrypted program you want to receive Only this will enable the receiver to work properly Anomalies can occur when unapproved CI modules and or smart cards are used EchoStar can not and will not accept any responsibility for the perfor...

Page 4: ...al has been provided pursuant to an agreement containing restrictions on its use This user manual is also covered by Federal Copyright Law No part of this user manual may be copied distributed transmitted stored in a retrieval system or translated into any human or computer language in any form or by any other means electronically mechanically magnetically manually or otherwise or disclosure to th...

Page 5: ...MENT 2 2 6 TO SETUP THE RECEIVER 2 2 Installation 1 CONNECT YOUR EQUIPMENT 3 1 2 CONNECT A DISH 3 2 3 TO SETUP YOUR RECEIVER FOR THE FIRST TIME 3 4 Familiarization 1 THE RECEIVER 4 1 2 THE ECHONAV INSTALLATION MENU 4 4 3 THE ECHONAV MODE AND SELECTION MENUS 4 14 4 THE ELECTRONIC PROGRAM GUIDE EPG 4 16 5 THE INFOBANNER AND POP UP MENUS 4 18 Operation 1 TO NAVIGATE THROUGH THE MENUS 5 1 2 USE THE FA...

Page 6: ...pendix 1 1 LNB CONFIGURATION MATRIX A1 1 2 LNBF CONFIGURATION MATRIX A1 1 3 USER DEFINED LNB F MATRIX A1 1 Appendix 2 1 INTRODUCTION A2 1 2 THE BATTERIES A2 1 3 THE KEYS A2 1 4 PROGRAM THE TV AND VCR KEY A2 3 5 SPECIAL SETUP FUNCTIONS A2 5 6 SPECIAL FUNCTIONS A2 6 7 TO SOLVE A PROBLEM A2 7 8 EQUIPMENT CODES A2 8 ...

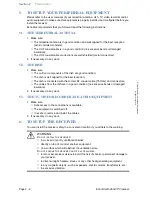
Page 7: ... can cause injury to persons and pets e g to stumble over eat the cable Do not install the receiver in a closed or poorly ventilated cabinet directly on top of or under another equipment on a surface which will obstruct the ventilation slots Do not expose the receiver and it s accessories to rain or excessive moisture to avoid the risk of shock or permanent damage to your receiver to direct sunlig...

Page 8: ...ation The Dolby Digital logo This logo tells you that this receiver is compliant with the Dolby Digital standard The Digital Video Broadcasting logo This logo tells you that this receiver is compliant with the DVB standards as registered under registration number 2345 The Viaccess logo This logo tells you that this receiver has an embedded Viaccess smart card reader The required smart card has to ...

Page 9: ...urred during shipment If you find any damage stop to unpack the box and call the retail seller where you bought the receiver To help avoid possible damage to the receiver s electronics allow the receiver to adapt to the ambient temperature and humidity level This to avoid condensation caused by a sudden change in temperature e g from a hot car into a cool room 3 THE CONTENTS OF THE BOX The box con...

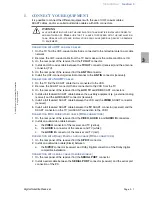
Page 10: ... dish is well aligned for the best reception The dish is connected with the correct RF coaxial cable 75 Ohm and connectors The cables from the dish are in a good condition no excessive bends or damaged insulation 2 If necessary do any work 5 3 THE TV VIDEO RECORDER AND AUDIO EQUIPMENT 1 Make sure Safe access to the connections is available The equipment is switched off It is safe to remove and ins...

Page 11: ...al analog receiver and the AUX SCART connector receiver 5 Install a full featured SCART cable between the VCR and the VIDEO SCART connector receiver 6 Install a full featured SCART cable between the TV SCART connector receiver and the SCART connector on the TV old SCART connection to the VCR CONNECTION WITH AUDIO VIDEO CABLE RCA CONNECTORS 1 On the rear panel of the receiver find the VIDEO AUDIO L...

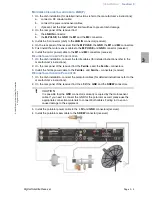
Page 12: ...NB IN digital and the IF OUT connectors FIXED DISH INSTALLATION WITH LNB F 3 Install the F connector dish to the LNB IN connector receiver FIXED DISH INSTALLATION WITH DISEQC SWITCH 3 Install the F connector DiSEqC switch to the LNB IN connector receiver WARNING ALL EQUIPMENT INVOLVED IN THE INSTALLATION TASK MUST BE INSTALLED CORRECTLY AND SWITCHED OFF MAKE SURE THAT IT IS SAFE TO PROCEED WITH TH...

Page 13: ... M2 connectors receiver DISH INSTALLATION WITH FERRITE FEED 1 On the dish installation connect the ferrite cables for detailed instructions refer to the manufacturer s instructions 2 On the rear panel of the receiver find the Ferrite and the Ferrite connectors 3 Install the ferrite power cable to the Ferrite and Ferrite connectors receiver DISH INSTALLATION WITH POLAROTOR 1 On the dish installatio...

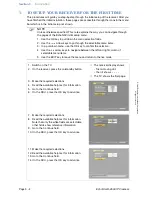
Page 14: ...he OK key to confirm the selection 4 Use the arrow keys to navigate between the left and right column of selectable menu items 5 Use the EXIT key to leave the menu and return to the live mode 1 Switch on the TV 2 On the receiver press the on standby button The receiver display shows first a moving dot then it shows The TV shows the first page 3 Make the required selections 4 Read the available hel...

Page 15: ...ifferent configurations The configurations are Fixed Motorized and SMATV Fixed means set up a single dish or multiple dishes with DiSEqC1 4 switch Motorized means set up a moveable dish motor actuator by positioner SMATV means set up for television distribution cable network in buildings 21 Make the required selections 22 Read the available help text for information Note that only the white fields...

Page 16: ...nce information 24 Go to the Autosat field 25 On the RCU press the OK key to advance 26 On the RCU a press the key to set the East limit b at the motor error press the key once c press the OK key 27 On the RCU press the OK key 28 Select a Eastern satellite which you can receive 29 When in the location field a press and hold the key and watch the signal indicator for an indication b in the signal i...

Page 17: ...UTION On the motorized dish set the physical East and West limit switches first Failing to do so might cause damage to your motorized dish installation or other properties 22 Make the required selections 23 Read the available help text for information Note that only the white fields are selectable other fields show reference information 24 Go to the Set Limits field 25 On the RCU press the OK key ...

Page 18: ...t b the search completed popup menu appears 35 On the RCU press the OK key to end the initial setup procedure 22 Make the required selections After the initial installation it is possible to add more symbol rates Refer to section Maintenance for detailed instructions 23 Read the available help text for information 24 Go to the Search Channels field 25 On the RCU press the OK key to advance 26 Wait...

Page 19: ... the software guides you through the required setup menu to allow for an easy and reliable installation setup of the receiver FEATURE HIGHLIGHTS EchoNAV Multi Lingual advanced User Interface 12 languages Embedded Viaccess 1 1 2 Common Interface Slots 7 day EPG 5 000 Digital Channels 100 Satellites 1 300 Transponders 8 Favorite Channel Lists for TV and 8 for radio Powerful Channel Sorting and Group...

Page 20: ...tor spring clip for the connection to the terminal of a magnetic polarotor Ferrite The TV connector SCART for the connection of a TV with the use of a fully featured SCART cable The FERRITE connector spring clip for the connection to the terminal of a magnetic polarotor Ferrite The S PDIF connector RCA for the connection of Dolby Digital AC 3 compatible audio equipment The M1 connector spring clip...

Page 21: ...N To select a favorites list PLAY Not used for Sat mode PAUSE Not used for Sat mode ALT AUDIO To choose a language ALT SUBTITLE To choose a subtitle RECORD Not used for Sat mode SAT Not used for Sat mode SAT To control the receiver NUMBER KEYS To enter numerical settings To type in a channel number FAV To go to the favorite list of the actual mode MUTE To blank out the volume Recall To go to the p...

Page 22: ...NAV installation menu has different main menus that give you access to the different sub menus The main menus are The guided initial setup menu which is only accessible after the first time you switch the receiver on and after every manually initiated factory reset The User Preferences menu the installation setup menu and the CI menu are accessible at any time NAVIGATION A highlighted button shows...

Page 23: ...stem page The main menus are divided in sub menus selection pages and option fields The main menu buttons are shown at the right hand side of the menu bar The different sub menu buttons are shown on the left hand side of the menu bar The selection pages with the option fields are accessible after you have selected a sub menu Every menu sub menu and selection page has one or more help lines to assi...

Page 24: ...s you can customize Aspect ratio To set the screen size of the TV Banner time out To set the view time for the InfoBanner Dolby Digital To tell the receiver that it is connected to a Dolby Digital amplifier or not Menu Language To set the language you want to use in the menus Main audio language To set language for programs with bi lingual audio 2nd audio language To set language for programs with...

Page 25: ...default or personal PIN code New password To type in your new PIN code numbers only Verify password To type in your New password again Now the receiver verifies the new password to make sure that you typed in the new password correctly Selected time zone To set the time zone where you are Year To set the actual year Month To set the actual month Date To set the actual date Day To set the actual da...

Page 26: ...o the position of the searched satellites is shown This main menu has different sub menus that give access to the pages where you can customize the settings to match your personal requirements Note that the sub menus are dynamic which means that they change with the selections you make The installation setup menu always comes in view with the system setup sub menu In the menu bar the sub menus are...

Page 27: ...ou use Method motorized only To set the scan method AutoSat automatically calculate the satellite positions from reference positions Manual enter the satellites by manual search AutoSat motorized AutoSat only To confirm the selections you made and advance to the AutoSat setup page AutoSat only Set Limits motorized manual only To confirm the selections you made and advance to the Set Limits page Sa...

Page 28: ...tch type which you use to control the dish installation LNB1 To set the LNB type s you use Satellite To set the satellite you want to scan for the LNB Check Signal To confirm the selections you made and advance to the Check Signal page Satellite To set the satellite you want to scan for the LNB Search mode To set a specific search mode All FTA IF TP network or update Longitude To view the satellit...

Page 29: ...r defined LNB Low Frequency To enter the low frequency of the user LNB High Frequency To enter the high frequency of the user LNB Polarity Control To select the device that controls the polarity Band Control To set the control signal for high or low band selection Ku C Control To set the control signal for the Ku C LNB Store settings To confirm the selection and save the settings Company This fiel...

Page 30: ... over your personal settings All customized data like parental lock and favorites will be replaced with the factory settings Location To select the default or user defined satellite where you want to download from Satellite To set the satellite where you want to download from TP frequency To set the transponder where you want to download from Polarity To set the correct polarity for the transponde...

Page 31: ...ages where you can view the CI module and smart card settings Note that the sub menus are dynamic which means that they change with the selections you make The conditional access information menu always comes in view with the system setup sub menu In the menu bar the sub menus are shown at the right side The available sub menus are shown as icons which become a highlighted button after selection T...

Page 32: ...ou have entered the mode and selection menu you can manipulate the lists through The Mode bar red The List bar green The Edit bar white The Group bar yellow The Sort bar blue TV To switch the receiver in the TV mode and to access the list of TV channels Radio To switch the receiver in the Radio mode and to access the list of Radio channels Lists To switch the receiver in the Lists mode and to acce...

Page 33: ...tions is mode dependent the available options are None No edit option is selected Move To enter the move channel function Add To enter the add channel function Rename To enter the rename channel function Volume To enter the set volume offset function Lock To enter the lock channel function Delete To enter the delete channel function Edit PID To enter the edit PID function Add PID To enter the add ...

Page 34: ...rved timer Zoom to expand or shrink the EPG window as a function of the time slot None No sort option is selected A to Z Sorts a list alphabetically Z to A Sorts a list alphabetically in reverse order Character Shows list with entered character only Word Shows a list that contains the selected word only Scrambled Shows a list of encrypted channels only FTA Shows a list of Free To Air channels only...

Page 35: ...ed program before it really starts or when the receiver is in standby to switch on the receiver If a timer is set on a program that is shown in the EPG the relevant data is already shown in the timer You can change the settings as follows Date to set the start date for the timer Start time to set the start time in hours minutes Stop time to set stop time in hours minutes Period to set the timer on...

Page 36: ... to indicate that there is detailed program information available The additional information bar to show the additional service icons These icons show only if the additional service is available The icons are the icon for teletext the icon for alternate audio the icon for alternate subtitling the icon for Dolby Digital audio the icon for Favorite channel the icon for Parental rating information Th...

Page 37: ... MENUS There are two types of pop up menus Some pop up menus are used to show that the receiver is busy to execute a task Other pop up menus require interaction with the user you have to confirm or deny an earlier given command to complete the task If transmitted you can set per channel your alternate audio and subtitling as shown above ...

Page 38: ...Section 4 Familiarization Page 4 20 EchoStar D 2600 IP Viaccess 2001 EchoStar International Corporation All rights reserved ...

Page 39: ...menu use the OK key to confirm the selection the yellow bar indicates the active selection on the left the green page indicator indicates where you are NOTE In the following procedures we assume that you have switched on the TV and the receiver is in the TV mode 1 On the RCU press the OK key 2 Press the RED key and make the selection 3 Read the available help text for information 4 Select the requ...

Page 40: ...required mode 3 On the RCU press the YELLOW key 4 Read the available help text for information 5 Select the required group option 1 On the RCU press the OK key 2 Select the required mode 3 On the RCU press the BLUE key 4 Read the available help text for information 5 Select the required sort option Note that only for the Character and Word option a keyboard appears 6 When the keyboard appears a us...

Page 41: ...ions are not always available If an option is not presented select Group None and Sort None 1 In the Edit menu select the Move option 2 Read the available help text for information 3 Go to the channel you want to move 4 On the RCU press the OK key Note a red bullet appears behind the selection 5 If you want to undo the selection press the OK key again 6 Move the channel either a use the keys b use...

Page 42: ...ect PIN code 1 In the Edit menu select the LOCK option 2 Read the available help text for information 3 Go to the channel you want to lock 4 On the RCU press the OK key Note a red bullet appears behind the selection 5 If you want to undo the selection press the OK key again 6 Either a press the WHITE key to confirm the lock and end the session or b select the next channel you want to lock 7 You ca...

Page 43: ...ances to the next channel 5 If you want to undo the selection press the OK key again 6 Either a press the WHITE key to confirm the deletion and end the session or b select the next channel you want to delete 1 In the Edit menu select the VOLUME option 2 Read the available help text for information 3 Go to the channel you want to edit 4 On the RCU use the keys to set the volume 5 Either a Press the...

Page 44: ...elect the next channel you want to rename CAUTION You can only hide a channel if you have set the parental lock and the PIN code correctly We recommend that you check if the hide option is set correctly NOTE After you have set a hide onto a channel the installation and the EDIT menu are automatically locked with an installation lock to prevent unauthorized access Now you can only access these func...

Page 45: ... one step to the Sports TV favorite list Note that for each mode a separate number of favorite lists is available 1 In the Edit menu select the HIDE option 2 Read the available help text for information 3 Go to the channel you want to hide 4 On the RCU press the OK key Note a red bullet appears behind the selection 5 If you want to undo the selection press the OK key again 6 Either a press the WHI...

Page 46: ... selection and the cursor advances to the next channel 12 If you want to undo the selection press the OK key again 13 Press the WHITE key to end the session NOTE As an example this procedure details the instructions on how to add a group of channels to a favorite list In this example we add a complete network to the My TV Channels favorite list 1 On the RCU press the OK key 2 Select the required m...

Page 47: ...oBanner a heart symbol appeared to indicate that this channel is a favorite channel 1 On the RCU press the OK key 2 Press the RED key and select Lists 3 Press the GREEN key and select the category 4 In the Edit bar select the RENAME option 5 Read the available help text for information 6 Go to the favorite list you want to rename 7 On the RCU press the OK key 8 When the keyboard appears a use the ...

Page 48: ... the now next infor mation or sometimes nothing at all EchoStar has no influence on this matter Make sure the local time is set otherwise you can not view EPG information because it needs the correct time Refer to the Local Time menu 1 Use the EPG key to access the main EPG menu 2 Allow the receiver to collect the EPG information for the selected channel 3 Read the available help text for informat...

Page 49: ...re right of the red line in the EPG window 3 If no EPG data is available select the correct channel 4 On the RCU press the YELLOW key 5 Read the available help text for information 6 Select the required timer 7 When the timer appears if necessary 8 Change the date a use the key to go to the date b read the available help text for information c press the OK key to change the date d in the calendar ...

Page 50: ...e the timer a use the key to go to the Store Settings b read the available help text for information c press the OK key to confirm the settings 14 Note the clock that appeared in your program 15 Do not forget to program also your VCR If the timer screen does not disappear you have set a timer in the past or for a running program Revise either date start or stop time to a time in the future 1 On th...

Page 51: ...ween the detailed program information and the InfoBanner 4 On the RCU press the EXIT key to remove the InfoBanner from the screen only in TV mode 1 On the InfoBanner find the alt audio symbol 2 On the RCU press the key 3 In the Alt Audio pop up menu select the required alternate audio Note that alternate audio information is provided by the service provider 4 On the RCU press the key twice 1 On th...

Page 52: ... to select the menu 2 Press the OK key and make the selections 3 Read the available help text for information 4 On the RCU a press the MENU key to save the settings b press the EXIT key to leave the menu 1 On the RCU press a the MENU key b the key to select the menu c the OK key to select the menu 2 Press the OK key and make the selections 3 Read the available help text for information 4 On the RC...

Page 53: ...e key to select the menu c the OK key to select the menu 2 Enter the correct PIN code as requested 3 Read the available help text for information 4 Make the selections 5 On the RCU a press the MENU key to save the settings b press the EXIT key to leave the menu 1 Select the parental Lock menu 2 Enter the correct PIN code as requested 3 Select the Change PIN Code bar 4 On the RCU press the OK key 5...

Page 54: ...e RCU press a the MENU key b the key to select the menu c the OK key to select the menu 2 Press the OK key and make the selections 3 Read the available help text for information 4 On the RCU a press the MENU key to save the settings b press the EXIT key to leave the menu 1 On the RCU press a the MENU key b the key to select the menu c the OK key to select the menu 2 Press the OK key and make the s...

Page 55: ... please refer to the section Operation 2 SOFTWARE MAINTENANCE 2 1 TO CHANGE THE SETUP OF THE RECEIVER WARNING RISK OF ELECTRICAL SHOCK REMOVE THE MAINS PLUG FROM THE POWER SUPPLY SOCKET BEFORE YOU CLEAN THE RECEIVER MAKE SURE IF USED CLEANING AGENTS CANNOT GET IN THE RECEIVER NOTE Make sure the local time is set correctly otherwise you can not view and use the EPG information because the EPG and t...

Page 56: ...the OK key 12 Wait for the search to complete a the receiver display shows a moving dot b the search completed popup menu appears 13 On the RCU a press the OK key to save the settings b press the EXIT key to leave the menu 1 On the RCU press a the MENU key b the key to select the menu c the OK key to select the menu 2 Press the OK key and make the selections 3 Read the available help text for info...

Page 57: ... channel indication NOTE EchoStar offers on a regular basis software updates via the satellite and the EchoStar website If you have trouble to get a download with the latest software version please ask your retail seller or dealer for assistance NOTE Be sure if you select Memory Erase because all your personal settings will be deleted and replaced with the factory settings Some of the personal set...

Page 58: ...ation 1 On the RCU press a the OK key b Select Mode TV c Select List All Channels d Select Group None e Select Sort None f Select Edit Add SAT 2 On the RCU press the OK key 3 Use the on screen keyboard to enter the name of the satellite 4 When the keyboard appears a use the arrow keys to navigate b press OK to accept the character c select the button to get lower case characters and numbers d sele...

Page 59: ...e that you have sufficient signal strength and quality 15 After you found the location press the OK key to confirm the position 16 Go to the Search Channels field 17 On the RCU press the OK key to advance 18 Wait for the search to complete a the receiver display shows a moving dot b the search completed popup menu appears 19 On the RCU a press the OK key to end the procedure b press the EXIT key t...

Page 60: ...9 On the RCU press the OK key to advance 10 Wait for the search to complete a the receiver display shows a moving dot b the search completed popup menu appears 11 On the RCU a press the OK key to advance b press the white key to end the procedure c press the EXIT key to return to live video 1 Select a channel of the transponder to which you want to add a PID 2 On the RCU press a the OK key b Selec...

Page 61: ... of reusable materials and to minimize the amount of materials to be disposed of Please inform yourself on local regulations on disposal of your equipment 6 Enter the required settings 7 Read the available help text for information 8 Monitor the signal indicator and make sure that you have sufficient signal strength and quality 9 Go to the Store Settings field 10 On the RCU a press the OK key to s...

Page 62: ...Page 6 8 EchoStar D 2600 IP Viaccess 2001 EchoStar International Corporation All rights reserved ...

Page 63: ... What to do 1 The EPG is empty You have selected an empty favorites list Select another favorites list The selected program supports no EPG There is no solution for this the data is supplied by the service provider and beyond control The local time is not correct In the Local Time menu set the correct time 2 The EPG shows little grey balloons without text The time scale of the EPG is to big Use th...

Page 64: ...AC 3 sound to my other equipment The equipment is connected to the receiver with a RCA or SCART cable only Connect the S P DIF connector of the receiver to the Dolby digital input of the receiving equipment 5 I cannot view or listen to a scrambled channel The CI module smart card is not valid Insert for this service a valid CI module smart card The CI module smart card is not correctly inserted In...

Page 65: ...eo channel on your TV Refer to the user manual of the TV for instructions On the receiver In the TV system menu select the correct channel and PAL setting Use another method to connect the receiver 2 My television does not receive any signal from the receiver You did not select the correct A V channel on your TV Select the correct A V channel on your TV You did not use a correct SCART cable Use on...

Page 66: ...ficiently shielded and correctly finished cables 7 During initial setup of the receiver no channels are found You did not select the correct LNB F On the receiver in the installation setup menu select the correct LNB F When installed you have selected the incorrect switch type or port On the receiver in the installation setup menu make the correct selections You have selected the incorrect satelli...

Page 67: ...mory Access PIN Personal Identification Number DVB Digital Video Broadcasting PWM Pulse Width Modulation DVR Digital Video Recorder QPSK Quadrature Phase Shift Key EL East Limit RCA Connector type also Cinch connector EPG Electronic Program Guide RCU Remote Control Unit ºF Fahrenheit RF Radio Frequency FTA Free To Air RND RaNDom Gb Gigabit S PDIF Sony Philips Digital Interface GB GigaByte SAT SATe...

Page 68: ... to switch between different LNBs or dishes The DiSEqC uses the 22 kHz signal to control the switching device DVB A broadcast standard for digital radio and television using MPEG 2 compression DVB is being supported by all European manufacturers and broadcasters EPG A electronic program guide that comes with the broadcast of a particular satellite Note that every station fills the EPG differently ...

Page 69: ...entifier PID present which tells the receiver what to do with the received information Satellite receivers use normally four types of PID these are VPID video PID APID audio PID Program Clock Reference PCR PID and data PID EPG information Parental lock A feature which is introduced to give you the possibility to lock or hide several functions of the receiver to prevent unauthorized persons childre...

Page 70: ...ns a smart code and is used to de scramble encrypted broadcasts when placed in a decoder or receiver with a built in decoder SMATV A satellite master antenna TV system is a system which shares the reception resources and is intended for the distribution of TV and radio signals to the user in one ore more buildings Stream The signal which is received from the transponder which contains the together...

Page 71: ... erroneous code Network In this mode the built in database or information from the received stream is used to search for the transponders that are included with the currently received network The digital channels that belong to this network are searched for and added to the all channel list TP In this mode the built in database or information from the received stream is used to search for or scan ...

Page 72: ...Page 8 6 EchoStar D 2600 IP Viaccess 2001 EchoStar International Corporation All rights reserved ...

Page 73: ...ed program information 5 10 5 13 disposal 6 7 dolby digital 4 18 dvb 1 II E echonav user interface 4 4 edit 4 15 edit a list 5 3 edit pid 4 15 edit tp 4 15 el wl indicator 4 8 epg 3 5 4 16 5 10 7 1 F factory reset 4 12 6 3 favorite 4 18 favorite lists 5 7 features 4 1 ferrite 3 3 4 2 8 2 fixed dish setup 4 10 fixed installations 3 5 fta 4 16 G green key 5 2 group 4 15 group a list 5 2 H hide a cha...

Page 74: ... alternate audio 5 13 select the subtitle language 5 13 set a timer 5 11 set the channel volume 5 5 set the local date and time 5 16 set the tv system 5 16 setup after memory erase 3 4 signal 4 8 4 10 signal indicator 4 8 smart card information 4 13 6 4 smatv 3 8 software update 6 3 software version 4 11 sort 4 16 sort a list 5 2 start time 5 11 stb 8 1 stop time 5 12 subtitling 4 19 5 13 symbols ...

Page 75: ...r own LNB F You can use the list below to note the settings LNB TYPE LO Frequency LO Selection 13 18V 0 22kHz H V H V Standard 10 000 13 18V 18 18 0 0 Enhanced 9 750 13 18V 18 18 0 0 Quattro 9 750 13V 13 13 0 0 10 750 18V 18 18 0 0 C Band 5 150 13 18V 18 18 0 0 DBS 10 750 18V 18 18 0 0 TELECOM 11 475 18V 18 18 0 0 LNBF TYPE LO Frequency LO Selection 13 18V 0 22kHz H V H V Standard 10 000 13 18V 18...

Page 76: ...Appendix 1 LNB F Configuration matrix Page A1 2 EchoStar D 2600 IP Viaccess 2001 EchoStar International Corporation All rights reserved ...

Page 77: ... _ _ _ _ _ 2 THE BATTERIES The RCU is powered by two 1 5 Volt Alkaline batteries type AA LR6 We recommend that you do not use rechargeable batteries At battery change the RCU keeps the programmed information for a maximum of 15 minutes 1 Remove the battery cover 2 Find the battery and marks 3 Insert the batteries accordingly the and marks 4 Install the battery cover 5 Press the SAT key once Make s...

Page 78: ...uster While in a menu this key is mainly used to scroll left right down or left OK key While in a menu this key is mainly used to confirm a selection MENU key This key activates the available on screen menu for the selected equipment EXIT key While in a menu this key is mainly used to exit from a selection Red key If the function is available this key activates the fast text functions fast navigat...

Page 79: ...licable user s guide Fast Forward key In the VCR mode this key is used to wind the video tape fast forward Pause key In the VCR mode this key is used to pause the play back of the video tape Subtitle key If the function is available in TV mode this key is used as white fast text key or menu key Alternate Audio language key If the function is available this key selects audio language choice for the...

Page 80: ...dure 4 2 SETUP WITH USE OF THE SEARCH CODE FEATURE 1 Switch your TV to on and make sure a broadcast is seen 2 On the RCU press the TV key continuously until the indicator stays on 3 Release the TV key and make sure the indicator blinks continuously 4 On the RCU press the on standby key and see that the indicator of the TV key stays on 5 Press the up key once and see if the TV switches off Make sur...

Page 81: ... the indicator blinks continuously 3 Use the numerical keys to enter code 9 9 2 4 Note that the indicator goes on and off and finally stays on 5 Press the VCR key once and note that the indicator goes on and off and finally stays off 6 Now the VCR key is assigned as a TV key 7 Setup the VCR key to control your second TV refer to chapter 4 for detailed instructions 5 2 UNDO THE SETUP OF A SECOND TV...

Page 82: ...es 6 Now the volume control is locked to the TV except for the AUX mode 6 2 RESET VOLUME LOCK PUNCH THROUGH 1 On the RCU press the SAT key continuously until the indicator stays on 2 Release the SAT key and make sure the indicator blinks continuously 3 Use the numerical keys to enter code 9 9 3 4 Press the Volume key once and note that the indicator blinks four times 5 Now the volume control is un...

Page 83: ... the sun blinds or get closer to the device You do not aim sufficiently at the device Aim at the device s display install a RCU extender Batteries are almost empty Insert new batteries 4 Your device code is not listed The device code was not know at the time this manual was created Try the search method 5 The RCU does not execute the commands properly Some codes are quite similar maybe you have ch...

Page 84: ...ries 0222 IR700 0312 LT7500 0465 LT80 0688 LT8700 0454 SR1500 0218 SR200 I P 0713 SR4500 0100 SR5500 0170 8 2 ECHOSTAR KEY ASSIGNMENTS KEY D2500 I P DSB1000 2Ci AD2000 I P DSB2000 SR1500 DSB9800 LT8700 Power Stby Power Stby Power Stby Power Stby Power Stby Power Stby 1 1 1 1 1 1 2 2 2 2 2 2 3 3 3 3 3 3 4 4 4 4 4 4 5 5 5 5 5 5 6 6 6 6 6 6 7 7 7 7 7 7 8 8 8 8 8 8 9 9 9 9 9 9 0 0 0 0 0 0 TV Radio sel...

Page 85: ...Up cursor Tuning Up Cursor Up Channel Down Channel Down Down cursor Tuning Down Cursor Down Volume Down Volume Down Left cursor Cursor left Left cursor Volume Up Volume Up Right cursor Cursor right Right cursor OK Store OK Store OK Enter store OK Select Info Info Info View Info Cancel Exit Exit E Function key ESC Escape exit VIEW A Function key teletekst B Function key C Function key D Function ke...

Page 86: ...8 9 9 9 9 9 9 0 0 0 0 0 0 TV SAT Radio RADIO SAT FAV MAIN ERASE FAV CANCEL FCH fav list Mute Mute Mute Mute Mute Mute Channel Up Channel Up Channel Up Channel Up Tuning Up Ch Up Channel Down Channel Down Channel Down Channel Down Tuning Down Ch Down Volume Up Volume Up Punch through TV Volume Up Volume Up Volume Up Volume Down Volume Down Punch through TV Volume Down Volume Down Volume Down TV Sel...

Page 87: ... Ok INDEX system info DECODER MASK SCAN ERASE CLAMP 8 3 TELEVISIONS A R Systems 0037 0352 M Electronic 0346 0037 0512 0109 0343 0057 0247 0105 0104 0374 0009 0217 0480 0492 0216 0411 Acura 0009 M Tec 0272 Admiral 0087 0093 0418 0213 0264 Magnadyne 0087 0247 0516 0102 0163 Adyson 0217 0216 Magnafon 0516 0213 0076 0102 0314 0216 Agazi 0264 Magnum 0648 AGB 0516 Mandor 0264 Agef 0087 Manesth 0037 0235...

Page 88: ...stona 0037 0556 0012 0013 MTC 0370 0349 Arthur Martin 0163 0400 Multi Broadcast 0193 ASA 0105 0346 0070 0104 0087 Multistandard 0102 0314 Asberg 0037 0076 Multitech 0217 0349 0009 0216 0247 0102 0314 0486 0370 0037 Asora 0009 Murphy 0104 0216 0072 0163 Asuka 0218 0264 0216 0282 0217 Naiko 0037 Atlantic 0037 0216 0206 0259 0320 Nakimura 0374 0037 Atori 0009 National 0237 Auchan 0163 0400 NEC 0036 0...

Page 89: ...PL 0282 0037 Pael 0216 Brandt 0109 0399 0237 0196 0198 0287 0335 Palladium 0370 0037 0191 0505 0010 0534 0200 0418 0554 0556 0247 0327 0349 0087 0163 0213 0217 0411 Brinkmann 0418 0037 Palsonic 0264 0412 0037 Brionvega 0037 0087 0362 Panama 0009 0217 0264 0216 0037 0247 Britannia 0216 0217 Panasonic 0226 0650 0250 0126 0213 0361 0237 0367 0516 0037 0163 0548 Bruns 0087 Panavision 0037 0411 BSR 016...

Page 90: ...Pye 0037 0556 0012 0013 0087 Cybertron 0218 Pymi 0009 Daewoo 0009 0037 0216 0374 0218 0217 0499 Quadra Vision 0400 Dainichi 0218 0216 Quasar 0247 Dansai 0037 0264 0035 0216 Quelle 0037 0010 0011 0109 0512 0535 0544 0349 0554 0191 0361 0036 0217 0247 0074 0084 0327 0306 0070 0104 0105 0157 0195 0200 0213 0264 0191 Dansette 0412 R Line 0037 Dantax 0370 0486 Radialva 0109 0218 0431 0163 0037 Datsura ...

Page 91: ...556 0012 0057 0303 0544 0349 0519 0394 0352 0336 0259 0323 343 0217 0247 0371 0218 0361 01630668 Euromann 0216 0264 0037 0217 0421 0370 SEG 0217 0264 0009 0247 0036 0102 0362 0163 0314 0037 0216 0668 Europhon 0037 0516 0102 0213 0217 0314 0247 0163 SEI 0087 0102 0010 0163 0516 0544 0349 0213 0294 03140206 0037 Expert 0206 0400 0259 0163 Seleco 0206 0259 0362 0163 0411 Exquisit 0037 Sencora 0009 Fe...

Page 92: ...neral Technic 0009 Stenway 0282 0218 Genexxa 0218 0037 0412 Stern 0206 0259 0163 Germanvox 0213 Strato 0037 0264 0009 Goldline 0337 Sunkai 0294 0355 0321 0455 0218 0235 Goldstar 0037 0370 0009 0377 0217 0247 0216 0431 0163 0361 Sunstar 0371 0037 0009 Goodmans 0036 0072 0037 0009 0264 0516 0179 0374 0487 0371 0499 0556 0343 0235 0035 0480 0217 Sunwood 0037 0009 Gorenje 0370 0421 SUperla 0516 0216 G...

Page 93: ...hi 0217 0216 Tensai 0104 0218 0037 0217 0294 0320 0009 0105 0374 0371 0377 0247 Hyper 0009 0216 0217 0247 Tenson 0320 Hypersonic 0361 Texet 0217 0374 0009 Hypson 0037 0264 0217 0282 0455 0400 Thomson 0287 0399 0109 0471 0335 0196 0198 0237 0343 0037 0625 Iberia 0037 Thorn 0193 0073 0190 0238 0192 0074 0084 0499 0037 0104 0335 0512 0359 0272 0374 ICE 0264 0217 0037 0371 0218 0216 0009 Tokai 0072 00...

Page 94: ...102 0314 0610 Visiola 0216 KB Aristocrat 0163 Vision 0037 0320 Kendo 0362 0235 0247 0102 0037 0428 0370 0411 0610 Vistar 0206 0361 Kennedy 0206 0213 0163 0435 Vortec 0037 Kingsley 0216 Voxson 0087 0076 0037 0418 Kneissel 0435 0259 0292 0370 0238 0037 0411 Waltham 0217 0356 0418 0287 0037 Kolster 0037 Watson 0037 0320 0163 0218 0213 0579 0519 0394 Konka 0218 0371 Watt Radio 0213 0102 0544 0349 0163...

Page 95: ... 0072 0322 Nikkai 0020 0072 0278 Ansonic 0004 Nokia 0104 0106 0315 0041 0278 0046 0344 0240 0048 0042 0081 Aristona 0081 Nordmende 0041 0297 0384 0320 0321 0187 0207 0494 0528 ASA 0037 0081 Oceanic 0000 0048 0106 0081 0104 0041 0046 Asuka 0072 0037 0081 0000 0038 Okano 0315 0209 0348 0072 0322 0278 Audiosonic 0278 Orion 0209 0004 0208 0295 0352 0348 0333 0334 Audioton 0020 Orson 0000 Baird 0106 02...

Page 96: ...043 0106 0104 Dual 0041 0081 0278 0000 Samsung 0240 0432 Dumont 0000 0081 0104 0105 Samurai 0020 EchoStar 0222 Sansui 0041 0067 0271 0106 0072 0322 Elbe 0278 0038 Sanwa 0004 Elcatech 0072 Sanyo 0104 0046 0047 0048 Elin 0240 Saville 0352 0278 0240 Elsay 0072 SBR 0081 Elta 0072 0278 Scan Sonic 0240 Emerson 0072 0045 Schaub Lorenz 0041 0344 0106 0000 0104 ESC 0278 0020 0240 Schneider 0072 0000 0037 0...

Page 97: ... 0104 0403 SUpra 0037 0240 Hornyphone 0081 Symphonic 0000 0072 Hypson 0072 0209 0278 Taisho 0004 0209 Impego 0020 Tandberg 0278 Imperial 0000 0240 Tashiko 0000 0048 0240 0081 0037 Ingersol 0004 0209 0240 Tatung 0000 0041 0081 0053 0048 0043 0209 Inno Hit 0020 0240 0278 0322 0072 Teac 0041 0000 0278 Interbuy 0037 0072 TEC 0020 0278 0072 Interfunk 0081 0104 Teleavia 0041 0187 Intervision 0000 0278 0...

Page 98: ...0240 0072 0106 0209 Victor 0008 0067 Lumatron 0278 Watson 0081 Luxor 0106 0046 0043 0072 0104 0047 0048 Weltblick 0037 M Electronic 0000 0037 0038 White Westinghouse 0344 Magnavox 0081 0403 Yamishi 0072 0278 Manesth 0072 0045 0081 0209 Yokan 0072 Marantz 0081 0038 0006 0003 0295 0209 Yoko 0037 0072 0020 0240 Mark 0278 ZX 0209 Marquant 0322 Matsui 0209 0004 0295 0348 0037 0208 0240 0352 0332 0000 M...

Reviews: