background image

A. Receiver and TV set-up

Check the 

Installation

To get the most out of the 

EchoStar DSB-2110 2CI Viaccess

 it should be correctly installed, the dish

should be optimally aligned and the mechanical limit switched on the dish should be set properly. Press
/I   on the remote control unit (RCU) or press 


on the front panel of the

 EchoStar DSB-2110 2CI

Viaccess

.

5. Operation and Menu Program

8

The receiver is supplied with factory setting and will start up with the “

Language Setting

” menu. For more

information on the “

Language Setting

” menu, please see page 9.  Please follow the steps outlined below to

properly install the 

EchoStar DSB-2110 2CI Viaccess

.

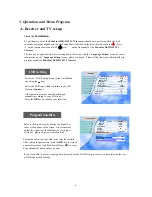
LNB Setting

Select the LNB type which conforms to your LN
B using the  ,   keys.

Other parameter values should be changed
manually according to your LNB type.
Press the 

OK

 key to confirm your selection.

Select the “LNB Setting” menu in the “Installation” m
enu using the  ,  keys.

LNB Setting

LNB Freq.Low                                         5150

LNB Frq. High                                           5150

Switch Type                                         DiSEqC 1..4

Switch Port                                                    1

Polarity Control                                          13/18V

LNB Freq. Band Control                              0/22kHz

Ku/C Control                                                 Disable  

LNB Type Index (1..8)

0/22kHz Control                                                Off

0/12V Control                                                        Off

LNB Power                                                             On

1

2

4

3

5

6

7

8

9

10

11

×

     Type 1     

Ø

i

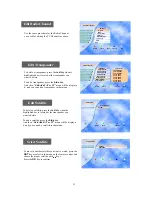
Program Satellites

If you are unable to get any signal quality, please check the LNB Setting to ensure you have selected the corr
ect LNB and switch settings.

This menu is to align your dish to the selected satellite.

After setting the parameters, press the 

OK 

key to store th

e parameter values. And Start Search(Press 

OK

) to searc

h the channels of transponder you want.

Refer to the Signal Quality bar and the Signal Lev
el bar at the bottom of the screen. It is recommend
ed that the signal is at the Medium level or higher.
If it is not , please adjust your satellite dish.

                                                    8 

                                                    7

Program Satellite 

Satellite          028.2

°

 E                

LNB Type                                             Type1

TP/Polar                                               11478/H

Symbol Rate                                            30000

Position      

Step Move                                               E                   W

Search type                                              Auto Search

Start Search(Press OK)


                                                    2

                                                     3

                                                    4


Set

Signal Level

Signal Quality

                                                    6 

52%

63%

×

        ASTRA2       

Ø

5

i

1

                                                    8

Summary of Contents for DSB-2110 2Ci Viaccess

Page 1: ...User Manual MENU OK DSB 2110 2CI Viaccess EMBEDDED VIACCESS DIGITAL SATELLITE RECEIVER ...

Page 2: ...19 Front Rear view 4 2 Features 3 1 Trade Mark of the DVB Digital Video Broadcasting Project 1971 A Receiver and TV set up 8 B Main menu Installation 11 C Advanced Installation 17 Safety instructions 2 1 AC power switch is on the rear panel of the receiver AC power switch is on the rear panel of the receiver ...

Page 3: ...ver power cord by gripping the power plug not the cord Route power supply cords so that they are not likely to be walked on or pinched by items placed upon or against them Pay particular attention to cords at plugs convenience receptacles and the point where they exit from the unit Use an outlet that contains surge suppression or ground fault protection For added protection during a lightning stor...

Page 4: ...plays signal level to setup the satellite antenna with ease 15 Power recovery function 16 64 step volume control 17 Powerful editing facilities PIDs TV or radio channel Channel name Satellite name Transponders 18 Teletext function Your TV should support Teletext function for this Subtitling 19 Favorite channel function 20 SCPC MCPC receivable from C Ku band satellites 21 User friendly OSG menu wit...

Page 5: ...onnection for the receiver should be well shielded Note All the cables used for Input Output connection for the receiver should be well shielded ON Standby AC power cord RF output connector to TV Antenna input LNB input AC power switch Selection conf irmation Channel up down Volume up down 2 Slots for CI module and the smart card Smart card slot ...

Page 6: ...g numeric keys The TV RAD Radio key switches between TV and radio mode The EPG key shows program information of the selected channel EPG Electronic Program Guide The Subtitle key enables subtitling only when provided by the broadcaster Selects the Audio Language or Soundtrack from among the data transmitted for the current channel Shows a thumb nail representation of the current channel in the Edi...

Page 7: ...the EchoStar DSB 2110 2CI Viaccess to the RF IN of the TV set 3 Search on the TV set for UHF channel 38 This is the default channel where the EchoStar DSB 2110 2CI Viaccess is se t to 1 Connect the Off air TV antenna or cable if available to the ANT IN socket of the EchoStar DSB 2110 2CI Viaccess 2 Connect the TV OUT socket of the EchoStar DSB 2110 2CI Viaccess with the RF IN of the VCR 3 Connect ...

Page 8: ...EchoStar DSB 2110 2CI Viaccess to the SCART of the TV set 6 Connect the SCART cable from the VCR SCART of the EchoStar DSB 2110 2CI Viaccess to the SCART of the VCR 7 When the EchoStar DSB 2110 2CI Viaccess is switched on the TV set it will automatically switch to the SCART input of the TV Note Use different UHF channels for VCR and EchoStar DSB 2110 2CI Viaccess TVSCART RF IN RF OUT RF IN VCR SCA...

Page 9: ...ion m enu using the keys LNB Setting LNB Freq Low 5150 LNB Frq High 5150 Switch Type DiSEqC 1 4 Switch Port 1 Polarity Control 13 18V LNB Freq Band Control 0 22kHz Ku C Control Disable LNB Type Index 1 8 0 22kHz Control Off 0 12V Control Off LNB Power On 1 2 4 3 5 6 7 8 9 10 11 Type 1 Ø i Program Satellites If you are unable to get any signal quality please check the LNB Setting to ensure you have...

Page 10: ...by the broadcaster To check if the subtitling language is available press key on the remote control unit to show a list with all available subtitling languages DiSEqC 1 2 Mount In case you are using the DiSEqC positioner you should set the most east satellite and most west satellite you want on the Position bar Most East satellite change the satellite name into you want by the most east satellite ...

Page 11: ...any Echostar Intl Corp Address Schuilenburglaan 5a City 7604 BJAlmelo About Echostar Fax number 31 546 814691 Phone number 31 546 815122 Country Netherlands Unit DSB 2110 2CIViaccess Software version XXXXXX Home page HTTP www echostar nl Unit info A V Output Setting Aspect Banner 3sec Sub backg On PAL B G TV mode 607 25MHz Channel 38 UHF Tuning 2 3 5 4 i Exit 4 3 Ø 1 Local Time Setting To set your...

Page 12: ... selected satellite After setting the parameters press the OK key to store th e parameter values And Start Search Press OK to searc h the channels of transponder you want Refer to the Signal Quality bar and the Signal Lev el bar at the bottom of the screen It is recommend ed that the signal is at the Medium level or higher If it is not please adjust your satellite dish Enter PIN Code Installation ...

Page 13: ...rk in the extended IF band above 950 MHz Before you start you have to check your condition whether it is possible to use this facility or not in your households You can ask your household supervisor If this receiver is connected to a SMATV network select SMATV Configuration The most common alternatives for Symbol rate and FEC are already preprogrammed When you need to change the Symbol rate for th...

Page 14: ...ode Enter PIN Code Parental Control Exit i Parental Control TV Channel Lock Radio Channel Lock Receiver Lock Off Installation Edit Lock Off Change PIN code 1 2 4 3 5 Exit i You can select the channel you would like to watch either b y pressing the numeric keys for the channel number or by m oving the highlighted bar to the channel of your choice usin g the keys Press the OK key to select the chann...

Page 15: ...nclude a channel in the FAV list select a channel and press the blue key on the remote control To select a favorite channel from the FAV list press the FAV key To view a thumb nail representation of the currently selected channel press the VIEW key on the remote control FAV Channels Edit TV Channel Voyage ContactTV LC I Canal J Paris Premere 5 2 4 3 6 8 7 DF 1 Info Kanal Star Kino CNN ASTRA1 Delet...

Page 16: ... to watch press the SAT key or select in the menu on the remote control and choose the proper satellite with keys Press the OK key to confirm EditSatellite ASTRA1 1 Exit Delete Cancel Add SAT Satellite Name i SelectSatellite APSTAR2R ASTRA1 1 2 Exit i To delete a satellite press the red key when the highlighted bar is located at the transponder you want to delete To add a satellite press the blue ...

Page 17: ...ST3RAI No Information No Time 1 Red TV Radio key Switches the TV Guide and the Radio Guide by pressing this key 2 Green Now Next key Switches the program guides of Now and Next 3 Yellow Info key Shows detailed information of the selected channel 4 Blue Select key Goes to the viewing mode of the selected channel 5 White Exit key Exits the TV Radio Guide TVGuide EPG Select Exit i RAI1 natura Linea v...

Page 18: ...grammed satellite you should input all the required data after mo ving to the satellite you want to edit CAUTION By doing an Auto Search you will lose all the data ex FAV Lock which you have edited Note 1 You should execute Auto Search after editing the satellite or the transponder If Auto Search is executed after adding the new transponder all channels of the added Transponder will be searched an...

Page 19: ...edited frequency press the OK key 18 If you want to reset all the data edited press the red ke y twice Edit LNB Local Frequency Reset Factory Default Edit LNB Local Frequency LNB Local Freq 0 9 11300 Ø Exit i Reset Factory Default If you want Factory Reset press Red button Reset Cancel Exit i ...

Page 20: ...n QPSK Input Symbol Rate 2 32Msps FEC Decoder Convolutional Code Rate 1 2 2 3 3 4 5 6 and 7 8 with Constraint Length K 7 2 MPEG Transport Stream A V Decoding Transport Stream MPEG 2 ISO IEC 13818 Transport Stream Specification Profile Level MPEG 2 MP ML Input T S Data Rate 90Mbit S max Aspect Ratio 4 3 16 9 with pan vector Video Resolution 720 x 576 PAL 720 x 480 NTSC Audio Decoding MPEG 1 Audio L...

Page 21: ...access 1 Smart Card Reader 7 RF Modulator RF Connect 75Ohm IEC169 2 Male Female Output Frequency 470MHz to 860MHz Output Channel CH21 69 TV Standard PAL D K PAL B G PAL I 8 Power Supply AC Power Switch Push lock type toggle Input Voltage AC90 240V 50 60Hz Type Linear PWM Power Consumption 40W Max Below 7W Max for stand by mode Protection Separate Internal Fuse and Chassis Grounding The Input shall...

Reviews: