background image

Index

Section 9

EchoStar International Corporation

Page 9 - 1

© 2

002 E

choS

tar

 Inte

rnati

onal

 C

o

rp

orat

io

n

A

ll ri

gh

ts

 re

se

rv

ed

9

INDEX

A

add sat


..................................................3-1

6-2

add tp


...................................................3-2

6-2

analog if


....................................................... 6-2

autosat


..................................................3-3

4-5

B

backgrounds


................................................ 4-3

blue key


....................................................... 5-1

C

capture background


............................4-12

5-8

check signal


................................................. 4-7

conditional access menu


............................. 4-3

D

delete a channel


.......................................... 5-4

detailed program information


....................... 5-5

disecq 1.2 setup


.......................................... 3-2

E

edit a list


...................................................... 5-2

F

favorite lists


................................................. 5-5

features


....................................................... 4-1

fixed dish setup


........................................... 4-7

fixed installations


......................................... 3-1

G

group a list


................................................... 5-1

H

hard disk


.................................................... 4-10

I

i-button


.............................................4-11

4-12

index marker


................................................ 5-6

indicator


....................................................... 4-9

infobanner


..........................................4-11

5-5

installation setup menu


................................ 4-3

K

keyboard


...................................................... 5-2

L

last played index


.......................................... 5-7

list


................................................................ 5-2

local time page


............................................ 4-4

lock a channel


............................................. 5-3

M

memory erase


........................................... 4-10

move a channel


........................................... 5-2

moveable dish


............................................. 3-2

N

navigation


.................................................... 5-1

next index


.................................................... 5-7

next song


..................................................... 5-7

O

ota


................................................................4-9

P

photo album


.................................................5-8

polarotor


.......................................................4-8

previous index


..............................................5-7

previous song


..............................................5-7

program satellites


................................ 4-6

4-7

Q

quattro


..........................................................4-2

R

red bullet


......................................................5-4

remote control unit


.......................................4-2

repeat list


...................................................4-12

repeat randomly


.........................................4-12

S

s00


........................................ 3-1

6-2

6-3

7-1

satellites list


.................................................5-6

scale


..........................................................4-12

search channels page


........... 3-2

3-3

3-6

6-2

setup after memory erase


............................3-1

signal


................................................... 4-7

4-9

signal indicator


.............................................4-9

smatv


...........................................................3-7

sort a list


......................................................5-1

system setup menu


......................................4-5

T

tp00


...............................................3-1

6-3

7-1

U

use the infobanner


.......................................5-5

user lnb


........................................................7-1

user lnb settings


...........................................6-1

user preferences menu


................................4-3

user profile page


..........................................4-3

W

white key


......................................................5-2

Y

yellow key


....................................................5-1

Summary of Contents for DVR-5000 HDD Viaccess

Page 1: ...Service Letter EchoNAV software version 2 2 EchoNAV User Interface for Digital Satellite Receivers HDD Printed on recycled paper...

Page 2: ...tional Corporation The Netherlands We encourage you to express your thoughts on this service letter Please send your comments to EchoStar International Corporation Technical Publications Department Sc...

Page 3: ...e time block Updated satellite transponder database THE HIGHLIGHTS FOR PREVIOUS VERSION 2 0 Six menu languages added Group and Sort behaviour revised to remember the last setting Extended channel info...

Page 4: ...International Corporation makes no warranties with respect to the use of the supplied software downloads and specifically disclaims any implied warranties of merchantability or fitness for any partic...

Page 5: ...MERS 4 14 Operation 1 TO NAVIGATE THROUGH THE MENUS 5 1 2 USE THE FAVORITE LISTS 5 5 3 TO SELECT ANOTHER SATELLITE 5 6 4 TO USE THE INDEX MARKERS 5 6 5 TO USE THE PHOTO ALBUM 5 8 6 TO USE THE DVR STOP...

Page 6: ...Preface Page IV EchoStar International Corporation 2002 EchoStar International Corporation All rights reserved...

Page 7: ...procedure is divided in different configurations The configurations are Fixed Motorized and SMATV Fixed means set up a single dish or multiple dishes with DiSEqC1 4 switch Motorized means set up a mo...

Page 8: ...for the search to complete a the receiver display shows a moving dot b the Search completed popup menu appears 35 On the RCU press the OK key to end the initial setup procedure 21 Make the required se...

Page 9: ...P00 Goes to the menu where you can define your own transponder for detailed information refer to section 6 If not proceed with step 36 31 Go to the Search channels field 32 On the RCU press the OK key...

Page 10: ...satellite go to the TP field and select TP00 Goes to the menu where you can define your own transponder for detailed information refer to section 6 If not proceed with step 31 31 When in the Position...

Page 11: ...popup menu appears 41 On the RCU press the OK key to end the initial setup procedure CAUTION On the motorized dish set the physical East and West limit switches first Failing to do so might cause dam...

Page 12: ...to section 6 If not proceed with step 34 34 When in the Position field a press and hold the or key and watch the signal indicator for an indication b in the signal indicator make sure a network name...

Page 13: ...the search to complete a the receiver display shows a moving dot b the Search completed popup menu appears 26 On the RCU press the OK key to end the initial setup procedure 21 Make the required select...

Page 14: ...nces to the User LNB setting menu 37 Read the available help text for information 38 Make the required selections 39 Go to the Save settings field 40 On the RCU press the OK key to advance 41 Note tha...

Page 15: ...user preferences Languages Menu Revised conditional access to support smartcards type PC2 4 The embedded Viaccess smartcard reader is revised to support the latest generation of PC2 4 smartcards as us...

Page 16: ...rded event fastly RECORD press twice To record a live program To show the DVR stop timer PREVIOUS To go to the previous event GREEN To select a favorites list RED To go to another mode NUMBER KEYS To...

Page 17: ...ss to the Local Time page The button that gives you access to the TV System page 2 1 1 USER PROFILE SUB MENU This sub menu allows you to customize the user profile settings you can customize NOTE Once...

Page 18: ...The button that gives you access to the About EchoStar information page The button that gives you access to the System Upgrade page The button that gives you access to the Factory Reset page Year To s...

Page 19: ...type which you use to control the dish installation if used LNB1 To set the LNB type s you use SAT for fixed only To select the satellite you want to scan for the LNB Satellite S00 brings you to the a...

Page 20: ...s LNBs To set the amount of LNBs you have installed Polarity To set the device that controls the signal polarity Switch To set the switch type which you use to control the dish installation if used LN...

Page 21: ...et the device that controls the signal polarity Switch Shows the switch type which you use to control the dish installation LNB1 Shows the LNB type which you use on the motorized dish LNB2 LNB3 LNB4 T...

Page 22: ...d by ambient conditions NOTE A re align dish will affect all satellite positions this means that all scanned positions will change which might result in total loss of signal for all satellites Search...

Page 23: ...Star EchoNAV This field shows the current software version loaded into the receiver Boot version This field shows the current boot version loaded into the receiver Internet site This field shows the E...

Page 24: ...struct the receiver to delete all personal settings and restore the factory default settings Hard disk Recordings To instruct the receiver to delete only all TV and Radio recordings from the hard disk...

Page 25: ...nformation available The additional information bar to show the additional service icons These icons show only if the additional service is available The icons for the channel information are the icon...

Page 26: ...he special functions The special functions are the button to scale the photo the button to repeat the list in a random order the button to repeat all the photos from the selected favorite list the but...

Page 27: ...at the marked position in the progress bar of the DVR recording The index markers are shown as vertical lines For the DVR mode The previous and the next key are available to jump from one index marke...

Page 28: ...p up menu gives you the possibility to choose directly a stop time for the recording You can call up the pop up menu with the record key press twice on the remote control unit after a recording is sta...

Page 29: ...he selection the yellow bar indicates the active selection on the left the green page indicator indicates where you are 1 On the RCU press the OK key 2 Select the required mode 3 On the RCU press the...

Page 30: ...foBanner with icons Sometimes a list seems to be empty because of the settings of the Group and Sort option If this happens select Group None and Sort None 1 On the RCU press the OK key 2 Select the r...

Page 31: ...lect No to undo the changes CAUTION You can only lock a channel if you have set the parental lock and the PIN code correctly We recommend in the parental lock menu that you check if the lock option is...

Page 32: ...e MENU key b Select the Parental Lock menu c Enter the correct PIN code as requested d Set the channel lock to Off 9 You can restore all the locks on the channels a On the RCU press the MENU key b Sel...

Page 33: ...choose from As an example now it is possible to add all sport related channels in one step to the Sports TV favorite list Note that for each mode a separate number of favorite lists is available 2 1 U...

Page 34: ...he detailed channel information 4 On the RCU press the i key to remove the information from the screen 1 On the RCU press the key 2 In the Satellites List pop up menu select the required satellite 3 O...

Page 35: ...matically adds the so called Last played index marker c in the list note that the Last played index is now applied to this event 1 Select the DVR mode 2 Select the event with the index marker 3 On the...

Page 36: ...ize 6 On the RCU a press the key for next photo b press the key for previous photo c press the i key twice for detailed information d press the key to start a photo slide show e press the key for paus...

Page 37: ...e to start the recording b press the key twice to show the timer 2 In the Timer pop up menu a If available from the EPG select the Set stop time for program end on the RCU press the OK key to confirm...

Page 38: ...Section 5 Operation Page 5 10 EchoNAV 2 2 2002 EchoStar International Corporation All rights reserved...

Page 39: ...eave the menu CAUTION On the motorized dish set the physical East and West limit switches first Failing to do so might cause damage to your motorized dish installation or other properties 1 On the RCU...

Page 40: ...or one LNB go to the Start field 7 For more LNBs select the applicable band 8 Press the OK key 9 Wait for the search to complete a the receiver display shows a moving dot b the search completed popup...

Page 41: ...ard to enter the name of the satellite a use the arrow keys to navigate b press OK to accept the character c select the button to get lower case characters and numbers d select the button e on the RCU...

Page 42: ...t the satellite the search cannot be completed When the popup message No channels found shows press OK and continue with step 14 14 On the RCU a press the MENU key b the key to select the menu c the O...

Page 43: ...In the SAT field a Press the OK key to drop down the menu b Select satellite your new satellite c Press the OK key 16 Go to the Check signal field 17 On the RCU press the OK key to advance 18 Wait fo...

Page 44: ...Section 6 Maintenance Page 6 6 EchoNAV 2 2 2002 EchoStar International Corporation All rights reserved...

Page 45: ...nu and save the correct position 3 I cannot add a TP In a TP field you did not select TP00 Refer to section 6 chapter Add data 4 I cannot configure User LNBs You did select the Easy mode In this mode...

Page 46: ...Section 7 Troubleshooting Page 7 2 EchoNAV 2 2 2002 EchoStar International Corporation All rights reserved...

Page 47: ...al Corporation All rights reserved 8 GLOSSARY 1 LIST OF USED ABBREVIATIONS S00 Satellite S00 brings you to the Add data menu where you can change S00 into a new satellite SR Symbol Rate TP00 Transpond...

Page 48: ...rs Advanced mode This is an installation mode where the user has full flexibility to setup an installation with multiple user defined LNBs Easy mode This is the recommended installation mode This mode...

Page 49: ...installation setup menu 4 3 K keyboard 5 2 L last played index 5 7 list 5 2 local time page 4 4 lock a channel 5 3 M memory erase 4 10 move a channel 5 2 moveable dish 3 2 N navigation 5 1 next index...

Page 50: ...Section 9 Index Page 9 2 EchoNAV 2 2 2002 EchoStar International Corporation All rights reserved...

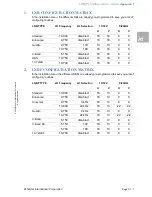
Page 51: ...es LNB TYPE LO Frequency LO Selection 13 18V 0 22kHz H V H V Standard 10 000 disabled 18 18 0 0 Enhanced 9 750 disabled 18 18 0 0 Quattro 9 750 13V 13 13 0 0 10 750 18V 18 18 0 0 C Band 5 150 disabled...

Page 52: ...ed 3 USER DEFINED LNB F MATRIX In the User LNB setting menu you can define your own LNB F You can use the list below to note the settings User LNB F LO Frequency LO Selection 13 18V 0 22kHz H V H V Us...

Reviews: