background image

Section 3

Installation

Page 3 - 4

EchoStar DVR-7000

Viaccess

©
2

002

E

c

hoS

tar

Inte
rnati

o

nal

C

o

rp

orat

io

n

A

ll

rig

hts

re

s

erved

3.

TO SETUP YOUR RECEIVER FOR THE FIRST TIME

This procedures will guide you step-by-step through the initial setup of the receiver. After you
have finished the initial installation, these pages are accessible through the icons in the menu

bar which is in the initial setup not shown.

NOTE

Unless otherwise specified; This note explains the way you can navigate through
the pages of the EchoNAV initial setup menu.

1. Use the OK key to pull down the menu selection fields.

2. Use the

arrow keys to go through the selectable menu items.

3. In a pull-down menu, use the OK key to confirm the selection.

4. Use the

arrow keys to navigate between the left and right column of

selectable menu items.

5. Use the EXIT key to leave the menu and return to the live mode.

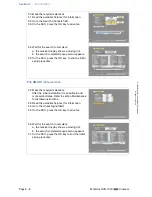
1. Switch on the TV.

2. On the receiver, press the on/standby button.

The receiver display shows:

- first a moving dot;

- then it shows - - - -

The TV shows the first page.

3. Make the required selections.

4. Read the available help text for information.

5. Go to the Continue field.

6. On the RCU, press the OK key to advance.

7. Make the required selections.

8. Read the available help text for information.

Note that only the white fields are selectable,
other fields show reference information.

9. Go to the Continue field.

10. On the RCU, press the OK key to advance.

11. Make the required selections.

12. Read the available help text for information.

13. Go to the Continue field.

14. On the RCU, press the OK key to advance.

Summary of Contents for DVR-7000 HDD Viaccess

Page 1: ...USER MANUAL DVR 7000 Viaccess Digital Satellite Receiver Printed on recycled paper ...

Page 2: ...rnational Corporation The Netherlands We encourage you to express your thoughts on this user manual Please send your comments to EchoStar International Corporation Technical Publications Department Schuilenburglaan 5a 7604 BJ Almelo The Netherlands ...

Page 3: ...E MODULES AND SMART CARDS For pay services please only use Common Interface CI modules and the related smart cards which are approved by the service provider of the encrypted program you want to receive Only this will enable the receiver to work properly Anomalies can occur when unapproved CI modules and or smart cards are used EchoStar can not and will not accept any responsibility for the perfor...

Page 4: ...l has been provided pursuant to an agreement containing restrictions on its use This user manual is also covered by Federal Copyright Law No part of this user manual may be copied distributed transmitted stored in a retrieval system or translated into any human or computer language in any form or by any other means electronically mechanically magnetically manually or otherwise or disclosure to thi...

Page 5: ...MATERIALS 2 1 5 TO SETUP YOUR PERIPHERAL EQUIPMENT 2 2 6 TO SETUP THE RECEIVER 2 2 Installation 1 CONNECT YOUR EQUIPMENT 3 1 2 CONNECT A DISH 3 2 3 TO SETUP YOUR RECEIVER FOR THE FIRST TIME 3 4 Familiarization 1 THE RECEIVER 4 1 2 THE ECHONAV INSTALLATION MENU 4 4 3 THE ECHONAV MODE AND SELECTION MENUS 4 14 4 THE ELECTRONIC PROGRAM GUIDE EPG 4 16 5 THE INFOBANNER AND POP UP MENUS 4 18 Operation 1 ...

Page 6: ...NSTALLATION RELATED 7 4 Glossary 1 LIST OF USED ABBREVIATIONS 8 1 2 EXPLANATION OF USED TERMINOLOGY 8 2 3 EXPLANATION OF THE SEARCH MODES 8 4 Index Appendix 1 1 LNB CONFIGURATION MATRIX A1 1 2 LNBF CONFIGURATION MATRIX A1 1 3 USER DEFINED LNB F MATRIX A1 1 Appendix 2 1 INTRODUCTION A2 1 2 THE BATTERIES A2 1 3 THE KEYS A2 1 4 PROGRAM THE TV VCR AND AUX KEY A2 3 5 SPECIAL SETUP FUNCTIONS A2 4 6 SPEC...

Page 7: ... can cause injury to persons and pets e g to stumble over eat the cable Do not install the receiver in a closed or poorly ventilated cabinet directly on top of or under another equipment on a surface which will obstruct the ventilation slots Do not expose the receiver and it s accessories to rain or excessive moisture to avoid the risk of shock or permanent damage to your receiver to direct sunlig...

Page 8: ...g logo This logo tells you that this receiver is compliant with the DVB standards as registered under registration number 2365 The Digital Recording logo This logo tells you that this receiver has a hard disk drive which gives you the capability to record TV and radio programs digitally The MP3 logo This logo tells you that this receiver has a MP3 player inside The Viaccess logo This logo tells yo...

Page 9: ... If you find any damage stop to unpack the box and call the retail seller where you bought the receiver To help avoid possible damage to the receiver s electronics allow the receiver to adapt to the ambient temperature and humidity level This to avoid condensation caused by a sudden change in temperature e g from a hot car into a cool room 3 THE CONTENTS OF THE BOX The box contains A receiver A re...

Page 10: ... dish is well aligned for the best reception The dish is connected with the correct RF coaxial cable 75 Ohm and connectors The cables from the dish are in a good condition no excessive bends or damaged insulation 2 If necessary do any work 5 3 THE TV VIDEO RECORDER AND AUDIO EQUIPMENT 1 Make sure Safe access to the connections is available The equipment is switched off It is safe to remove and ins...

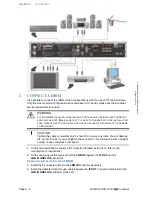
Page 11: ... VCR and the VIDEO SCART connector receiver 6 Install a full featured SCART cable between the TV SCART connector receiver and the SCART connector on the TV old SCART connection to the VCR CONNECTION WITH AUDIO VIDEO CABLE RCA CONNECTORS 1 On the rear panel of the receiver find the VIDEO AUDIO L and AUDIO R connectors 2 Install an audio video cable between a the VIDEO connector of the receiver and ...

Page 12: ...e IF OUT and the LNB IN ANALOG connectors FIXED DISH INSTALLATION WITH LNB F 3 Install the F connector dish to the LNB IN connector receiver 4 Install the delivered loop through cable between the IF OUT connector receiver to the LNB IN ANALOG connector receiver WARNING ALL EQUIPMENT INVOLVED IN THE INSTALLATION TASK MUST BE INSTALLED CORRECTLY AND SWITCHED OFF MAKE SURE THAT IT IS SAFE TO PROCEED ...

Page 13: ...el of the receiver find the M PULSE the GND the M1 and M2 connectors 6 First install the motor sensor cables to the M PULSE and GND connector receiver 7 Install the motor power cable to the M1 and M2 connectors receiver DISH INSTALLATION WITH FERRITE FEED 1 On the dish installation connect the ferrite cables for detailed instructions refer to the manufacturer s instructions 2 On the rear panel of ...

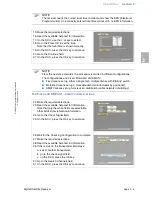
Page 14: ...e OK key to confirm the selection 4 Use the arrow keys to navigate between the left and right column of selectable menu items 5 Use the EXIT key to leave the menu and return to the live mode 1 Switch on the TV 2 On the receiver press the on standby button The receiver display shows first a moving dot then it shows The TV shows the first page 3 Make the required selections 4 Read the available help...

Page 15: ... is divided in different configurations The configurations are Fixed Motorized and SMATV Fixed means set up either a single dish multiple dishes with DiSEqC switch Motorized means set up a moveable dish motor actuator by positioner SMATV means set up for television distribution cable network in buildings 22 Make the required selections 23 Read the available help text for information Note that only...

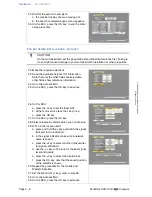
Page 16: ...nce information 24 Go to the Autosat field 25 On the RCU press the OK key to advance 26 On the RCU a press the key to set the East limit b at the motor error press the key once c press the OK key 27 On the RCU press the OK key 28 Select a Eastern satellite which you can receive 29 When in the location field a press and hold the key and watch the signal indicator for an indication b in the signal i...

Page 17: ...UTION On the motorized dish set the physical East and West limit switches first Failing to do so might cause damage to your motorized dish installation or other properties 22 Make the required selections 23 Read the available help text for information Note that only the white fields are selectable other fields show reference information 24 Go to the Set Limits field 25 On the RCU press the OK key ...

Page 18: ...ot b the search completed popup menu appears 35 On the RCU press the OK key to end the initial setup procedure 22 Make the required selections After the initial installation it is possible to add more symbol rates Refer to section Maintenance for detailed instructions 23 Read the available help text for information 24 Go to the Check Signal field 25 On the RCU press the OK key to advance 26 Wait f...

Page 19: ...able installation setup of the receiver FEATURE HIGHLIGHTS Multilingual Advanced User Interface 12 languages Embedded Viaccess 1 1 40 Gbyte Low Noise Audio Video Hard Disk Drive Digital Audio Video Recording with Slow Motion Pause FF Rew Pause Live Video MP3 Player 500 Songs typical USB Port 6 Week EPG Saved on Hard Disk 5 700 Channels 100 Satellites 1 300 Transponders 8 Favorite Lists for each Mo...

Page 20: ... connector RCA for the connection to the composite video input of the TV monitor The FERRITE connector spring clip for the connection to the terminal of a magnetic polarotor Ferrite The AUDIO L connector RCA for the connection of the left audio input channel of a stereo set The FERRITE connector spring clip for the connection to the terminal of a magnetic polarotor Ferrite The AUDIO R connector RC...

Page 21: ... fastly RECORD press twice To record a live program SKIP BACKWARD Not used for Sat mode GREEN To select a favorites list RED To go to another mode NUMBER KEYS To enter numerical settings To type in a channel number TV RAD To switch to TV or Radio mode MUTE To blank out the volume AUX To control the Audio Set or DVD SAT To control the receiver i To view the InfoBanner To view detailed EPG informati...

Page 22: ...he EchoNAV installation menu has different main menus that give you access to the different sub menus The main menus are The guided initial setup menu which is only accessible after the first time you switch the receiver on and after every manually initiated factory reset The User Preferences menu the installation setup menu and the CI menu are accessible at any time NAVIGATION A highlighted butto...

Page 23: ...stem page The main menus are divided in sub menus selection pages and option fields The main menu buttons are shown at the right hand side of the menu bar The different sub menu buttons are shown on the left hand side of the menu bar The selection pages with the option fields are accessible after you have selected a sub menu Every menu sub menu and selection page has one or more help lines to assi...

Page 24: ...io To set the screen size of the TV Banner time out To set the view time for the InfoBanner Dolby Digital To tell the receiver that it is connected to a Dolby Digital amplifier or not Backgrounds To select the standard or a personal background Menu Language To set the language you want to use in the menus Main audio language To set language for programs with bi lingual audio 2nd audio language To ...

Page 25: ...default or personal PIN code New password To type in your new PIN code numbers only Verify password To type in your New password again Now the receivers verifies the new password to make sure that you typed in the new password correctly Selected time zone To set the time zone where you are Year To set the actual year Month To set the actual month Date To set the actual date Day To set the actual d...

Page 26: ...o the position of the searched satellites is shown This main menu has different sub menus that give access to the pages where you can customize the settings to match your personal requirements Note that the sub menus are dynamic which means that they change with the selections you make The installation setup menu always comes in view with the system setup sub menu In the menu bar the sub menus are...

Page 27: ...ou use Method motorized only To set the scan method AutoSat automatically calculate the satellite positions from reference positions Manual enter the satellites by manual search AutoSat motorized AutoSat only To confirm the selections you made and advance to the AutoSat setup page AutoSat only Set Limits motorized manual only To confirm the selections you made and advance to the Set Limits page Sa...

Page 28: ...tch type which you use to control the dish installation LNB1 To set the LNB type s you use Satellite To set the satellite you want to scan for the LNB Check Signal To confirm the selections you made and advance to the Check Signal page Satellite To set the satellite you want to scan for the LNB Search mode To set a specific search mode All FTA IF TP network or update Longitude To view the satellit...

Page 29: ...r defined LNB Low Frequency To enter the low frequency of the user LNB High Frequency To enter the high frequency of the user LNB Polarity Control To select the device that controls the polarity Band Control To set the control signal for high or low band selection Ku C Control To set the control signal for the Ku C LNB Store settings To confirm the selection and save the settings Company This fiel...

Page 30: ... set the satellite where you want to download from TP frequency To set the transponder where you want to download from Polarity To set the correct polarity for the transponder Symbol rate To set the correct symbol rate for the transponder FEC To set the correct Forward Error Correction for the transponder Memory Erase User Data To instruct the receiver to delete all personal settings and replace t...

Page 31: ...to the pages where you can view the CI module and smart card settings Note that the sub menus are dynamic which means that they change with the selections you make The conditional access information menu always comes in view with the system setup sub menu In the menu bar the sub menus are shown at the right side The available sub menus are shown as icons which become a highlighted button after sel...

Page 32: ...ave entered the mode and selection menu you can manipulate the lists through The Mode bar red The List bar green The Edit bar white The Group bar yellow The Sort bar blue TV To switch the receiver in the TV mode and to access the list of TV channels Radio To switch the receiver in the Radio mode and to access the list of Radio channels DVR To switch the receiver in the DVR mode and to access the l...

Page 33: ... Move To enter the move channel function Add To enter the add channel function Rename To enter the rename channel function Volume To enter the set volume offset function Lock To enter the lock channel function Delete To enter the delete channel function Edit PID To enter the edit PID function Add PID To enter the add PID function Edit TP To enter the edit TP function Add TP To enter the add TP fun...

Page 34: ...ains the selected word only Scrambled Shows a list of encrypted channels only FTA Shows a list of Free To Air channels only Locked Shows a list of locked channels only Most digital channels transmit program data as an EPG Digital channels that transmit EPG offer you program information in advance for a certain period of time Dependent of the service provider EPG is offered in different ways After ...

Page 35: ...r If a timer is set on a program that is shown in the EPG the relevant data is already shown in the timer You can change the settings as follows Date to set the start date for the timer Start time to set the start time in hours minutes Stop time to set stop time in hours minutes Period to set the timer once or repeat for every occurrence Favorite list to select a list where to save the recording n...

Page 36: ...rogram information available The additional information bar to show the additional service icons These icons show only if the additional service is available The icons are the icon for teletext the icon for alternate audio the icon for alternate subtitling the icon for Dolby Digital audio the icon for Favorite channel the icon for Parental rating information The digital clock to show the actual lo...

Page 37: ...rk a scene with an index marker the button to repeat the recording continuously the button to repeat all the recordings from the selected favorite list the button to mark and repeat a scene continuously the button to capture an image as a personal background 5 4 THE MP3 INFOBANNER The MP3 InfoBanner shows the information related to the actual MP3 song The song information bar to show the name of t...

Page 38: ...can call up the pop up menu with the alternative audio key on the remote control unit You can navigate up and down between the audio languages or left and right for bi lingual programs For the radio channels you can navigate up and down between the different radio stations within the selected channel If transmitted you can set per channel your subtitling You can call up the pop up menu with the su...

Page 39: ...to the view mode 5 In a pull down menu use the OK key to confirm the selection the yellow bar indicates the active selection on the left the green page indicator indicates where you are NOTE In the following procedures we assume that you have switched on the TV and the receiver is in the TV mode 1 On the RCU press the OK key 2 Press the RED key and make the selection 3 Read the available help text...

Page 40: ...required mode 3 Read the available help text for information 4 On the RCU press the YELLOW key 5 Select the required group option 1 On the RCU press the OK key 2 Select the required mode 3 Read the available help text for information 4 On the RCU press the BLUE key 5 Select the required sort option Note that only for the Character and Word option a keyboard appears 6 When the keyboard appears a us...

Page 41: ...ions are not always available If an option is not presented select Group None and Sort None 1 In the Edit menu select the Move option 2 Read the available help text for information 3 Go to the channel you want to move 4 On the RCU press the OK key Note a red bullet appears behind the selection 5 If you want to undo the selection press the OK key again 6 Move the channel either a use the keys b use...

Page 42: ...e correct PIN code 1 In the Edit menu select the LOCK option 2 Read the available help text for information 3 Go to the channel you want to lock 4 On the RCU press the OK key Note a red bullet appears behind the selection 5 If you want to undo the selection press the OK key again 6 Either a press the WHITE key to confirm the lock and end the session or b select the next channel you want to lock 7 ...

Page 43: ...the selection and the cursor advances to the next channel 5 If you want to undo the selection press the OK key again 6 Either a press the WHITE key to confirm the deletion and end the session or b select the next channel you want to delete 1 In the Edit menu select the VOLUME option 2 Read the available help text for information 3 Go to the channel you want to edit 4 On the RCU use the keys to set...

Page 44: ...ant to rename CAUTION You can only hide a channel if you have set the parental lock and the PIN code correctly We recommend that you check if the hide option is set correctly NOTE After you have set a hide onto a channel the installation and the EDIT menu are automatically locked with an installation lock to prevent unauthorized access Now you can only access these functions if you know the correc...

Page 45: ...avorite list Note that for each mode a separate number of favorite lists is available 1 In the Edit menu select the HIDE option 2 Read the available help text for information 3 Go to the channel you want to hide 4 On the RCU press the OK key Note a red bullet appears behind the selection 5 If you want to undo the selection press the OK key again 6 Either a press the WHITE key to confirm the hide a...

Page 46: ... selection and the cursor advances to the next channel 11 If you want to undo the selection press the OK key again 12 Press the WHITE key to end the session NOTE As an example this procedure details the instructions on how to add a group of channels to a favorite list In this example we add a complete network to the My TV Channels favorite list 1 On the RCU press the OK key 2 Select the required m...

Page 47: ...oBanner a heart symbol appeared to indicate that this channel is a favorite channel 1 On the RCU press the OK key 2 Press the RED key and select Lists 3 Press the GREEN key and select the category 4 Read the available help text for information 5 In the Edit bar select the RENAME option 6 Go to the favorite list you want to rename 7 On the RCU press the OK key 8 When the keyboard appears a use the ...

Page 48: ... sometimes nothing at all EchoStar has no influence on this matter Make sure the local time is set otherwise you can not view EPG information because it needs the correct time Refer to the Local Time menu 1 Use the EPG key to access the main EPG menu 2 Allow the receiver to collect the EPG information for the selected channel 3 Read the available help text for information 4 Use the keys to select ...

Page 49: ... On the RCU press the YELLOW key 6 Select the required timer 7 When the timer appears if necessary 8 Change the date a use the key to go to the Date b read the available help text for information c press the OK key to change the date d in the calendar select the required date e press the OK key to return to the timer NOTE Be aware that the shown EPG start stop time might not be the same as the act...

Page 50: ...he key to go to the Status b read the available help text for information c press the keys to set the status 15 Save the timer a use the key to go to the Store Settings b read the available help text for information c press the OK key to confirm the settings 16 Note the clock that appeared in your program 17 Do not forget to program also your VCR if you have set a VCR timer NOTE You cannot set a E...

Page 51: ...e timer a use the key to go to the Store Settings b read the available help text for information c press the OK key to confirm the deletion 1 On the RCU press the i key 2 If available allow the receiver to collect the EPG information for the selected channel 3 If the i button in the InfoBanner is shown use the i key on the RCU to shift between the detailed program information and the InfoBanner 4 ...

Page 52: ...rovided by the service provider 4 On the RCU press the key 1 On the RCU press the key 2 In the Satellites List pop up menu select the required satellite 3 On the RCU press the OK key Note that the dish moves towards the selected satellite 1 On the RCU press the OK key 2 Select the DVR mode 3 Read the available help text for information 4 Select a recording either a use the keys b use the page keys...

Page 53: ...motion 1 Play back a recording 2 On the RCU a press the i key to show the InfoBanner b press the MENU key to activate the menu c use the keys to select the button 3 Wait for the scene that you want to mark 4 On the RCU press the OK key 5 Wait for the popup to disappear 6 On the RCU a press the MENU key to leave the menu b press the EXIT key to remove the InfoBanner 1 Select the DVR mode 2 Select t...

Page 54: ...ant to repeat 7 On the RCU press the OK key 8 Wait for the popup to disappear 9 Note that the marked scene repeats continuously 10 On the RCU press the OK key to cancel the marker 11 Wait for the popup to disappear 12 On the RCU a press the MENU key to leave the menu b press the EXIT key to remove the InfoBanner 1 Play back a recording 2 On the RCU a press the i key to show the InfoBanner b press ...

Page 55: ... On the RCU a press the MENU key to leave the menu b press the EXIT key to return to live video 1 In the TV mode select a channel to view 2 On the RCU press the key a the DVR InfoBanner appears with a yellow pause and a red blinking indicator recording b the live video freezes c the display on the receiver shows Hdd 3 On the RCU press the key a the live video is continued from the pause b the DVR ...

Page 56: ... On the RCU press the OK key to play back the song 6 On the RCU a press the key for play b press the key for fast forward c press the key for rewind d press the key for pause e press the key to stop f press the i key for detailed information 7 For bass and treble setting on the RCU a press the key for the bass control button b press the keys to change the setting c press the key for the treble con...

Page 57: ...it for the end of the fragment you want to repeat 7 On the RCU press the OK key 8 Wait for the popup to disappear 9 Note that the marked fragment repeats continuously 10 On the RCU press the OK key to cancel the marker 11 Wait for the popup to disappear 12 On the RCU press the MENU key to leave the menu 13 Note that none of the buttons is highlighted 1 On the RCU press a the MENU key b the key to ...

Page 58: ...ired channels or favorites manu ally For a detailed procedure please refer to the paragraph To lock a channel 1 On the RCU press a the MENU key b the key to select the menu c the OK key to select the menu 2 Enter the correct PIN code as requested 3 Press the OK key and make the selections 4 Read the available help text for information 5 On the RCU a press the MENU key to save the settings b press ...

Page 59: ...e RCU press a the MENU key b the key to select the menu c the OK key to select the menu 2 Press the OK key and make the selections 3 Read the available help text for information 4 On the RCU a press the MENU key to save the settings b press the EXIT key to leave the menu 1 On the RCU press a the MENU key b the key to select the menu c the OK key to select the menu 2 Press the OK key and make the s...

Page 60: ...Section 5 Operation Page 5 22 EchoStar DVR 7000 Viaccess 2002 EchoStar International Corporation All rights reserved ...

Page 61: ...ns please refer to the section Operation 2 SOFTWARE MAINTENANCE 2 1 TO CHANGE THE SETUP OF THE RECEIVER WARNING RISK OF ELECTRICAL SHOCK REMOVE THE MAINS PLUG FROM THE POWER SUPPLY SOCKET BEFORE YOU CLEAN THE RECEIVER MAKE SURE IF USED CLEANING AGENTS CANNOT GET IN THE RECEIVER NOTE Make sure the local time is set correctly otherwise you can not view and use the EPG information because the EPG and...

Page 62: ...els field 11 On the RCU press the OK key 12 Wait for the search to complete a the receiver display shows a moving dot b the search completed popup menu appears 13 On the RCU press the OK key 1 On the RCU press a the MENU key b the key to select the menu c the OK key to select the menu 2 Press the OK key and make the selections 3 Read the available help text for information 4 Go to the Store Settin...

Page 63: ...w software d1 d100 downloading P1 P100 upgrading done update memory C channel indication NOTE EchoStar offers on a regular basis software updates via the satellite and the EchoStar website If you have trouble to get a download with the latest software version please ask your retail seller or dealer for assistance NOTE Be sure if you select Memory Erase because all your personal settings will be de...

Page 64: ...tion 1 On the RCU press a the OK key b Select Mode TV c Select List All Channels d Select Group None e Select Sort None f Select Edit Add SAT 2 On the RCU press the OK key 3 Use the on screen keyboard to enter the name of the satellite 4 When the keyboard appears a use the arrow keys to navigate b press OK to accept the character c select the button to get lower case characters and numbers d selec...

Page 65: ...e that you have sufficient signal strength and quality 15 After you found the location press the OK key to confirm the position 16 Go to the Search Channels field 17 On the RCU press the OK key to advance 18 Wait for the search to complete a the receiver display shows a moving dot b the search completed popup menu appears 19 On the RCU a press the OK key to end the procedure b press the EXIT key t...

Page 66: ...9 On the RCU press the OK key to advance 10 Wait for the search to complete a the receiver display shows a moving dot b the search completed popup menu appears 11 On the RCU a press the OK key to advance b press the white key to end the procedure c press the EXIT key to return to live video 1 Select a channel of the transponder to which you want to add a PID 2 On the RCU press a the OK key b Selec...

Page 67: ... of reusable materials and to minimize the amount of materials to be disposed of Please inform yourself on local regulations on disposal of your equipment 6 Enter the required settings 7 Read the available help text for information 8 Monitor the signal indicator and make sure that you have sufficient signal strength and quality 9 Go to the Store Settings field 10 On the RCU a press the OK key to s...

Page 68: ...Section 6 Maintenance Page 6 8 EchoStar DVR 7000 Viaccess 2002 EchoStar International Corporation All rights reserved ...

Page 69: ...ode Contact your dealer Problem Possible cause What to do 1 The EPG is empty You have selected an empty favorites list Select another favorites list The selected program supports no EPG There is no solution for this the data is supplied by the service provider and beyond control The local time is not correct In the Local Time menu set the correct time The selected program is an analog channel Info...

Page 70: ...el selected transmits Make sure the correct dish or LNB is selected Make sure the dish and LNB are clean and correctly adjusted Do any necessary work 4 There is no Dolby digital AC 3 sound to my other equipment The equipment is connected to the receiver with a RCA or SCART cable only Connect the S P DIF connector of the receiver to the Dolby digital input of the receiving equipment 5 I cannot view...

Page 71: ...ast onto the hard disk drive You have pressed the record key once Press the record key twice EchoStar has build in a safety to prevent unwanted recording You have selected an analog station Analog broadcasts cannot be recorded onto the digital DVR Please record the broadcast with a VCR 2 The programmed channel is not recorded com pletely Local time setting is not correctly set Check the Local Time...

Page 72: ...downloading use the MP3 loader to change or complete the MP3 tag 3 I cannot go to another song with the keys You are in the special functions menu Press the MENU key and try again Problem Possible cause What to do 1 My television does not receive any signal from the receiver UHF only You did not select the correct audio video channel on your TV Refer to the user manual of the TV for instructions O...

Page 73: ... finished or not sufficiently shielded Use sufficiently shielded and correctly finished cables 7 During initial setup of the receiver no channels are found You did not select the correct LNB F On the receiver in the installation setup menu select the correct LNB F When installed you have selected the incorrect switch type or port On the receiver in the installation setup menu make the correct sele...

Page 74: ...Section 7 Troubleshooting Page 7 6 EchoStar DVR 7000 Viaccess 2002 EchoStar International Corporation All rights reserved ...

Page 75: ...t Memory Access PIN Personal Identification Number DVB Digital Video Broadcasting PWM Pulse Width Modulation DVR Digital Video Recorder QPSK Quadrature Phase Shift Key EL East Limit RCA Connector type also Cinch connector EPG Electronic Program Guide RCU Remote Control Unit ºF Fahrenheit RF Radio Frequency FTA Free To Air RND RaNDom Gb Gigabit S PDIF Sony Philips Digital Interface GB GigaByte SAT ...

Page 76: ...al radio and television using MPEG 2 compression DVB is being supported by all European manufacturers and broadcasters EPG A electronic program guide that comes with the broadcast of a particular satellite Note that every station fills the EPG differently or not so differences in the EPG are not necessarily receiver errors FEC Is an invisible part of a broadcast which makes sure that possible erro...

Page 77: ...is PIN code you can change or unlock the locked or hided recordings and channels Pay Per Channel With this feature the viewer has to pay a certain price per month or other period to receive all programs of a certain channel Pay Per View Conditional access service where the user is able to buy one particular program from a particular service provider Pay TV With Pay TV the consumer has to pay for c...

Page 78: ...h are then added to the all channel list In the real world it seems that the service providers do not always accurately code their channels with a scrambled or FTA code For this reason you may find that some searched channels are scrambled Also there is a possibility that scrambled channels are coded as FTA These channels will then be missed out because of the erroneous code Network In this mode t...

Page 79: ...er 5 13 detailed program information 5 10 5 13 disposal 6 7 dolby digital 4 18 dvb 1 II dvr timer 4 17 5 11 E echonav user interface 4 4 edit 4 15 edit a list 5 3 edit pid 4 15 edit tp 4 15 el wl indicator 4 8 epg 3 5 4 16 5 10 7 1 erase backgrounds 4 12 erase epg data 4 12 6 3 erase mp3 songs 4 12 6 3 erase recordings 4 12 6 3 F factory reset 4 12 6 3 fast forward 4 19 5 14 favorite 4 18 favorite...

Page 80: ... list 5 14 scrambled 4 16 search channels page 3 5 6 2 search mode 6 2 search modes 8 4 select a channel 5 1 select a list 5 2 select a mode 5 1 select a recording 5 14 select the alternate audio 5 13 select the subtitle language 5 14 set a timer 5 11 set the channel volume 5 5 set the local date and time 5 21 set the tv system 5 21 setup after memory erase 3 4 signal 4 8 4 10 signal indicator 4 8...

Page 81: ...r own LNB F You can use the list below to note the settings LNB TYPE LO Frequency LO Selection 13 18V 0 22kHz H V H V Standard 10 000 13 18V 18 18 0 0 Enhanced 9 750 13 18V 18 18 0 0 Quattro 9 750 13V 13 13 0 0 10 750 18V 18 18 0 0 C Band 5 150 13 18V 18 18 0 0 DBS 10 750 18V 18 18 0 0 TELECOM 11 475 18V 18 18 0 0 LNBF TYPE LO Frequency LO Selection 13 18V 0 22kHz H V H V Standard 10 000 13 18V 18...

Page 82: ...Appendix 1 LNB F Configuration matrix Page A1 2 EchoStar DVR 7000 Viaccess 2002 EchoStar International Corporation All rights reserved ...

Page 83: ... _ _ _ _ AUX key _ _ _ _ SAT key _ _ _ _ Serial Number _ _ _ _ _ _ _ 2 THE BATTERIES The RCU is powered by two 1 5 Volt Alkaline batteries type AA LR6 We recommend that you do not use rechargeable batteries At battery change the RCU keeps the programmed information for a maximum of 15 minutes 1 Remove the battery cover 2 Find the battery and marks 3 Insert the batteries accordingly the and marks 4...

Page 84: ...om function AUX Transport keys These keys operate the transport function of your VCR DVD and DVR To prevent accidental recording the RECORD key is pressed twice to start the recording Subtitle key If the function is available this key gives subtitles in DVD mode and may also function in TV mode as white fast text key or menu key Audio language key If the function is available this key selects audi...

Page 85: ...V and press the on standby key and make sure the TV switches off 8 Now the RCU is programmed to control your TV 9 If there is no response aim and press again If there is no response the first code is not valid for your TV Repeat the previous steps with the next code given 10 If the TV does not respond at the last code continue with the next procedure Numerical keys The Numerical keys 0 9 TV RAD FA...

Page 86: ...ode 9 9 0 5 Monitor the TV key and note that the indicator goes off and stays off 6 Press the numerical key 1 and count the blinks for the first number 7 Press the numerical key 2 and count the blinks for the second number 8 Press the numerical key 3 and count the blinks for the third number 9 Press the numerical key 4 and count the blinks for the fourth number 10 Write the code with a permanent p...

Page 87: ...OLUME LOCK PUNCH THROUGH The RCU allows you to select the device that you want to control the volume of independently from any other mode As an example if you are in the SAT mode you can stay in the SAT mode and adjust the volume of the TV directly with the volume key 1 On the RCU press the TV key continuously until the indicator stays on 2 Release the TV key and make sure the indicator blinks con...

Page 88: ...seconds 6 3 3 DELETE A MACRO 1 On the RCU press the SAT key continuously until the indicator stays on 2 Release the SAT key and make sure the indicator blinks continuously 3 Use the numerical keys to enter code 9 9 5 and note that the indicator stays on 4 Choose and press the key for the macro that you want to delete 5 Press the SAT key for three seconds to delete the macro Note that the indicator...

Page 89: ...atteries 3 Device does sometimes not respond to the RCU Direct sun light from behind the device Close the sun blinds or get closer to the device You do not aim sufficiently at the device Aim at the device s display install a RCU extender Batteries are almost empty Insert new batteries 4 Your device code is not listed The device code was not know at the time this manual was created Try the search m...

Page 90: ...00 I P 0713 SR4500 0100 SR5500 0170 8 2 ECHOSTAR KEY ASSIGNMENTS KEY DSB2000 DSB9800 LT8700 LT80 SR4500 SR1500 Power Stby Power Stby Power Stby Power Stby Power Stby Power Stby Select SAT mode Select SAT mode Select SAT mode Select SAT mode Select SAT mode Select SAT mode Select TV mode Select TV mode Select TV mode Select TV mode Select TV mode Select TV mode Select VCR mode Select VCR mode Selec...

Page 91: ... Volume down IRD Vol IRD Volume down IRD Volume down IRD EXIT IRD RECALL SAT ERASE RECALL EPG EPG Guide SERV Info subscription STORE ENTER Ok IRD CLAMP Menu Navigator IRD Menu Navigator IRD MENU Menu Navigator IRD FORMAT format SETUP Setup menu IRD Up cursor IRD Cursor up IRD Ch up IRD VIDEO FINE up TUNING up IRD Down cursor IRD Cursor down IRD Ch DOWN IRD VIDEO FINE down TUNING down IRD Left curs...

Page 92: ... Power Stby Power Stby Power Stby Power Stby Select SAT mode Select SAT mode Select SAT mode Select SAT mode Select SAT mode Select SAT mode Select TV mode Select TV mode Select TV mode Select TV mode Select TV mode Select TV mode Select VCR mode Select VCR mode Select VCR mode Select VCR mode Select VCR mode Select VCR mode Select AUX mode Select AUX mode Select AUX mode Select AUX mode Select AU...

Page 93: ...tellites SAT List of satellites INDEX system info MASK SCAN dish par MASK Menu Navigator IRD Menu Navigator IRD ENTER SATELLITE Menu Navigator IRD ENTER SATELLITE Channel up IRD Channel up IRD Up cursor IRD TUNING up IRD Channel DOWN IRD Channel DOWN IRD Down cursor IRD TUNING down IRD Volume down IRD Volume down IRD Left cursor IRD TUNING TUNING TUNING Volume up IRD Volume up IRD Right cursor IRD...

Page 94: ...1189 Philips 0642 1089 1189 1269 1289 Bang Olufsen 0799 Phonotrend 0502 Denon 1104 1160 Pioneer 0289 1107 1143 Fine Arts 1189 RCA 1254 1123 Fisher 0360 Sanyo 0219 0360 Goodmans 0440 Sharp 0262 Grundig 0219 1131 1189 1192 Sherwood 0491 0502 0653 1050 Harman Kardon 0110 Sony 1058 1158 1258 JVC 0074 0464 Technics 0208 1135 1308 1309 1518 Kenwood 1027 1313 1569 1570 Thomson 1254 Marantz 0219 0412 1089...

Page 95: ...191 0349 0505 0556 Baur 0010 0037 0349 0361 0505 0512 Nesco 0179 Beko 0370 0486 0714 0715 Nikkai 0032 0035 0037 0072 0216 0218 0264 0337 Beon 0037 Nobliko 0102 Bestar 0626 Nogamatic 0501 0568 Binatone 0217 Nokia 0361 0473 0480 0548 0606 0631 Blaupunkt 0191 0195 0200 0327 0328 Nordmende 0109 0196 0198 0501 0560 0568 Blue Sky 0218 0668 1037 Oceanic 0163 0361 Blue Star 0282 Onwa 0433 Bondstec 0247 Or...

Page 96: ...ual Tec 0217 SBR 0012 0037 0043 0193 Dumont 0070 0087 SEG 0036 0217 0264 0668 Elbe 0259 SEI 0010 0087 0102 0177 0294 0516 Elin 037 0548 Saba 0087 0109 0163 0196 0198 0335 0501 0568 Elite 0218 Saccs 0238 Elta 0009 Sagem 0610 Emerson 0087 0361 Saisho 0009 0011 0033 0177 0211 0235 0264 0354 0516 Erres 0012 0037 Salora 0163 0194 0349 0356 0359 0361 0548 Europhon 0516 Sambers 0102 0516 Expert 0206 Sams...

Page 97: ...0217 0359 Hitachi 0032 0036 0043 0044 0105 0109 0145 0163 0196 0198 0217 0225 0349 0356 0441 0481 0548 0563 0578 Tatung 0037 0072 0217 0516 Huanyu 0216 0374 Tec 0217 0247 Hypson 0037 0264 0282 Technics 0250 0650 ICE 0217 0264 0371 Technol Ace 0179 ICeS 0218 Teleavia 0501 0568 ITS 0371 Telefunken 0074 0084 0101 0109 0262 0335 0471 0498 0501 0568 0625 ITT 0163 0361 0548 Teletech 0009 Imperial 0074 0...

Page 98: ...ch 0072 Osaki 0000 0037 0072 Asuka 0037 Otto Versand 0081 Baird 0000 0041 0104 0107 Palladium 0006 0037 0041 0072 Bang Olufsen 0013 0499 Panasonic 0162 0226 0227 0454 0459 1162 Basic Line 0020 0072 0278 0554 Pathe Marconi 0041 Blaupunkt 0003 0006 0034 0154 0162 0195 0226 0227 Pentax 0042 Blue Sky 0278 Perdio 0000 Brandt 0320 0321 0493 Philco 0038 Brandt Electronic 0041 Philips 0081 0146 0384 Bush ...

Page 99: ...y 0011 0032 0033 0034 1032 Hanseatic 0037 Sunkai 0348 Hinari 0004 0072 0240 0293 0352 Sunstar 0000 Hitachi 0000 0004 0041 0042 0166 0240 0544 Suntronic 0000 Hypson 0072 Tashiko 0000 ITT 0041 0046 0104 0106 0240 0384 Tatung 0000 0041 0081 ITV 0020 0037 0278 Tec 0020 0554 Imperial 0000 Technics 0162 0226 Ingersol 0004 Teleavia 0041 0493 Interfunk 0081 Telefunken 0041 0320 0321 0384 0493 0494 0529 05...

Page 100: ... Minerva 0006 0195 Yokan 0072 Mitsubishi 0043 0067 0075 0081 0608 Yoko 0020 0240 0554 Multitech 0000 0072 Murphy 0000 Myryad 0081 8 8 DVD Akai 0611 Samsung 0573 Bush 0690 Sharp 0630 Denon 0490 Sony 0533 JMB 0695 Technics 0490 JVC 0558 Thomson 0551 Kenwood 0490 0534 Toshiba 0503 Oritron 0651 Wharfedale 0686 Panasonic 0490 0703 Yamaha 0668 Philips 0539 Yamakawa 0665 Pioneer 0525 0571 Proline 0652 8 ...

Reviews: